Wednesday, December 25, 2013

Snowman Christmas Tree

Merry Christmas!!!


I hope everyone is having a wonderful day with friends and family.  With Christmas falling midweek, no travel for us.  We're enjoying a quiet Christmas at home.

When we cleaned out my Dad's house earlier this year, I brought home this white Christmas tree.  I love the ideas you find on Pinterest.  A perfect use for my little white tree.  This snowman was easy and fun to put together.  Here's what you need:

7 or 8" Styrofoam ball 
Dowel the height of the tree
Buttons for the eyes, nose and mouth
Top Hat
Scarf
Twigs for his arms
Ornaments for his buttons
Boots for his feet (I'm still searching for these)

Insert the ball into the dowel.  Using a twist tie, secure to the tree.  Glue the eyes, nose and mouth to the head.  Top with the hat and wrap his neck with the scarf.  Using a twist tie, secure the button ornaments.  My tree was already lit but if you have one that is not, add lights.  Plug in and enjoy!!!


Sunday, December 22, 2013

Cranberry Feta Pinwheels

Are you ready for Christmas?  My shopping has been done for several weeks but the last minute things crept up on me.  The mailing deadline to get packages to California for my son and his girlfriend came and went.  Now before you think I am awful, we did have their big gift shipped.  What didn't get in the mail was a couple of smaller gifts.  We'll call them New Year's gifts, although I don't think they'll be there by New Year's either, since I haven't shipped them yet.  I decided to go homemade for my associates at work this year.  A cute mug, cocoa mix and homemade marshmallows.   If you've made homemade marshmallows, please share your recipe with me because mine were an EPIC FAIL.  Needless to say, they're getting cocoa and mini marshmallows instead.

Last week for my neighborhood holiday BUNCO, I made these pinwheels.  Fortunately, they were not a FAIL.  Everyone loved them, they were gone in a flash.  These are easy and beautiful for a holiday party!


 Cranberry Feta Pinwheels

1 carton (8 ounces) whipped PHILADELPHIA® Cream Cheese, softened
 1 cup (8 ounces) crumbled feta cheese (I only used 4 ounces)
 1/4 cup chopped green onions
 1 package (5 ounces) dried cranberries
4 flour tortillas (10 inches)
 Directions In a small bowl, combine the cream cheese, feta cheese and onions. Stir in cranberries. Spread about 1/2 cup mixture over each tortilla and roll up tightly. Wrap with plastic wrap and refrigerate for at least 1 hour. Cut each roll-up into 10 slices. Yield: 40 appetizers.

Next time, I will sprinkle on the cranberries after I spread the cream cheese mixture on the tortilla.  It was hard to spread the cream cheese with the cranberries already mixed in.

Sunday, December 15, 2013

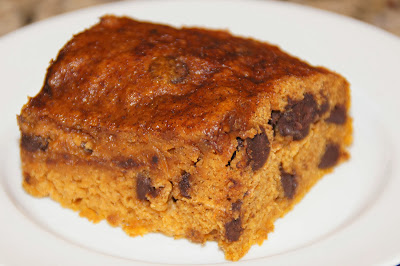
Pumpkin Chip Bars - Secret Recipe Club

Hard to believe it's our final Secret Recipe Club of 2014.  This year has just flown by for me.  Seems I say that every year any more!!  Group B of SRC will be taking a break for the month of January!  Perfect for me because we're going on a cruise!  Warm weather vacations are the only thing that helps me get through these cold Nebraska winters!

I was lucky this month to be assigned the blog From Grandma Loy's Kitchen.  It was so hard to decide what to make.  She has an outstanding variety of recipes to choose from.  My recipe choice ended up coming down to a recipe to use that partial can of pumpkin in my fridge, Pumpkin Chocolate Chip Bars!  Have you tried pumpkin with chocolate chips?  It's one of my favorite new flavor combinations! Nice this recipe only calls for 1/4 cup of oil and makes a delicious, moist bar. 


Pumpkin Chip Cookies
Recipe Courtesy of Grandma Loy's Kitchen

4 eggs
1 (15 oz.) can pumpkin
1/4 c. vegetable oil
1 1/2 c. sugar
2 c. flour
2 t. baking powder
2 t. ground cinnamon
1 t. baking soda
1 t. salt
1 cup semisweet chocolate or other flavor baking chips
3 T. sugar
1/2 t. ground cinnamon

Place eggs in a large mixing bowl.  Beat well.  Add pumpkin, oil, and sugar.  Mix thoroughly.  Combine flour, baking powder, cinnamon, baking soda, and salt.  Mix well.  Add flour mixture to pumpkin mixture and mix until just moistened.  Stir in chips.  Spread in an ungreased 15x10x1-inch baking pan.  Combine sugar and cinnamon and sprinkle evenly over batter.  Bake at 350 degrees 25 to 30 minutes or till done.  Cool.  Cut into bars.  The recipe says 36 cookies, but I easily got 48.


(Cannot add links: Registration/trial expired)

Sunday, December 8, 2013

Butternut Squash Mac and Cheese

 
We had our first neighborhood dinner group a few weeks ago at my house.  I am envious of those bloggers who are members of dinner groups and mange to find the time to take photos of their dishes.  Needless to say, that wasn't me.  I made  Butternut Squash Lasagna.   Between trying to make sure the lasagna was the right temperature to cut and  the wine was on the table, no pictures were taken.

Whenever I make lasagne, I never seem to have the proportions the recipe says I should have.  I made a full recipe and a half recipe.  After assembling an oversized 9 x 13 pan, I had leftover noodles and squash mixture. What to do with the leftover squash mixture?  How about a mac and cheese?  I added a little Monterey Jack cheese and topped with bread crumbs.  It came out perfectly and makes a delicious and healthy mac and cheese.


Thursday, November 28, 2013

Happy Thanksgiving!!

I hope everyone is having a wonderful Thanksgiving with friends and family!!!  It's a quiet day at home for Tim and I.  We still cooked up a feast and ate in the dining room.


Smoked Turkey Breast
Roasted Brussels Sprouts
Doni's Cranberry Sauce

We brined the turkey breast in this brine, used a local rub and smoked it in the smoker.  It was moist and delicious!  Michael Symon's stuffing is unlike any I've ever tried before.  The addition of the juice of an orange and the zest adds an interesting flavor.  We liked the stuffing but I think if I make it again, I would just a little less orange.  Doni's Cranberry Sauce is the recipe of my son's girlfriend's mother.  We enjoyed it when celebrating Thanksgiving with everyone a couple of years ago and it's now my go to recipe for Cranberry Sauce. 

I can't comment on the bread pudding just yet because we'll be enjoying it a bit later.  Perhaps, it will become a post of it's own.

Did you try some new recipes today or make the family favorites?

Sunday, November 10, 2013

Nantucket Cranberry Pie

For November's Secret Recipe Club, I was assigned Sarah's Kitchen.  It was hard to decide which recipe to make, there were lots of tempting ones on her blog!!!  Always looking for a new cranberry dessert for the holiday season, I chose this Nantucket Cranberry Pie!!! Why is it certain ingredients like cranberries and pumpkin seem to be reserved for October and November.  Delicious and versatile, why don't we use them more often?

This isn't your typical pie recipe, there's no bottom crust and the top crust is more like cake batter.  The recipe didn't say what size cake pan to use and my 8" round seemed small.  I decided to use my 9" springform pan.  While my cake was baking, I was watching the finale of Master Chef Junior.  Are those kids amazing or what?  When I started smelling something burning, I checked the oven and there was cranberry juice all over the bottom of the oven.  The good news, I use an oven liner.  The bad news, it's a two piece one so some juice had seeped onto the bottom of the oven.  What a mess!!  It's been a while since I've had a kitchen disaster!!  Note to self, springform pan was a bad idea!  More good news though, I have two ovens, so I finished the baking in the second oven. 

Despite the mess in the oven, the pie was a success.  The tartness of the cranberries combines nicely with the hint of almond and buttery dough. 


Nantucket Cranberry Pie
Recipe Courtesy of Sarah's Kitchen

Butter, for greasing pan
2 cups (heaping) cranberries 
3/4 cups pecans, chopped 
2/3 cups sugar 
1 cup flour 
1 cup sugar 
1 stick unsalted butter, melted 
2 eggs
1 tsp almond extract 
1/4 tsp salt 
1 tbsp sugar for topping

Preheat oven to 350.

Butter a cake pan.  Add the cranberries and chopped pecans to the pan, top with 2/3 cup sugar.

In a bowl, mix together the flour, sugar, melted butter, beaten eggs, almond extract and salt.  Pour the batter over the cranberries.  Bake for 40 minutes, top with the tablespoon of sugar and continue baking for an additional 5 minutes.


(Cannot add links: Registration/trial expired)

Wednesday, October 30, 2013

Cranberry Jalapeno Jam

We planted four jalapeno plants this summer and ended up with more jalapenos than we could count.
After freezing, smoking, candying, giving some away and using as many as I could in recipes, I still had jalapenos left. 

Why not try jalapeno jam?  I wanted the jam to have a nice color and it seemed wrong to use green food coloring.  Wondering what else I could do, I ran across several recipes for Cranberry Jalapeno Jam.  Perfect, the cranberries will give the jam a beautiful red color. 

Top cream cheese with this jam and you have a delicious, quick appetizer.  I also plan to use mine to glaze chicken or pork!


Cranberry Jalapeno Jam
  • 3 Jalapeno peppers, whole
  • 2 cups whole cranberries
  • 1 cup white vinegar
  • 5 cups sugar
  • 1 bottle liquid Pectin (3 oz)
Rinse whole cranberries and drain to remove excess water.
Trim Jalapeno pepper caps and tops, then slice lengthwise and remove all seeds and inner membranes. Discard tops, seeds, and membranes. Chop pepper halves.
Grind whole cranberries to a pulp with the food processor or grinder. Add 1/8 cup water to moisten the pulp slightly. Add chopped peppers and pulse or grind.  (I used the coarse chopping blade of a food processor.)
Spoon the cranberry and Jalapeno pulp into a stainless pot. Add vinegar and blend.  Slowly cook mixture for 10 minutes to blend flavors, then add sugar all at once, stir until dissolved. Cook the jam mixture, stirring constantly, until sugar is completely dissolved and boils. Once the jam mixture bubbles and the top foams, rising significantly, add liquid pectin. Boil hard for 1 minute, no longer.
Remove pot from heat. Ladle jam into sterilized half-pint jars, to within 1/2-inch of top. Add sterilized caps and screw rings on. Process in water-bath canner for 10 minutes. Yield: 6 half-pints.

Sunday, October 20, 2013

Biscoff Brown Sugar Bars

I hardly ever fly Delta Airlines anymore !!  I don't miss their baggage fees or upcharges for a better seat but what I do miss is those wonderful Biscoff cookies they give you.  Thanks to Trader Joes cookie butter, I don't have to miss them any more.  With cookie butter, I can make my own Biscoff treats. Have you tried this stuff?  It's so delicious, I could eat it by the spoonful!!!

These Biscoff Brown Sugar Bars have a delicious shortbread like crust with a creamy filling.  I found the center of these to be a bit too gooey for my liking, although one of my coworkers said she loved them that way.  Next time, I think I will decrease the brown sugar and bake longer for a firmer bar.  Either way, they are yummy!!!


Biscoff-Brown Sugar Bars
Recipe Courtesy of Mississippi Kitchen
Crust:
1/2 cup butter, softened
1/4 cup light brown sugar
1 cup all-purpose flour
1/8 teaspoon salt
Filling:
3 large eggs
1 1/2 cups light brown sugar
1/2 cup Biscoff spread
1/2 cup all-purpose flour
Powdered sugar for sprinkling tops
Preheat oven to 350 degrees.  In a large bowl, combine crust ingredients on low to medium speed just until mixture is evenly mixed and moist.  (It will start clumping together.) Dump into an 8 x 8 inch baking pan that has been sprayed with non-stick cooking spray.  Press mixture onto bottom of pan in an even layer. (Use wet fingers if mixture sticks to skin.)  Prick 6-8 times with a fork, then bake for 15 minutes or until golden brown around edges.
Meanwhile, beat the ingredients for the filling on medium speed until smooth.  When crust is done, pour mixture evenly over crust and bake for 30 minutes or until middle is just set. Cool completely on wire rack before cutting into bars.  Sprinkle each bar with powdered sugar, if desired.
*For a firmer bar, decrease light brown sugar in filling to 1 cup, then bake for 40 minutes.

Sunday, October 13, 2013

Slow Cooker Pumpkin and Bean Chili

It's fall and nothing says fall better than chili and pumpkin.  But together?  This recipe caught my eye as I was looking through the recipes on my assigned Secret Recipe Club blog, This Mama Cooks.  I love the idea of adding a fruit or vegetable to a traditional dish in order to add more nutrients. 

This is a delicious chili recipe and the addition of the pumpkin give the chili a nice creamy texture.  You will never know this recipe has pumpkin in it.  Although the recipe is designed for the slow cooker, you could easily make this stove top.

 Slow Cooker Pumpkin and Bean Chili
Recipe Courtesy of This Mama Cooks

Ingredients

  • 1 yellow onion, chopped
  • 1 red bell pepper, chopped
  • 1 pound ground venison, turkey, chicken or lean beef
  • 1/2 teaspoon salt
  • 3 cloves garlic, minced
  • 2 tablespoons chili powder or your favorite gourmet chili blend
  • 1/8 teaspoon cayenne pepper or ground chipotle chile (optional)
  • 1 teaspoon oregano
  • 1 1/2 teaspoon cumin
  • 2 1/2 cups vegetable broth (I used beef broth)
  • 2 15 ounce cans black beans, drained and rinsed
  • 1 15 ounce can kidney beans, drained and rinsed
  • 1 15 ounce can pumpkin puree
  • 1 14.5 ounce can diced tomatoes, with juice
  • 1 tablespoon pumpkin oil (optional)

Directions

  1. Cook onion, bell pepper and ground meat over medium high heat until meat is cooked through.
  2. Add salt and garlic. Cook for 1 minute.
  3. Add spices (chili powder through cumin) and mix thoroughly. Cook for 1 minute.
  4. Place onion, pepper, meat, garlic and spice mixture into a slow cooker.
  5. Add remaining ingredients.
  6. Cook on low for 5-6 hours.
  7. Dish chili into bowls and top with a small dollop of no fat sour cream or a large pinch of shredded cheese. 
I am linking this to Miz Helen's Chili Cook-off!!!

(Cannot add links: Registration/trial expired)

Sunday, October 6, 2013

Preserving Summer's Best - Tomato Jam

Has the weather started to cool off where you are?  With temperatures that didn't make it above 50 today, we know winter is not far off.  There's many reason's I will miss summer .... long boat rides on the lake, outdoor concerts, beautiful flowers and most of all fresh vegetables.  I am envious of those of you who live somewhere and can enjoy fresh fruits and vegetables year round. 

Our tomato crop was so plentiful this year.  I wanted to preserve as much as possible.  After roasting some and making two huge batches of sauce (to be shared later), what else could I make?  Tomato Jam?  Interesting!  I've read about it but never eaten or made it.  Why not give it a try.  For no other reason than the amazing smell this brings to your kitchen, give this recipe a try.  I couldn't get enough of the combination of cinnamon and tomatoes.  YUM!

I was curious, what can you do with tomato jam?  Glaze chicken, use it in place of ketchup, put a dollup on a savory scone?  What do you do with tomato jam?


Tomato Jam
Recipe Courtesy of Food in Jars
Yield: Varies depending on the kind of tomato used, pan width and the finished thickness*
Ingredients
  • 5 pounds tomatoes, finely chopped
  • 3 1/2 cups sugar
  • 8 tablespoons lime juice
  • 2 teaspoons freshly grated ginger
  • 1 teaspoon cinnamon
  • 1/2 teaspoon ground cloves
  • 1 tablespoon salt
  • 1 tablespoon red chili flakes
Instructions
  1. Combine all ingredients in a large, non-reactive pot. Bring to a boil and then reduce temperature to a simmer. Stirring regularly, simmer** the jam until it reduces to a sticky, jammy mess. This will take between 1 and 1 1/2 hours, depending on how high you keep your heat.
  2. When the jam has cooked down sufficiently, remove from heat and fill jars, leaving 1/4 inch of head space. Wipe rims, apply lids and twist on rings. Process in a boiling water canner for 20 minutes.
  3. When time is up, remove jars from water bath and allow them to cool. When jars are cool enough to handle, test seals. Store jars in a cool, dark place for up to one year.
Notes
*The finished yield on this recipe varies depending on the kind of tomato you use, the width of your pan and the finished thickness to which you cook it.

Sunday, September 22, 2013

Corn and Hatch Pepper Chowder

Despite a photo that doesn't make me want to try this recipe, this is a delicious soup.  August and September is  Hatch Chili Pepper time.  Our local Hy Vee store always has an ample supply.  Hatch peppers are meant to be roasted and used in soups, salsa's and other main dishes.

Having roasted a few extra ears of corn, I was interested in finding a recipe that used the corn and the chili peppers.  I like to roast the peppers on the gas grill but this time, I used the oven.  I set it for 400, on the convection roast setting,  roasting them until charred about 20 minutes.  After taking the peppers out of the oven, I put them in a paper bag for a few minutes and the skins pull off nicely.

Many cream soups and chowders use heavy cream.  I was searching for a lighter option for thickening.  I found several recipes using corn meal for thickening.  What a great idea!  Why didn't I think of that?  I used 3 tablespoons mixed with water and stirred into the soup after completing the cooking time. 


 Roasted Corn and Hatch Pepper Chowder

3 slices bacon, chopped
1 large onion, minced
3 cups fresh corn kernels, scraped from the cob, or frozen
 3 cups whole milk (I used skim)
 1 pound baking potatoes, peeled and diced
1 teaspoon salt
1/2 cup whipping cream (I omitted this and used cornmeal for thickening)
1 cup roasted, peeled and chopped mild green New Mexican, Anaheim, or Poblano chiles
Fresh ground black pepper
2 tablespoons fresh chives, minced

 Directions Fry the bacon in a large saucepan over medium heat until brown and crisp. Remove the bacon with a slotted spoon and reserve. Stir the onion into the bacon drippings and cook until the onion is soft and translucent, about 5 minutes. Puree 1 cup of corn with 1 cup of milk in a blender. Pour the mixture into the pan and add the remaining milk and corn along with the potatoes and 1 teaspoon of salt. Reduce the heat to medium-low and cook 10 to 15 minutes, or until the potatoes are fork-tender. Stir in the cream and the green chile. Add salt and pepper, to taste. Ladle the chowder into bowls, garnish with chives and the reserved bacon, and serve.

Sunday, September 15, 2013

Box Oven S'mores Brownies - Secret Recipe Club

My assigned blog for this month's Secret Recipe Club is Angela's Kitchen.  Angela cooks gluten and dairy free.  If you are looking for a gluten or dairy free recipe, check out Angela's blog.  You'll be able to enjoy many of the same recipes, while following a gluten or dairy free diet.

I spent quite a bit of time on Angela's blog trying to decide what to make.   I really wanted to bake one of her great recipes but was concerned about the substitution of non gluten free products in her recipes.  After much deliberation, I settled on her Box Oven S'more Brownies but chose to make them in a regular oven.  If you're a camper or have kids this would be such a fun recipe to try.

Author:
Serves: 16 to 20

Ingredients
  • 1 gluten free box brownie mix (or homemade), batter made dairy free according to instructions
  • 2 cups gluten free mini marshmallows
  • 1 cup broken and crumbled gluten free graham crackers or gluten free sugar cones
  • 12″x8″ foil pan
  • oil for pan
  • Box oven
Instructions
  1. Set up box oven. See this post (http://angelaskitchen.com/2013/07/02/the-great-gluten-free-campout-box-oven-muffins-and-eggs/) for instructions. While charcoal is flaming and heating up, make gluten free brownie mix according to instructions on box.
  2. Oil foil pan. Pour batter into pan, patting out batter to cover the entire pan. Sprinkle crushed gluten free graham crackers evenly over batter, then add mini-marshmallows.
  3. When coals are ready, place brownies on cans in box oven. Set the box over brownies and allow to bake for 5 minutes longer than the longest bake time on the brownie batter box (in the case of Better Batter Brownie Mix, allow to bake for 30 minutes) before checking to see if brownie bars are done. Bars are done when bakes through in center and marshmallows have melted and browned slightly.
  4. Remove brownies from box oven and allow to cool before slicing.
  5. To bake these at home, bake in a 350 degree F oven for the shortest time on your baking mix box before checking for doneness.

(Cannot add links: Registration/trial expired)

Sunday, September 1, 2013

Swiss Chard Pasta Bake

 Besides the fresh, locally grown farm veggies, my favorite thing about being in a CSA is the vegetables we haven't tried before.  This year we've been treated to kale and swiss chard.  Kale is my new favorite vegetables but chard not so much.  We've received it twice in our CSA.  The first time, I sauteed in olive oil with salt and pepper.  It was way too much like cooked spinach for us.  When we received it a second time, I searched for a recipe to try and see if we like it any better in something.

I found this recipe for pasta with swiss chard. The verdict?  I liked it, Tim not so much.  He struggled through it, pushing the chard to the side wherever he could.  Do you like swiss chard?  How do you prepare it?


Swiss Chard Pasta Bake
Recipe courtesy of Love and Olive Oil

INGREDIENTS:
12 oz. penne pasta
 2 cups tomato sauce, any kind you like or see recipe below
1 pound swiss chard (about 6 large leaves), stems removed
3/4 cup asiago cheese cut into small cubes (I used goat cheese)
1/2 cup chopped fresh basil
shredded parmesan to go on top (optional)

simple tomato sauce:
1 onion, diced
1 clove of garlic, minced
1 tablespoon olive oil
1 14-oz can diced tomatoes
1 8-oz can tomato sauce (plain)
1/4 cup white or red wine
2 teaspoons sugar
salt & pepper
red pepper flakes (optional)
METHOD:
Preheat oven to 350 degrees.
Fill a large pot with salted water and bring to a boil. Fill another bowl with ice and a bit of water. Drop chard leaves in boiling water for about 1 minute, remove and drop in ice water to stop the cooking process so your chard keeps its vibrant green color.
Re-using the same pot, cook pasta according to package directions, cutting the time a minute or two short since the pasta will continue cooking while it bakes.
Meanwhile make the tomato sauce (or use your own and skip this step). Over medium-high heat sauté onion in 1 tablespoon olive oil. Add a few pinches of salt. Add garlic. When onions are translucent, add both cans of tomatoes, sugar and wine. Reduce heat. Simmer for 10 or 15 minutes, stirring occasionally. Add more salt & pepper to taste (only if needed). Add red pepper flake, if using.
Remove chard from ice water, squeeze out excess water, and chop.
In a large bowl mix pasta, chard, cheese cubes and tomato sauce.
Pour the mixture in a 9×13 pan. Sprinkle shredded parmesan cheese on top (if you like), and/or a drizzle of olive oil. Bake for 25-30 minutes. Broil for the last 1-2 minutes if you would like the cheese topping more brown and bubbling. (note, if you’re not putting cheese on top, watch it more closely because it will dry out faster). Even without cheese on top, I prefer a bit of a crunchy crust. If you don’t cook it less.
Remove from oven, let cool for 15 minutes. Sprinkle with fresh chopped basil.

Sunday, August 25, 2013

Susie's Salsa (Revisited)

How are the plants in your garden doing this summer?  Ours are growing like mad, producing lots of tomatoes and tons of jalapenos!   What else to do with that combination but make salsa.  My favorite salsa is one shared by a friend of ours a few years ago.  It's become my go to salsa recipe.  If you like a super hot salsa, this probably isn't the one for you.  Susie's salsa is only mildly hot with a hint of sweetness.

I first shared Susie's Salsa on my blog in 2009.  Last week, I made a big batch but didn't have time to photograph, so I am revisiting my post from 2009.


Susie's Salsa

5 green tomatoes (I used 10 tomatillos), chopped
10 red tomatoes (I used romas), peeled and chopped
4 jalapeno peppers, chopped and seeds removed
2 cubes of beef boullion (I used 2 tablespoons of beef gravy mix)
1 teaspoon salt
1 teaspoon pepper
3 medium sweet onions, chopped
3 garlic cloves, chopped
1/4 cup vinegar
1/2 cup brown sugar
12 oz. tomato paste

Mix everything, except the tomato paste in a large saucepan. Cook 1/2 hour over medium heat. Remove from the stove and stir in the tomato paste.

Makes 5 - 6 pints.

I froze this in freezer containers so we can enjoy the fresh taste of salsa when it's snowy and cold outside.

Sunday, August 18, 2013

Roasted Kale and Arugula Salad

One of my favorite things about our CSA is the veggies we get to try.  We've had kale twice this year.  I am slow getting on the kale bandwagon but it's my new favorite veggie.   I love that it's so good for you.  A couple of weeks ago, I had kale and arugula in the fridge.  Surely there's something I can make that uses them both?  A quick google search returned this salad.  I didn't have any parsnips but I did have a cucumber.  Not at all similar but a good crunchy addition.  (The cucumber is the white blob in the picture.)  I had a little leftover roasted kale for  lunch the next day.  Roasted, crispy kale is delicious.  A wonderful healthy substitution for chips.  Next spring, we'll be planting kale, so we can try more new recipes and have this delicious green more often.


ROASTED KALE & ARUGULA SALAD WITH TANGY ASIAN VINAIGRETTE

½ lb kale leaves (about 1lb if purchasing them on the full stem)
3 TBL extra-virgin olive oil
¼ TSP ground black pepper
¼ TSP kosher salt
half of a medium parsnip, cut into a small dice
half of a spicy red pepper (optional), seeded with membrane removed
small handful of baby arugula
Vinaigrette
6 TBL extra-virgin olive oil
3 TBL rice vinegar
2 TSP light soy sauce
3 TSP sugar
1 TSP toasted sesame oil
2 TSP honey
dash kosher salt
dash ground black pepper
Preheat oven to 400 degrees. Roughly chop kale leaves into 2-3 inch pieces. In a large bowl, evenly mix kale, olive oil, kosher salt and black pepper. Spread the kale out in one layer in 2 large baking sheets/pan. Roast kale until its crispy and dark around the edges of the leaves, about 15 minutes. Set cook kale aside.
To make vinaigrette, combine the olive oil, vinegar, soy sauce, sugar, sesame oil and honey in a bowl. Whisk until thick and emulsified. Salt and pepper to taste.
Add parsnip, red pepper and arugula in vinaigrette bowl. Toss until completely coated. Set aside.
As you are serving salad lightly toss the cooked kale with the vinaigrette mixture. NOTE: Do not do this step ahead. The vinaigrette will moisten the kale and you will lose the crispy texture. On that note, don’t over mix the kale and vinaigrette – as to not over saturate the crisp kale with liquid.
Serves 2.

Sunday, August 11, 2013

Lemon Pie Bars - Secret Recipe Club

 Three weeks since my last post?  Seriously where have I been?  Week one, we were in Seattle visiting with my son and his girlfriend.  What an amazing city!  I will post a few pics, sooner or later.  The second week we were gearing up for Summer Fun Days in our neighborhood.  We live in the BEST neighborhood ever, great friends and truly wonderful neighbors.  Along with 20 or so couples, we hosted a party for 100+.  If I was a more organized blogger, like a lot of you, I'd have posted pictures!   Last week was Summer Fun Days week and we were helping with Kids Night, the Duck Race and last night's Dinner / Dance. 

I am thrilled to have my first post in three weeks be Secret Recipe Club, it's always my favorite week of the month in blog land.  Each month when I receive my recipe assignment for SRC, I can't wait to visit the blog!  I browse the recipes, read about the blogger and spend time deciding what recipe to choose.  Normally it's the recipe that draws me in.  Initially this month, it was the recipe for Lemon Pie Bars that I found interesting but it was the cookbook the recipe is from that sealed the deal.  The recipe comes from The Back in the Day Bakery cookbook.  Just recently, my best friends of 30 plus years and I were discussing when can we say "back in the day"?  Ever since then,  I find myself running across this phase being used in lots of different ways.  These Lemon Pie Bars come from a blogger I follow,  A Spoonful of Thyme.  She takes beautiful photographs and posts delicious recipes.

Looking for a quick and easy summer dessert, give this recipe a try.  The color is vibrant and the flavors tart and lemony!  


Lemon Pie Bars
Recipe Courtesy of A Spoonful of Thyme
For the crust
3 cups graham cracker crumbs
12 Tbsp (1 1/2 sticks) unsalted butter, melted
2 Tbsp sugar

For the filling
1 cup heavy cream
2 tsp grated lemon zest
1 cup fresh lemon juice
Two 14 oz cans sweetened condensed milk
6 large egg yolks

Fresh whipped cream

Position a rack in the middle of  the oven and preheat the oven  to 350° F.  Grease a 9 X 13 inch baking dish and line with parchment, allowing the ends of the paper to hand over two opposite edges of the pan.  (I also greased the parchment paper when it was in the dish.)

To make the crust:  In a medium bowl, combine the graham cracker crumbs, butter,  and sugar and blend with a fork until the crumbs are evenly moistened.  Press the graham cracker mixture firmly and evenly into the bottom of the prepared pan.  Use a piece of parchment to press on the crust with the palm  of your hands to make sure it is completely level.

Bake the crust for about 8 minutes, until lightly golden.  Let cool completely before adding the filling. Turn the oven temperature down to 325° F.

To make the filling:  In a large bowl, whisk together the heavy cream, lemon zest, lemon juice, sweetened condensed milk,  and egg yolks.  Pour the filling over the cooled crust.

Place the baking pan   inside a larger baking pan and pour enough hot water  into the larger  pan  to come halfway up the sides of the smaller pan.  Bake for 20 to 25 minutes, until the filling is puffed at the edges and no longer jiggles in the center when the pan is tapped.  Remove the pan from the water  bath and set it on a rack to cool for 1 hour, then refrigerate until cold.

Cut the bars into squares and serve chilled, with the whipped cream.  The bars will keep in an airtight container in the refrigerator for up to 3 days.


(Cannot add links: Registration/trial expired)

Sunday, July 21, 2013

Kohlrabi Slaw

Have you had kohlrabi?  It's that veggie that looks like it just landed from space.  With two in my fridge, I needed to find something to do with one of them besides grill them.  Which by the way is delicious, you can find my recipe here.

Using this salad as my inspiration,  I added kohlrabi, apple and carrots.  I used the food processor to shred the kohlrabi.  If you do, be careful because it can come out a little too grated.  I actually liked this better after the next day.  The crunch of the apple gives this slaw a great texture!


Kohlrabi Slaw

Ingredients:

For Dressing:
3 tablespoons cider vinegar
2 tablespoons honey
1/4 cup olive oil
salt and freshly ground black pepper, to taste


1 Granny Smith apple or other tart, green apple
1 Kohlrabi shredded (I used the food processor - be careful not to over process)
3 carrots peeled and shredded

3 ounces Pecorino Romano cheese, finely grated (about 1 cup)

Directions:

To prepare dressing, whisk together cider vinegar and honey. Drizzle in olive oil and whisk until combined. Season to taste with salt and pepper.
Core apple and cut into small cubes or matchsticks. Place in a small bowl and toss with 1 tablespoon of dressing to prevent the apples from browning. Peel kohlrabi, grate with grate, mandolin or food processor.  Peel and shred carrots. Toss with apples and remaining dressing.  Set aside and let sit for at least 15 minutes or more.(I thought it was better the next day)

Sunday, July 14, 2013

Asian Cole Slaw - Secret Recipe Club

There's a Wednesday night Farmer's Market in the area where Tim works.  A few weeks ago, he was were given a coupon for $5.00 off at the market.  Tim used his to purchase two beautiful heads of cabbage.  That means cole slaw at my house.   I'd just received my Secret Recipe Club assignment for the month, Morsels of Life.  One of the first recipes I found was for Asian Cole Slaw.  We prefer non mayonnaise based cole slaw's at our house, so this was a perfect recipe to try.

We really enjoyed the flavors in this dressing.  Mine came out a little thick. When I make this again, I think I will add a little olive oil to thin it out just a bit.  You can find a series of cole slaw recipes at Morsels of Life.  Next time we have cabbage, I can't wait to try the Cranberry Walnut Slaw.


Asian Cole Slaw
Recipe Courtesy of Morsels of Life

8 oz cabbage, shredded
2/3 cup carrots, grated
1/8 tsp celery seed
1/2 tsp ginger, grated
2 tsp peanut butter
1 T. soy sauce
1 T. lime juice
1 tsp. sesame oil
1/8 c peanuts, chopped

Combine cabbage and carrots.  Whisk remaining ingredients together.  Pour over cabbage and carrot mixture.  Combine well.  Sprinkle chopped peanuts on top, just prior to serving.
(Cannot add links: Registration/trial expired)

Tuesday, July 9, 2013

Not Your Mama's Banana Bread

One blog I never miss reading is Tomatoes on the Vine.  If you haven't been to Velva's blog, stop by she takes beautiful pictures and has delicious recipes.  I am always intrigued by banana bread recipes because I have one that I consider THE BEST!!  It's not my mama's but one of my best friends mama's and it is delicious.  When Velva said if you have a family favorite recipe, you'll like this one better, I knew I had to give this recipe a try.    I've tried a lot of banana bread recipes the past 30 years and none have replaced my favorite but let's take this one for a spin and see where we end up.

In fairness the recipe calls for bourbon and we didn't have any.  I used brandy instead.  I was going to throw in a few chocolate chips because they make everything better but I forgot.  That's probably good because it wouldn't be a true test of the recipe with the addition of the chips.  I think my pan was a little large than what the recipe called for so I reduced the baking time to 40 minutes.  Checked it and it was done.  The brandy added a delicious flavor profile to this bread.  Is it going to replace my favorite banana bread recipe?  Probably not but I will add it to the recipe box!


 Not Your Mama's Banana Bread
Recipe Courtesy of Tomatoes on the Vine
Ingredients:
3 to 4 ripe bananas, smashed
1/3 cup melted salted butter
3/4 to 1 cup light brown sugar (depending on your level of sweetness, that your prefer)
1 egg, beaten
1 teaspoon vanilla
1 tablespoon bourbon (optional)
1 teaspoon baking soda
Pinch of salt
1 teaspoon cinnamon
1/2 teaspoon nutmeg
Pinch of ground cloves
1-1/2 cups of flour
Directions:
 Preheat the oven to 350 degree F.  With a wooden spoon, mix butter into the mashed bananas in a large mixing bowl.  Mix in the sugar, egg vanilla and bourbon, then the spices.  Sprinkle the baking soda and salt over the mixture and mix in.  add the flour last, mix.  pour mixture into a buttered 4x8-inch loaf pan.  Bake for 50 minutes to one hour, or until a tester comes out clean.  Cool on rack.  Remove from pan and slice to serve.
Enjoy!

Sunday, June 30, 2013

Red Hots Rice Krispy Treats

I've been making desserts as long as I can remember but never a lot of Rice Krispy treats.  Until recently that is!  Like a lot of older desserts, Rice Krispy treat recipes are receiving some updates.  There's even a blog, devoted to nothing but Rice Krispy treats.

 When Tim told me the coworker who's birthday they were celebrating with treat day liked  Red Hots, I wasn't sure I was going to find a recipe including the little hot candies.  I should have known better, you can find a recipe for almost anything with just a google search!

Rice Krispy treats are quick and easy to make and almost everyone likes them.  It's fun trying different flavors for a this classic treat.  The toughest thing about this recipe is smashing the red hots.  I ended up using my meat mallet out on the front porch, in a baggie of course. 


Red Hots Rice Krispy Treats
Recipe Courtesy of Mallow and Co
4 Tbsp butter
6 cups marshmallows 
1/2-3/4 cup crushed red hot candies (really smash them down to a powder)
1 tsp vanilla extract
 6 cups rice krispies
red food coloring (optional, I didn't use this)
4 oz (2 squares) Vanilla Almond Bark (I didn't do this step)

Pour the rice krispies in a large mixing bowl and set aside. Melt the butter in a saucepan over low heat. Once it's melted add in the marshmallows. Stir until they are mostly all melted (this will take a few minutes--low and slow is key for perfect texture) then stir in the vanilla, crushed red hots, and a few drops of red food coloring
.

Once fully melted, take them off heat and pour over the rice krispy mixture. Stir lightly to combine, then dump into a greased 9x9 pan (I made mine in 9 x13 pan). Allow to cool 5 minutes, then press into pan with greased hands. While they 
finish cooling, melt the almond bark in the microwave at 30 second intervals, stirring in between each one until fully melted. Drizzle the bark over the treats. Enjoy!


Sunday, June 23, 2013

Grilled Romaine

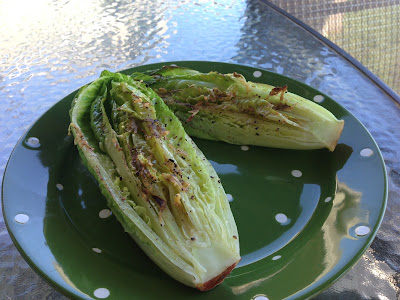
There's almost always a package of romaine lettuce in my refrigerator. We enjoy the flavor and it seems to keep well. Now that summer is here, I wanted to grilling the romaine. Pretty confident you just brush them with olive oil, sprinkle on some salt and pepper before grilling them, I wasn't sure I needed a recipe. However, I wasn't sure how long to leave them on the grill. I ran across this recipe and was intrigued by the use of the red wine vinegar granita.

If you haven't tried grilling romaine, try it soon!  We love it!  The combination of the char and red wine vinegar granita give the lettuce a nice smoky tang!


  Grilled Romaine
Recipe Courtesy of Alton Brown
1/2 cup red wine vinegar
2 hearts of romaine, rinsed and patted dry
1 tablespoon olive oil
Freshly ground black pepper
1 cup finely grated Parmesan
Vegetable spray, for pan

Directions

Place vinegar in shallow pan and place in the freezer. Allow the vinegar to freeze, approximately 2 hours. Once frozen, scrape with a fork to create a shaved ice texture. Return the vinegar to the freezer until ready to use.

Cut each heart of romaine in half lengthwise so that the root keeps each piece together. Lightly brush the cut side of the romaine pieces with olive oil. Season with the pepper. Place the cheese in a shallow pan large enough to lay the romaine in and press the cheese firmly onto the cut side of the romaine until it adheres.

Spray a nonstick griddle or saute pan with vegetable spray and preheat over medium-high heat. Place the romaine in the pan and cook until the cheese turns golden, approximately 1 to 2 minutes Place the romaine, cheese side up onto plates and sprinkle with the vinegar ice. Serve immediately.

I am linking this to On The Menu Monday and Miz Helen's Full Plate Thursday!

Monday, June 17, 2013

Butterfinger Cake

Do you try new recipes before you serve them to company or take them to an event? Normally I do! There's nothing worse than making a dish for a dinner party and having it be a flop. We were having friends over for dessert and I was debating whether or not to make a tried and true dessert recipe or try a new one. Browsing the dessert recipes, I'd pinned on Pinterest I saw this Butterfinger Cake. Looks easy enough and doesn't use too many ingredients, I decided to give it a try.  Oh my gosh, what a great choice, simple to put together and so good!  This may become my new go to for dessert.  I am going to try it next time with a chocolate cake and Heath bars!!!


Butterfinger Cake
Recipe Courtesy of Plain Chicken

 1 box yellow cake mix, plus ingredients to make the cake
1 can sweetened condensed milk
1 jar Smucker's caramel ice cream topping
 1 (8oz) tub Cool-Whip 4 regular sized Butterfinger candy bars, crushed

Bake cake according to direction on the package.

 While cake is baking, mix milk and caramel topping until well blended. When the cake is done and while it's still hot, poke holes in it with a fork. Pour milk mixture over the cake. Allow cake to cool completely. If you don't want it quite as sweet, add half the can and half of the jar. Sprinkle two candy bars over cake. Spread (refrigerator temp) Cool Whip over the top, then sprinkle the remaining candy bars on top. Chill.

I am linking this to On The Menu Monday and Miz Helen's Full Plate Thursday!!!

Sunday, June 9, 2013

Cake Batter Rice Krispie Treats - Secret Recipe Club

Can you believe it's the second week of June?  Crazy!  The second week of June means two things Secret Recipe Club and here in Omaha,  the College World Series.  This month my assigned SRC blog is No Reason Needed.  I am not sure whether my favorite part of SRC is browsing my assigned blog or finding out who had my blog and what recipe they chose.  Either way, SRC is fun.  You can find out more about SRC here.

It's always hard to decide which recipe to choose but when I saw the recipe for Cake Batter Rice Krispie treats, the decision was easy!!  I love cake batter!  I know it's risky  because of the raw eggs.  I've been eating it for years and have never gotten sick, so it's a risk I am willing to take.  Over the past few years the blogsphere has been filled with cake batter recipes.  I've made a couple of them Cake Batter Muddy Buddies and Cake Batter Ice Cream.  

I've always thought Rice Krispie treats were just okay,  almost too sweet for my taste.  Although it may sound strange, the addition of cake batter seems to tone down that sweetness.  I will never make the original Rice Krispie treats again.  Maybe it's that cake batter obsession but it's Cake Batter Rice Krispie treats for me from now on!


 Cake Batter Rice Krispie Treats
Ingredients:
3 Tbsp. butter
1 (10 oz) bag marshmallows
1 tsp. vanilla extract
1/4 cup yellow cake mix (I used 3/4 cup cake mix)
6 cups rice krispies cereal
assorted sprinkles

Melt butter in a large saucepan over low heat and add marshmallows. Stir until the begin to melt and mix in vanilla. Add in cake mix one spoonful at a time and stir until combined. Stir in cereal so it is completely coated with marshmallow mixture. Sprinkle in half of the sprinkles and mix. Press into a baking dish sprayed with non-stick spray (I like an 8x8 or 9x9 to make them thicker - I used a 9x13 pan) and top with remaining sprinkles. Let sit for about 30 minutes before cutting.

I am linking this to On The Menu Monday and Miz Helen's Full Plate Thursday!

(Cannot add links: Registration/trial expired)

Sunday, June 2, 2013

Five Ingredient Peanut Butter Cookies

Five ingredients? This recipe caught my eye immediately! I love a good cookie but don't bake drop cookies very often because they take so much more time than bar cookies. These are a creation of Emily's, she at Sugar Plum. If you don't follow her blog, you should. She has the best recipes and they're all her own.

These cookies are quick and easy to make.  Emily suggest grinding the coconut in the food processor until it's fine.  My coconut seemed to just whirl and whirl around, never seeming to become fine.  No worries, it still worked great in the recipe.   Five Ingredient cookies are delicious and crispy.  I will be making these again!  Next time I may try nutella or biscoff spread instead of peanut butter!!


Five Ingredient Peanut Butter Cookies
Recipe Courtesy of Sugar Plum

Ingredients:
1 cup creamy peanut butter
1 1/4 cups granulated sugar
1/4 cup egg whites or 1 large egg
1 teaspoon baking soda
1 1/2 cups finely ground unsweetened flaked coconut

Directions:
Heat oven to 350 degrees F.

In a large bowl, using a mixer on medium speed, beat together peanut butter, sugar, and egg and until well combined - about 1-2 minutes.  Beat in baking soda until combined.  Beat in coconut until combined.

Roll heaping tablespoons of dough into balls.  Place on baking sheets, spacing about 3/4-inch apart.  Flatten balls making a criss-cross with a fork.  Sprinkle with a little sugar, if desired.  Bake 12 minutes or until cookies are golden around the edges, and crisp.  Cool 5 minutes before transferring to wire racks to cool.

Makes about 1 dozen cookies depending how big you make them.

I am linking this to On The Menu Monday and Miz Helen's Full Plate Thursday!

Monday, May 27, 2013

Peaches and Dream Pie

Happy Memorial Day!  I hope everyone is enjoying the long weekend with friends and family!

I know it's not quite peach season but the first official weekend of summer has me thinking peaches! This is a recipe I made almost a year ago.  Last summer produced some the best peaches I'd experienced in years. I believe I read somewhere the hot summer produced a sweeter fruit?


 Pie crust and I just don't get along.  So I must confess, the crust for this was a boxed pie crust.   Isn't the color of these peaches just beautiful?  In reading the reviews of this pie, it received more nays than yeahs.  It's much different than what we all expect when we think of pie.  At our house, it was a yeah.  It reminded us of a custard pie. 


Peaches and Dream Pie
Recipe Courtesy of Baked Explorations

Ingredients
1 ball Classic Pie Dough
3 cups all purpose flour
1 tablespoon sugar
1 teaspoon fine salt
1 cup (2 sticks) cold unsalted butter

 In a medium bowl, whisk the flour,sugar and salt together. In a measuring cup,stir 3/4 cup water with several ice cubes until it is very cold Cut the cold butter into cubes and toss them in the flour mixture to coat. Put the mixture in the bowl of a food processor and pulse in short bursts until the butter pieces are the size of hazelnuts. Pulsing in 4 second bursts, slowly drizzle the ice water into the food processor through the feed tube. As soon as the dough comes together in a ball, stop adding water. Remove the dough from the food processor and divide it in half. Flatten each piece into a disk and wrap each disk first in parchment paper and then in plastic wrap. Refrigerate the dough until firm, about 1 hour. (The dough can be kept refrigerated for up to 3 days or frozen for up to 3months. Thaw it in the refrigerator before proceeding with your recipe).

 For the Peaches and Dream Filling
10 canned peach halves, or about 2 1/2 cups fresh diced,peeled peaches
 2 large eggs
1 cup sour cream
 2 tablespoons honey
 1/4 teaspoon salt
1/2 cup firmly packed dark brown sugar
 2 tablespoons all purpose flour

 For the Pie Topping
1/2 cup firmly packed dark brown sugar
1/3 cup all purpose flour
4 tablespoons cold unsalted butter,cut into 1/2 inch pieces

Make the Crust
Dust a work surface with a sprinkling of flour. Roll the dough ball out into a 12 inch round. Transfer the dough to a pie dish and carefully work it into place, folding any overhang under and crimping the edge as you go. Cover the crust in plastic wrap and refrigerate it for at least 30 minutes.

 Preheat the oven to 375 degrees F.
 Make the Peaches and Dream Filling Arrange the peach halves cut side up on the bottom of the pie shell or spread the diced fresh peaches in the pie shell. In a medium bowl,whisk together the eggs, sour cream, and honey until they just come together. Sprinkle the mixture with the salt, brown sugar, and flour, and whisk until just combined. Pour the mixture over the peaches. Make the Pie Topping Place the sugar, flour, and butter in a bowl. Use your hand to work the butter into the dry ingredients until the mix looks like coarse sand. Assemble the pie. Sprinkle the pie topping across the filling, and bake for 45 minutes, or until the filling is bubbly (place a sheet pan on the oven rack directly below the pie to catch any filling that bubbles over ). Let the pie cool overnight before serving.

 BAKED NOTES:
At least 90 percent of the peaches and cream recipes that crossed Matt and Renato's path specified the use of canned peaches. Perhaps they were written in an era when fresh peaches were difficult to locate, or perhaps the sugar content of a canned peach was an added plus, but they tested fresh peaches in place of their canned counterparts in several recipes without any problems.

I am linking this to On the Menu Monday and Miz Helen's Full Plate Thursday!!!

Sunday, May 19, 2013

Super Smoked Sweet and Spicy Wings

A few weeks ago I shared this recipe for Smoked Mac and Cheese, prepared in Tim's smoker. We are loving this smoker, you can make just about anything in it. The flavors in these wings are a nice combination of smoky, sweet and spicy. You can adjust the sweet and spice to your own taste.


 Super Smoked Sweet and Spicy Wings
 Recipe Courtesy of John McLemore

2 1/2 tablespoons ground black pepper
1 tablespoon onion powder
1 tablespoon chili powder
1 tablespoon garlic powder
1 tablespoon seasoned salt
5 pounds chicken wings, rinsed and dried
1 cup honey
 1/2 cup hot barbecue sauce
3 tablespoons apple juice
Suggested wood for smoking Apple wood chips 1. In a small bowl, mix together the black pepper, onion powder, chili powder, garlic powder, and seasoned salt. Place the chicken wings in a large Ziploc bag. Pour in the dry rub and shake to coat the wings well. Marinate for at least 30 minutes (at room temperature) or as long as 24 hours (in the refrigerator). 2. Preheat smoker to 225˚F. Place the wings on the top rack of the smoker and cook for 20 minutes. Turn wings and cook for another 25 minutes, or until internal temperature reaches 165˚F. 3. While the wings are cooking, mix the honey, barbecue sauce, and apple juice together in a small saucepan.Cook over medium heat until warmed through. Remove the wings from the smoker and place in a disposable aluminum foil pan. Pour the warm sauce over the wings and toss to coat evenly. Return to smoker on second rack and cook for another 25 minutes, stirring occasionally. Remove from the smoker and serve immediately.

I am linking this to On The Menu Monday, Miz Helen's Full Plate Thursday and Foodie Friday.