Sunday, December 30, 2012

Crock Pot Chicken Tortilla Soup

Whenever we have roast chicken, I freeze the leftover chicken.  It's perfect for soup, enchiladas or other casseroles.  I find chicken cooked in the crockpot tends to dry out but using already cooked chicken in a soup or casserole works perfectly.  This recipe would also be great made with leftover turkey!


Crock  Pot Chicken Tortilla Soup
Ingredients:
  • 4 uncooked boneless, skinless chicken breasts
  • 1 (15 oz) can crushed tomatoes, undrained
  • 1 (10 oz) can red enchilada sauce
  • 1 (15 oz) can black beans, drained & rinsed
  • 1 medium onion, chopped
  • 1 (4 oz) can chopped green chile peppers
  • 2 cloves garlic, minced
  • 1 package frozen corn (about 14 oz)
  • 2 (14.5 ounce) cans chicken broth
  • 1 tsp cumin
  • 1 tsp chili powder
  • 1 tsp salt
  • 1/4 tsp pepper
  • 1 bay leaf
  • corn tortillas
  • cooking spray
Directions:
1.     Place chicken, tomatoes, enchilada sauce, black beans, onion, green chiles, corn and garlic into your crock pot. Pour in chicken broth, and season with cumin, chili powder, salt, pepper, and bay leaf. Cover, and cook on Low setting for 6 to 8 hours or on High setting for 3 to 4 hours.
2.     When fully cooked, pull chicken out and shred. Place back inside crock pot. 
3.     Preheat oven to 400 degrees. Lightly spray both sides of tortillas with cooking spray. Cut tortillas into strips using a pizza cutter, then spread on a baking sheet. Sprinkle some Lawry's seasoning salt or just plain salt and pepper if desired.
4.     Bake in preheated oven until crisp, about 10 to 15 minutes. To serve soup, top with cheese, avocado, green onions or any other add-in you like and then sprinkle tortilla strips on top.

 I am linking this to On the Menu Monday,  Miz Helen's Full Plate Thursday and Foodie Friday.

Sunday, December 23, 2012

The Best Roast and Gravy EVER!!!

 Check out my giveaway for a digital magazine subscription here!

I love my Crock Pot, especially this time of year.  Dinner is ready when I come home from work, leaving plenty of time for baking or present wrapping!  Pinterest has become my new vehicle for storing the recipes I want to try!  Sometimes the challenge with Pinterest is to find the link to the original post, which makes it hard for a blogger to credit that source.  I am going to link to my original pin which was from a site called Repinly!

Crock Pot's were made for cuts of meat like roasts.  I almost always cook mine in the slow cooker.  Traditionally, I use an envelope of onion soup and some beef broth or water.  After cooking all day, the roasts are always tender and delicious.  Curious about this recipe, I decided to give it a try.  I am not a Dr. Pepper fan but have made other recipes using soda.  The original poster said this was the best roast and gravy ever and they were so right.  Usually I can take or leave beef gravy.  With this recipe, however, I could have just eaten the gravy by the spoonful. 


Dr Pepper Roast

1 beef chuck roast
1 can cream of mushroom soup
2 cans cream of potato soup
1 package onion soup mix
2 cups Dr. Pepper

Cook on low in a slow cooker 6 - 8 hours and you'll have the best roast and gravy you have ever had. 

I am linking this to On The Menu Monday, Tasty Tuesday, Miz Helen's Full Plate Thursday and Foodie Friday!

Zinio Digital Magazine Subscription Giveaway


Are you a magazine reader?  I am!  I find a lot of my recipes and ideas in magazines.  I clip the page and then what do I do?  Go on line and find a digital link to the recipe or idea and save it.  With digital magazine subscriptions becoming more and more mainstream,  if my magazine subscriptions were digital ones, this would be so much easier and less paper!

Have you heard of Zinio?  They offer digital subscriptions to thousands of top magazines from around the world.  You can browse and purchase subscriptions or even single issues instantly from your computer or mobile device wherever or whenever you like.  Zinio's explore section lets you read, even without a subscription, thousands of articles from your favorite magazines and share them with friends.

Zinio has 300 magazine titles available at up to 50% off their already-discounted prices.  Here are just a few sample titles: LA CUCINA ITALIANA, VEGETARIAN TIMES, FOOD ARTS, CLEAN EATING.  

Check our Zinio's titles and deals here !   Also, you can enter Zinio's sweepstakes for a chance to win an iPad Mini here !!!

Want to try reading a digital magazine?  Zinio offered me 10 free magazine subscriptions.  I am going to try one myself, so I will be sharing 9 of them with my readers!  To enter, leave me a comment letting me know which magazine you would choose.  Also, make sure I have a way to contact you, if you're a winner!  Contest ends at midnight on 12/30!

I was compensated for this post but all opinions are my own!


Tuesday, December 18, 2012

Sunday, December 16, 2012

Macaroon Kiss Cookies - Virtual Cookie Exchange

Last week, I participated in the cookie exchange at Tim's office.  It's so much fun to try everyone's delicious recipes.  Today I am participating in a virtual cookie exchange, equally as fun but so much easier on the hips.  Di over at Di's Kitchen Notebook is hosting her 3rd annual virtual cookie exchange.  This is my second year participating.   Last year, I shared these Chocolate Nutella No Bakes.


Having pinned about a dozen cookie recipes over the past few weeks, it was hard to decide whether to try a new recipe or bake an old favorite.  I decided to try a new recipe,  Macaroon Kiss Cookies and as a bonus I had all the ingredients in the house.  These cookies combine all of the goodness of a coconut macaroon with a hint of orange and a chocolate kiss.  The coconut gets toasty while the cookies remain soft and chewy.  Delicious!


Macaroon Kiss Cookies
Makes approx. 48 cookies
Recipe courtesy of Rook No. 17
2 1/2 cups All purpose flour
1 Tablespoon plus 1 teaspoon baking powder
1/2 teaspoon table salt
2/3 cups butter, softened
6 oz. cream cheese, softened
1 1/2 cups granulated sugar
2 egg yolks
1 Tablespoon plus 1 teaspoon Vanilla extract
1 Tablespoon plus 1 teaspoon juice from a fresh orange
10 cups sweetened flaked coconut, divided in to 6 cup and 4 cup portions
1 bag Hershey Kisses (48 pieces)

Step 1:  In a medium bowl, sift flour, baking powder and salt.  Set aside.

Step 2:  In the bowl of an electric mixer, beat the butter, cream cheese, and sugar until light and fluffy.  Add egg yolks, vanilla and orange juice and beat till smooth.  

Step 3:  In 1 cup increments, mix flour in to the butter mixture.  Add the 6 cups flaked coconut and beat to combine.

Step 4:  Refrigerate dough for 1 hour. While dough is chilling, remove wrappers from the Kisses.

Step 5:  Preheat oven to 350.  One at a time, scoop dough into 1.5" balls (about the size of a large walnut, roll between your palms, then roll in the bowl of remaining coconut (4 cups).  Arrange on an ungreased baking sheet, at least an inch apart (cookies will spread slightly).  A standard cookie sheet should accommodate a dozen cookies at a time.  Bake 12-14 minutes, until the cookies puff and are very lightly browned.  

Step 6:  Remove from oven.  Immediately press one Kiss into each cookie.  Return pan to oven and bake for an additional minute.

Step 7:  Remove pan from oven and cool on a rack for 10 minutes.  With a thin spatula, gently move cookies on to a rack to finish cooling.

I am linking this to On The Menu Monday, Tasty Tuesday, Miz Helen's Full Plate Thursday and Foodie Friday.

Tuesday, December 11, 2012

A Crafty Christmas

I don't really consider myself crafty!  Pinterest has turned even me into a crafter!  Every time I am on Pinterest I am inspired by all of the great DIY ideas out there!  Kudos to all of you creative people who come up with these great crafts!!

Two years ago I bought a roll of Deco Mesh, convinced I would (could) make a wreath or garland out of it.  Last year, time got away from me and the Deco Mesh remained in the boxes with the Christmas decorations.  This year, determined to use it, I decided to make a garland for the mantle.  Armed with the Deco Mesh, pipe cleaners and some ribbon, I made the garland! It was fun and easy.  The biggest challenge is how to attach it to the mantle.  I have some mesh leftover and am thinking of making bows for our garage lights.  


Our downstairs family room / bar area is decorated in a wine theme.  We have a small pencil Christmas tree in that room.  Last year I remember thinking how  great it would be to decorate this tree in a wine theme but decided against it because it would mean buying all new ornaments.  This Spring when we were in wine country, I purchased a key chain made from a wine cork.  At the time, I thought, I could do this.  I should make these for gifts or to sell.  Last week while browsing on Pinterest, I saw this same idea turned into Christmas ornaments.  Tim reminded me I had "those" beads I purchased when I took beading classes a few years ago.  With Tim's help (THANK YOU, TIM), we now have a tree in the family room with a wine theme!!!


A few weeks ago our local home improvement store, Menards, had those fun glass blocks on sale.  I picked up a couple.  I know Tim thought they were going end up, undecorated, in the box with the Christmas decorations, along with the Deco Mesh (from last year) at the end of the season.  Convinced I was going to prove him wrong, I did some searching on Pinterest.  I found some fun lettering sets for the blocks but they were a bit expensive and I really didn't want to spend a lot on something that was only going to be out for a few weeks each year.  I did find a pin on Pinterest showing the glass block wrapped like a present!  Ribbon and some sort of embellishment, seems easy enough.  I can do this!  I even think if I change embellishment on these, they can be Valentines Day blocks, too!!


What crafts have you made this holiday season?
I am linking this to  Homespun Christmas and Make It Pretty Monday at The Dedicated House

Sunday, December 9, 2012

A Recipe Rewind - Peanut Butter Balls

When Tim shared with me that his office was having a cookie exchange, I didn't have to think twice about what I was going to share.  Not sure if you would consider these cookies or candy but they're a holiday recipe I've been making since Justin was small.  I've posted these a couple of times before but they're so good, I couldn't resist sharing again this year.  This years batch is in the fridge chilling, so I am posting a picture from a couple of years ago.

I saw this tip for keeping chocolate warm while dipping candies and plan to give it a try when I dip these this week. 


Peanut Butter Balls
1/2 cup butter
3 cups Rice Krispies
2 cups smooth peanut butter
1 pound powdered sugar
8 ounces Hershey's chocolate bar
6 ounces semi sweet chocolate bits
1 teaspoon vanilla
1/2 cake paraffin

Melt butter, stir in peanut butter until smooth. In a large bowl, combine rice krispies and powdered sugar. Pour peanut butter mixture over rice krispie mixture. Stir until combined well. Chill for at least one hour. Roll rice krispie mixture into balls approximately the size of walnuts.

In a double boiler or a bowl over a pan of boiling water, combine chocolate bar, chocolate chips, paraffin and vanilla. Stir until melted and combined.

Dip balls into chocolate mixture, making sure to cover all sides. Place on waxed paper to dry.


I am linking this to On The Menu Monday, Tasty Tuesday, Miz Helen's Full Plate Thursday and Foodie Friday. 

Sunday, December 2, 2012

Chocolate Candy Cane Kiss Cookies

Have you started your holiday baking?  Tomorrow is food day at Tim's office, so I decide to bake a holiday cookie recipe I've been eying since last year.  The chocolate and peppermint are a perfect combination!  Watch out these are addictive!!


Chocolate Candy Cane Kiss Cookies Recipe:
(Makes about 4 dozen cookies)

Ingredients:
1/2 cup shortening
1/2 cup butter
1 cup light brown sugar
1 cup granulated sugar
2 large eggs
2 teaspoons vanilla
1 teaspoon peppermint extract
1 teaspoon baking powder
1 teaspoon baking soda
1/2 teaspoon salt
2 1/2 cups all-purpose flour
1/4 cup + 2 Tablespoons unsweetened cocoa powder
2 cups semisweet chocolate chips
1 (10 ounce) package  Hershey's Candy Cane Kisses, unwrapped
 
Directions:
Preheat oven to 350 degrees.  In a large mixing bowl, cream together softened butter, shortening, brown sugar and granulated sugar until light and fluffy.  Add eggs and vanilla.  In a separate bowl, combine baking powder, baking soda, salt, flour and cocoa powder.  Add to the butter/sugar mixture and combine.  Fold in chocolate chips.  Chill dough in the refrigerator for 30-60 minutes to avoid cookies from flattening.

After your dough has chilled, drop by rounded tablespoons onto an ungreased cookie sheet.  Bake for 8 minutes or until set up but the centers are still soft.  Let the cookies cool for 1-2 minutes.  Top each cookie with an unwrapped Candy Cane Kiss.  Allow to cool long enough for the kisses to harden.


I am linking this to On The Menu Monday, Tasty Tuesday, Miz Helen's Full Plate Thursday and Foodie Friday. 

Monday, November 26, 2012

Banana Bars with Brown Butter Frosting

 Thanks to everyone for your kind words last week!  Hope everyone had a wonderful Thanksgiving!!!

Brown butter adds such depth to the flavor of these bars.  Most of my experience with brown butter has been in savory cooking with recipes like this Brown Butter Sage Pasta.  When I saw this recipe for Banana Bars with Brown Butter Frosting, I couldn't wait to give them a try.

The trick to perfect brown butter is to brown the butter slowly, swirling the pan while the butter browns.  If you brown it too quickly it will burn and that's not good!!!  You frost this cake while it's still warm.  I used a trick I learned a number of years ago with this banana bread, I poked holes into the cake allowing the frosting to seep down inside the cake.

These banana bars are delicious and dense like a pumpkin bar.  The brown butter frosting is heavenly and puts these bars over the top. 


Banana Bread Bars:
1-1/2 c. sugar
1 c. sour cream
1/2 c. butter, softened
2 eggs
1-3/4 (3 or 4) ripe bananas, mashed
2 tsp. vanilla extract
2 c. all purpose flour
1 tsp. baking soda
3/4 tsp. salt
1/2 c. chopped walnuts (optional)

Brown Butter Frosting:
1/2 c. butter
4 c. powdered sugar
1-1/2 tsp. vanilla extract
3 tbsp. milk

Directions:
1.  Heat oven to 375F.  Grease and flour 15x10-inch jelly roll pan.  For the bars, in a large bowl, beat together sugar, sour cream, butter, and eggs until creamy.  Blend in bananas and vanilla extract.  Add flour, baking soda, salt, and blend for 1 minute.  Stir in walnuts.

2.  Spread batter evenly into pan.  Bake 20 to 25 minutes or until golden brown.

3.  Meanwhile, for frosting, heat butter in a large saucepan over medium heat until boiling.  Let the butter turn a delicate brown and remove from heat immediately.

4.  Add powdered sugar, vanilla extract and milk.  Whisk together until smooth (it should be thicker than a glaze but thinner than frosting).  Using a spatula, spread the brown butter frosting over the warm bars (the frosting will be easier to spread while the bars are still warm). 

Yield: 2 dozen large bars

I am linking this recipe to On The Menu Monday, Tasty Tuesday, Miz Helen's Full Plate Thursday and Foodie Friday!

Sunday, November 18, 2012

Goldie June Johnson 04/21/20 - 11/12/12


Goldie June Johnson, 92, passed away quietly at the Life Care Center of Kansas City, on Monday, November 12, 2012. June was born on April 21, 1920 in Benton City, Missouri. She lived most of her life in Kansas City, Missouri or Kansas, and was a graduate of Rosedale High School. She also lived in Clark, Missouri, California and Nebraska. June was a Regional Manager for Russell Stover's Candies, and a homemaker. June and Robert W. Johnson, her husband and sweetheart, were married August 3, 1988.  She was a beloved wife, sister, daughter, mother, grandmother, aunt and friend. June enriched the lives of all who knew her, and she leaves many in sorrow but with gratitude for having had her in their lives. 

June was my Bonus Mother (I never liked the word step mother).  (My Mother passed away when I was 16.)
  Having June in our lives brought us all great joy.   She will be missed!!!

Monday, November 12, 2012

Chicken Enchilada Pasta - Secret Recipe Club

It's Secret Recipe Club time! For those of you who aren't familiar with SRC, it works like this. Each month, we're assigned a blog and choose one of their recipes to feature on reveal day. For this month's reveal, I was assigned Cheese Curd in Paradise.  Congratulations to Ashley, she's about to welcome a new baby, Kellen, into this world.

 I try to choose a savory recipe for SRC since I never have any trouble coming up with a new sweet recipe to make! I love Chicken Enchilada's. When I saw this recipe for Chicken Enchilada Pasta, I decided that was the recipe I was going to choose. I omitted the red peppers (none on hand) and used some leftover cream cheese instead of the sour cream. This recipe tastes just like chicken enchiladas. I think next time I might try adding a few black beans, more protein and more color.


Chicken Enchilada Pasta
Ingredients
2 chicken breasts, cooked & shredded (you can add more chicken if you like a meaty pasta)
2 tbsp. olive oil
2 garlic cloves, minced
1 medium onion, diced
1 red bell pepper, diced
1 4 oz. can diced green chiles
1/2 tsp salt
1/2 tsp black pepper
2 1/2 tsp chili powder
1 tsp cumin
2 10 oz. cans green chili enchilada sauce (I used medium heat)
1 10 oz can red enchilada sauce (I used mild heat)
2 cups shredded reduced fat sharp cheddar cheese
1 cup light sour cream
1 lb Penne pasta

Toppings:
Avocado
Green Onion
Sour Cream
Cheese
Black Olives

Instructions
In a large rimmed skillet, heat olive oil over medium heat. Add onions and peppers and cook for about 5 minutes. Add garlic and stir. Add chicken, spices, chilies, and enchilada sauces. Simmer for 15 minutes.  While the sauce is simmering, cook the pasta, drain and set aside.

Lower the heat for the sauce and stir in the cheese. Allow mixture to stop bubbling and stir in the sour cream. Be careful not to boil the sauce because the sour cream will break and curdle.

Return drained pasta to the original pot and pour sauce over pasta. Toss pasta with sauce so it is evenly coated. Plate and top with desired toppings.

I am linking this to On The Menu Monday, Tasty Tuesday, Miz Helen's Full Plate Thursday and Foodie Friday.

Saturday, November 3, 2012

Taco Bake

Looking for a new hamburger recipe, here's one that's easy and uses ingredients you may have on hand.  This dish is cheesy and the leftovers, if you have any, are delicious the next day!


Taco Bake
Recipe Courtesy of The Country Cook
Ingredients:
1 pound ground beef
1 packet taco seasoning
* water as called for on back of seasoning packet
3 large flour tortillas (8-inch size)
1/2 cup Salsa Con Queso
1 1/2-2 cups shredded Mexican cheese blend

Directions:
Brown and crumble ground beef. Drain excess grease.
Add in taco seasoning and water (following directions on back of seasoning packet).

Once the taco meat is ready, turn off heat and had in 1/2 cup salsa con queso.
I like a mild salsa con queso. This is a spicy dish so a hot salsa con queso would just be too spicy for us.
If you have anyone in your family that is very sensitive to spicy dishes, you could always use a regular, spreadable cheese dip.

Preheat oven to 350F degrees.
Spray an 8-inch round baking pan with nonstick cooking spray.
Layer the bottom of  the pan with a flour tortilla.
Now add about 1/3 of the meat filling.  Then add 1/3 of the shredded cheese.
Continue until you are done with all of the layers.
Bake a 350 for 15 - 20 minutes. 
Allow to cool for a few minutes, cut into wedges.  Top with salsa or sour cream.   

I am linking this to On The Menu Monday, Tasty Tuesday, Miz Helen's Full Plate Thursday and Foodie Friday!

Thursday, November 1, 2012

In The Mood Intimates - Lace Boyshorts Review

Are you an online shopper?  I am!  I buy make up, shoes, clothes, gifts, books and kitchen items on line.  It's easy and such a time saver, find what you want and click click, it's done.

One thing I've never purchased on line is intimate apparel.  Seems like that's something I always put off purchasing and I am not sure why.  Everyone deserves to wear something beautiful underneath their clothes.  For me that's about to change,  recently I was contacted by In The Mood Intimates.  They were looking for some blog ambassadors.  I quickly responded and said, sign me up!!!


For this month's review, I received a pair of their Hanky Panky Signature Lace Boyshorts.  I love boyshorts.  Their fit is perfect and they are so comfortable.  These were no exception, comfy....check, good fit....check and to top it off they are a beautiful pink color.  (I have to clarify this, no that's not me in the boyshorts, I only wish I looked like that when wearing them.)


If you're looking to treat yourself or need a beautiful holiday gift for someone, check out In The Mood Intimates.  They have a great selection, reasonable pricing and $5.00 shipping (unless you spend $70.00 and then shipping is free.)

Disclosure:  I’m a member of the In  The Mood Intimates Ambassador program and received a review item in exchange for this post.  The opinions are my own.

Sunday, October 28, 2012

Breakfast Casserole

Weekend breakfasts are one of my favorite meals! Breakfast casseroles are the best. You make them the night before and bake them the next morning. They're also perfect if you're having house guests. Today's recipe is a different take on a breakfast casserole I've been making for years. Instead of bread, it uses waffles and has the addition of maple syrup. You could easily omit the syrup if you don't want the casserole to have a slight sweet taste.


Maple Sausage and Waffle Casserole
Recipe Courtesy of Plain Chicken
8 frozen Eggo homestyle waffles, cubed
16 ounces maple breakfast sausage, crumbled
1 cup shredded cheddar cheese
6 large eggs
1-1/4 cups whole or low-fat milk
1/4 cup maple syrup
salt
pepper
 Cook the sausage in a nonstick skillet over medium heat, breaking it apart with a wooden spoon, until well browned, 8 to 10 minutes. Drain fat. Grease an 8-inch square baking dish. Add half of the cubed waffles in a single layer. Top with half of the sausage and 1/2 cup of the cheese. Layer the remaining waffles and sausage and 1/2 cup more cheese. Whisk together the eggs, milk, maple syrup, salt, and pepper in a medium bowl until combined. Pour the egg mixture evenly over the casserole. Wrap the baking dish with plastic wrap and place refrigerate for at least 1 hour, or up to 1 day. Bake at 325 degrees 45 to 50 minutes.

I am linking to On The Menu Monday, Tasty Tuesday, Miz Helen's Full Plate Thursday and Foodie Friday!

Sunday, October 21, 2012

Chinese Cumcumber Salad

As summer draws to a close and we're focused on those fall foods, I wanted to share one more recipe of summer. Many weeks our CSA bag included a cucumber or two. Looking for a new way to serve cucumbers, I found this recipe. If you like foods with an asian flair, you'll enjoy these. They're crisp and delicious. Be sure to soak them before marinating them in the dressing, it adds to their crispiness. These are best served the day you make them but will be okay the next day, after that they tend to get a little soggy.


Chinese Cucumber Salad
Recipe Courtesy of Kalyn's Kitchen

Ingredients:
4 medium sized cucumbers
2 T sea salt (for soaking water)
black sesame seeds for garnishing salad (optional but fun)
Dressing Ingredients: 4 T red wine vinegar
4 T soy sauce
3 T sugar
4 tsp. sesame oil
 1-2 tsp. Sriracha Sauce (or other hot sauce of your choice)
 Instructions: Peel cucumbers, leaving some of the peel on in stripes if they are fresh garden cucumbers. Cut each cucumber in half lengthwise, then use a spoon to scrape out the seeds. Cut cucumbers in 1/4 - 1/2 inch thick slices. Soak 30 minutes in salted ice water. (I used 2 T sea salt in the water.) While the cucumbers are soaking in the ice water, mix the red wine vinegar, soy sauce, sweetener of your choice, sesame oil, and Sriracha or other hot sauce to make the dressing. After 30 minutes, drain the cucumbers well, put them in a plastic container with a tight-fitting lid, and pour dressing over cucumbers. Let marinate 30 minutes in the fridge, turning the container over a few times. After 30 minutes more, drain the cucumbers, reserving a few tablespoons of the dressing. Put cucumbers on serving dish, drizzle over the reserved dressing, and sprinkle with black sesame seeds if desired.

I am linking this to On The Menu Monday, Tasty Tuesday, Miz Helen's Full Plate Thursday and Foodie Friday.

Monday, October 15, 2012

The Ultimate Sugar Cookie - Secret Recipe Club

It's hard to decide what I like most about Secret Recipe Club...reveal day or choosing which recipe to make from my assigned blogger.  If I had to pick, I think it would be looking through the recipes of the blogger I am assigned for the month and deciding on a recipe.  This month, I was assigned Heavenly Treats and Treasures.  Check out her blog, she has beautiful photography and a wonderful selection of recipes.

Do you have a favorite cookie?  Mine is probably chocolate chip but a close second is a good sugar cookie.  When I came across the recipe for ULTIMATE Sugar Cookie, I stopped searching and bookmarked the recipe.

Why is this recipe the Ultimate Sugar Cookie?  The secret ingredients are cream cheese and melted butter.  The cream cheese, I totally get but melted butter just seems counter intuitive to cookies.  The results a slightly crispy, yet creamy sugar cookie!


 The Ultimate Sugar Cookie:
Yields about 18 large size cookies

Ingredients:

2 1/4 cups all purpose flour
1 teaspoon baking powder
1/2 teaspoon baking soda
1/2 teaspoon salt
1 1/2 cups sugar, plus about 1/3 cup for rolling
2 ounces of cream cheese (cut into eight pieces so it's easier to incorporate)
6 tablespoons unsalted butter, melted and still warm
1/3 cup canola oil (or vegetable oil)
1 large egg
1 tablespoon milk
2 teaspoons vanilla extract

Directions:
  •  Adjust oven rack to middle position.  Preheat oven to 350 degrees F.  Line three baking sheets with parchment paper.
  • Whisk flour, baking powder, baking soda and salt together in a medium bowl.  Set aside.
  • Add 1 1/2 cups sugar and cream cheese to a large bowl.  Pour warm butter over sugar mixture and whisk until combined.  Add vegetable oil and whisk again until incorporated.
  • Add egg, cream, vanilla and whisk until smooth.
  • Add half of flour mixture and gently mix in with a spatula or wooden spoon until almost incorporated, then do the same with the remaining flour.
  • Measure 1/3 cup sugar into a bowl.  Using about a 2" size scoop (approximately 2 1/2 tablespoon size), scoop cookie dough, drop into hands and roll gently into a ball.  Working in batches, roll balls of dough in the sugar to coat evenly and then space a few inches apart on cookie sheets.  There will be enough room for 6 large cookies per sheet. 
  • Using bottom of a drinking glass or a measuring cup, flatten each cookie so it is about 3" in diameter.
  • Sprinkle top of each cookie with additional sugar
  • Top with colored sprinkles if desired.
  • Bake one sheet at a time, just until edges are barely beginning to turn golden - about 12-13 minutes.  Rotate cookie sheets halfway through baking time.
  • Remove pan from oven, and allow cookies to cool 2 minutes on the sheets on a baking rack.  Then, slide cookies on parchment paper off sheet to the rack and allow to cool.

Honey Corn Muffins - Club Baked

I grew up making those little Jiffy mixes.   Sometimes it was the cake mixes and other times it was the corn muffins.  I think it was the next step up from the Easy Bake Oven.  The authors of Baked Explorations describe our recipe for this month's Club Baked as their favorite, similar to the Jiffy mix, not overly sweet and light in texture.

I made these last week with our first bowl of fall chili.  They're delicious with just a little butter or the addition of drizzle of honey.  They have a nice tender crumb and the edges turn a beautiful golden brown.  Next  time I am going to try these as corn bread in my cast iron pan.

Want to make these yummy muffins?  You'll find the recipe over at Karen's blog, Karen's Cakes & More.  Karen's hosting this month's recipe and also is our leader in Club Baked.  You can find the links to the other Club Baked bakers muffins here!


Next up for Club Baked, Carrot Coconut Scones on 11/1.  November?  Crazy that it's almost November!  That means the holidays are just around the corner and Club Baked will be taking a break until January!!

I am linking these to On the Menu Monday, Tasty Tuesday, Miz Helen's Full Plate Thursday and Foodie Friday!


Sunday, October 7, 2012

Penne with Butternut Squash and Goat Cheese

Here in Nebraska we quickly went from summer into fall, or almost winter, this week.  The low was in the upper 20's the past two nights.  The trees are a beautiful golden hue and the leaves are falling quickly.

 I love the flavors of fall; pumpkin, squash, apples and pears.  Butternut squash has been in our CSA bag the past couple of weeks.  Butternut squash is so versatile.  It can be sweet or savory and easily makes for a hearty meal.  I had a log of honey goat cheese that needed to be used up.  This recipe gave me the opportunity to do just that.  To offset some of the sweetness of the cheese, I added about 1/2 pound of Italian Sausage to this dish.  I didn't have any walnuts, so omitted those.  This dish just defines comfort food!

What's your favorite fall food?


  Penne with Butternut Squash and Goat Cheese

Recipe Courtesy of Giada De Laurentis
Ingredients
  • Vegetable oil cooking spray
  • 1 (2-pound) butternut or kombucha squash, peeled, seeded and cut into 3/4-inch cubes
  • 1 onion, diced into 1/2-inch pieces
  • Olive oil, for drizzling
  • Kosher salt and freshly ground black pepper
  • 1 pound penne pasta
  • 1 cup (8 ounces) goat cheese, crumbled
  • 1 cup coarsely chopped walnuts, toasted
  • 1 packed cup chopped fresh basil leaves
  • 1/3 cup finely grated Parmesan
Directions
Put an oven rack in the upper third of the oven. Preheat the oven to 425 degrees F.
Spray a baking sheet, liberally, with vegetable oil cooking spray. Set aside.
Mix the squash and onion together and arrange in a single layer on the prepared baking sheet. Drizzle with olive oil and season with salt and pepper, to taste. Bake for to 40 to 45 minutes until the vegetables are golden and cooked through. Remove from the oven and set aside to cool slightly.
While the squash mixture is cooling, bring a large pot of salted water to a boil over high heat. Add the pasta and cook until tender but still firm to the bite, stirring occasionally, about 8 to 10 minutes. Drain and reserve about 2 cups of the pasta water. Put the pasta, goat cheese and 1 cup of pasta water in a large serving bowl. Toss until the cheese has melted and forms a creamy sauce. Add the squash and onion mixture, the walnuts and the basil. Toss well and season with salt and pepper, to taste. Garnish with Parmesan and serve.

I am linking this to On The Menu Monday, Make It Pretty Monday, Tasty Tuesday, Miz Helen's Full Plate Thursday and Foodie Friday.

Thursday, October 4, 2012

From The Good Life

It's hard to believe a year ago we were frantically packing in preparation to move.  When Tim and I began looking at our house, we knew one of the first things we wanted to do after we moved in was to add some landscaping.  This house had virtually no landscaping.  There was one small tree and two, almost dead, petunias in the front of the house.  


Each week, during the summer, our homeowners association awards "Yard of the Week"
A little over a week ago, Tim and I were surprised with this sign in our yard.

Monday, October 1, 2012

A Tribute to Daniel Saraga - Smores Bars

Today's post is a special one.  It's a tribute to fellow Secret Recipe Club member, Daniel Saraga. Daniel died suddenly on September 14th.   I first "met" Daniel in June 2011 when I had his blog the Haggis and the Herring as my assigned blog for SRC. I made Daniel's very tasty Crunchy Roasted Potatoes and Carrots.  Daniel was a wonderful fellow SRC member, always taking time to comment on everyone's posts.

Daniel's wife Meredith, posted this eulogy shortly after his funeral.  What a beautiful tribute to the man she loved so dearly.  I can only imagine how difficult it must have been to compose.

Today, the Secret Recipe Club members are posting Daniel's recipes.  I hope you'll take the time to check out some of these recipes and participate in a random act of kindess today in memory of Daniel.


I've seen lots of versions of Smores bars on the blogsphere. Until now, I have resisted trying them because I just knew they would be amazing and one of those desserts where you can't eat just one piece. I was right, these Smores Bars are so delicious and for sure you won't be able to eat just one.


S'mores Squares
Recipe Courtesy of the Haggis and the Herring

1/2 cup unsalted butter (at room temperature)
1/2 cup sugar
1/4 cup brown sugar (lightly packed)
1 egg
1 tsp vanilla
1-1/3 cups flour
3/4 cup graham cracker crumbs
1 tsp baking powder
1/4 tsp salt
2 100g flat slab bars of milk chocolate (do not break)
1 jar (213g) marshmallow fluff (not melted marshmallows)
  1. Preheat oven to 350F.
  2. Cream butter sugar and brown sugar using an electric mixer on medium-high.
  3. Add egg and vanilla, and continue to mix for five minutes, until the mixture is fluffy.
  4. Add flour, graham cracker crumbs, baking powder and salt, and mix on low until fully combined (2-3 minutes).
  5. Grease an 8-inch square baking pan and press half of the dough evenly into the bottom (about 1/2-inch thick).
  6. On top of the cookie mix, place the two chocolate slabs side-by-side, and top the pan with the marshmallow fluff, spreading evenly across.
  7. Flatten the remaining dough into small/flat circles, one tablespoon at a time. Place the dough on top of the marshmallow layer.
  8. Bake on the center rack 30-35 minutes, until lightly browned and let cool completely before cutting into bars.
Mostly from the Christine Loueiro, the Toronto Star.

Sunday, September 23, 2012

Peach Caprese Salad

Until recently I thought caprese only referred to those lovely salads of tomato, basil and mozzarella.  When in fact caprese refers to something that comes from the style of the island of Capri, off the coast near Naples, Italy.   Most commonly used in the United States to refer to the Caprese Salad.  During the summer months when tomatoes are beautiful and plentiful, we enjoy Caprese Salad several times a week.  A few weeks ago, our CSA basket included some of the most delicious Missouri peaches I've ever eaten.  Having bookmarked this recipe for a Peach Caprese Salad, I decided to see how it stacked up to the tomato version we enjoy so often.  This beautifully color salad is a wonderful combination of tang from the vinegar and sweetness from the honey. 


Georgia Caprese Salad with Lime Vinaigrette
Adapted slightly from Southern My Way by Gena Knox – serves 4

Vinaigrette:
Juice and zest of 1 lime
1 tablespoon champagne or white wine vinegar
4 tablespoons extra virgin olive oil
1 tablespoon honey
1 tablespoon water
½ teaspoon salt

Salad:
4 ounces tiny water-packed mozzarella cheese balls
4 ripe peaches (southern if you can find them), unpeeled, each cut into eight wedges
Freshly ground black pepper to taste
6 tablespoons fresh basil leaves, torn into pieces
3 tablespoons fresh mint leaves, torn into pieces

Prepare the vinaigrette by combing the ingredients in a glass jar with a screw top lid. Shake well to combine and set aside. Cut cheese into 1-inch pieces (or leave whole if they are small balls) and gently toss with the peaches. Add the vinaigrette and toss again gently. Add a little freshly ground black pepper and the basil and mint pieces. Serve right away.

I am linking this to On The Menu Monday, Tasty Tuesday, Miz Helen's Full Plate Thursday and Foodie Friday.

Saturday, September 15, 2012

Heartland Turtle Bars - Club Baked

It's Club Baked time and it's my turn to host!!   Our leader, Karen asked me to choose a recipe from the Cookies and Bars section of Baked Explorations.   Heartland Turtle Bars?   I've never lived anywhere else but the Heartland.  Check! The book says the original recipe for these came from a Minnesota church cookbook and my husband is from Minnesota. Check!  Heartland Turtle Bars it is!

The recipe calls for a 9 x 13 pan.  Not wanting to have quite that much dessert in the house, I cut the recipe in half and used a 9 x 9 pan.  These remind me of Magic Cookie bars, with a homemade caramel topping in place of the Sweetened Condensed Milk.  Although there are several steps and some cooling time in between steps, this is a relatively simple dessert to make.  These bars are delicious, rich in butter and chocolate.  Need I say more?


Heartland Turtle Bars
Servings: 24 bars
For the bar topping and base:
1 and 1/2 cups all-purpose flour
1/4 teaspoon salt
3/4 teaspoon baking soda
1 cup firmly packed dark brown sugar
1 and 3/4 cups rolled oats
1 cup (2 sticks) unsalted butter, melted
1 cup toasted pecans, chopped into large pieces
1 and 1/2 cups chocolate chips
For the caramel filling:
1/2 cup firmly packed light brown sugar
10 tablespoons ( 1 and 1/4 sticks) unsalted butter, cut into cubes
2 tablespoons heavy cream
Directions: 
1. For the bar topping and base: Preheat the oven to 350 degrees.
2. Butter the sides and bottom of a 9-by-13-inch glass or light colored metal baking pan.
3. Line the pan with parchment paper so that the paper overhangs the pan on two sides.
4. Butter the parchment.
5. In a medium bowl, whisk together the flour, salt, and baking soda.
6. Use your hands to rub in the brown sugar.
7. Add the oats and stir until the ingredients are evenly combined.
8. Make a well in the center of the dry ingredients, then pour in the melted butter and stir until
the entire mixture is wet and combined.
9. Spread two-thirds of the mixture across the bottom of the prepared pan and bake for about 10
minutes.
10. Remove the pan from the oven to cool (but leave the oven on).
11. Sprinkle the pecans and chocolate chips across the cooled crust.
12. For the caramel filling: In a medium saucepan over medium-high heat, melt the sugar and
butter together.
13. Bring the mixture to a boil and boil for 1 minute, stirring constantly (the caramel will begin
to darken at this point).
14. Remove the pan from the heat, stir in the cream, and pour the caramel directly over the
chocolate pecan layer.
15. Use an offset spatula to evenly distribute the caramel.
16. Sprinkle the remaining oatmeal mixture onto the caramel and bake for 10 to 12 minutes, or
until the top is golden brown.
17. Let the bars cool in the pan for about 15 minutes, then place the pan in the refrigerator and
chill for 1 hour to firm up.
18. Cut and serve.

You can find the links to the other Club Baked members Heartland Turtle Bars here.  Next up for Club Baked, Burnt Sugar Bundt Cake with Caramel Rum Frosting.

I am linking this to On the Menu Monday, Tasty Tuesday, Miz Helen's Full Plate Thursday, Foodie Friday.  

Monday, September 10, 2012

Baked Acorn Squash with Apple Filling

Acorn Squash just says Fall to me!  Fall is one of my favorite seasons and I love the hearty foods that go along with it.  For this month's Secret Recipe Club, my assigned blog is Close to Home.  Check out her blog, she has some fun information and terrific recipes.  When I saw this recipe for acorn squash with an apple and pear filling, I was hooked.

Did you know if you microwave any winter squash for about 60 seconds, it will be easier to slice?
The apples and raisins add texture and flavor to the already hearty squash.  We'll be having this again the next time there's a squash in our CSA basket!


Baked Acorn Squash with Pear and Apple Filling from Joy of Cooking
Recipe Courtesy of Close to Home
2 medium acorn squash, halved and seeded
2 large apples, peeled cored and diced
1 ripe pear, pealed cored and diced (I just used apples)
1/4 cup dried currants or raisins
2 tbsp packed dark brown sugar
Zest of 1 small orange
1/4 tsp ground cinnamon
 

1/8 tsp ground nutmeg
2 tbsp butter
1/4 cup apple cider or orange juice
1 tbsp bourbon or dark rum (optional)  (I used brandy)


4 tsps of softned butter mixed with cinnamon and sugar  to taste

Preheat oven to 325. Butter a baking pan. Place the squash cut side down in the pan. Add 1/4 inch hot water.


Bake for 45 minutes.

Meanwhile in a medium bowl, mix apples, pear, currants or raisins, brown sugar, orange zest cinnamon and nutmeg.

In a large skillet heat the butter over medium heat until melted. Add the apple mixture and cook until the fruit is golden brown. (about 5 minutes).

Stir in the cider and bourbon. Simmer, stirring often until the fruit is tender. (about 8 minutes). Sprinkle with a tsp of salt.

Remove the squash from the oven; pour off the water from the pan and turn the squash cut side up. Fill the squash with the apple mixture.

Bake until the squash is tender, About 15 minutes. Dollop a teaspoon of Cinnamon butter and let melt.


I am linking this to On The Menu Monday, Tasty Tuesday, Miz Helen's Full Plate Thursday and Foodie Friday.

Monday, September 3, 2012

A Summer's Worth of Goodness

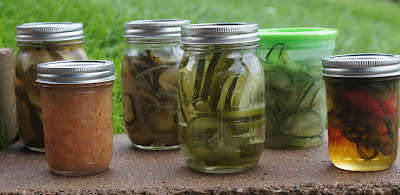
As summer draws to a close, I'd like to share my adventures in preserving.  Until recently, I'd never pickled or canned anything.  We are a member of a local CSA  and there are times I have too much of something for just the two of us to eat.  Keeping with my vow to throw away less food, I decided to learn how to can.  In addition to dehydrating some tomatoes and freezing the vegetables that freeze well or can be used in soups this winter, here's what I have made.

As a kid, I remember eating Lime Pickles.  To this day, I remember how much I enjoyed their crisp crunchy taste.  With a little research and some assistance from Tim,  we made these Lime Pickles.  I chose not to dye them green, as I think I remember them being when I was young.

Tim says he can take or leave pickles but does remember those great Bread and Butter pickles his mom made when he was a kid.  He says these taste just like the ones his mom made.  Curious why they're called Bread Butter pickles?  It's because during the Depression they were as as common as bread and butter.

Searching for a different type of pickle, I ran across this recipe that uses IPA beer as the base.  They won't be ready for a couple of weeks.  I am looking forward to checking them out!!

If you read Lynn's blog, Happier Than a Pig in Mud, you're most likely familiar with her Freezer Pickles.  I actually made these for the first time last summer.  I put them in the freezer in the garage and apparently forgot about them.   While seeing what was lurking in the freezer, I found them.  I love them, they are delicious.  To me they're a cross between a pickle and a cucumber.  I use them on everything, salads, burgers, brats and sandwiches.  They're perfect for a cold winter day when you are missing the taste of summer. 

My friend Larry loves jalapenos. Whenever we eat out, he will often ask for a side of jalapenos.  I made him these pickled jalapenos (No picture, I forgot to take one before I gave them to him.).  He said, "they were excellent with a strong kick".  After making a batch of this salsa I had some leftover jalapenos and decided to give these Candied Jalapenos a try.  They have to sit for a few weeks before they're ready for eating, so I don't have his comments on these just yet.

We were lucky enough to have delicious Missouri peaches in our CSA this summer.  These were some of the best peaches I'd had in years.  I am sure like a lot of the fruits and vegetables this summer, our intense heat has caused them to be sweeter.  Having made regular peach jam before I wanted to try something different.  I found this recipe which takes Martha Stewart's Rosemary Peach Jam and adds pepper to it.  I am looking forward to trying this with cream cheese and crackers, on chicken or a pork loin.


 (Left to Right IPA Pickles, Peppered Rosemary Peach Jam, Bread and Butter Pickles, Lime Pickles, Freezer Pickles, Candied Jalapenos)


As we enter the final weeks of our CSA, we'll receive acorn squash, butternut squash, pumpkins and cabbage in our bags.  I need to research some preserving techniques for these items.  Does anyone have any great recipes, they'd like to share?

I am linking this to On The Menu Monday, Tasty Tuesday, Miz Helen's Full Plate Thursday and Foodie Friday.

Sunday, August 26, 2012

Beer Marinated Chicken with Aged Cheddar

A few weeks ago Tim and I went to a series of classes on wine and cheese at our local Hy Vee store.  Not only were these classes informative, they were FREE!  It was fun, informative and great to taste different wines and cheeses together.  We purchased several varieties of cheese, most to enjoy with wine and crackers.  We did purchase an 8 year aged cheddar with the intention of cooking with it  Of course we know it works beautifully stuffed inside a burger.  Curious what else aged cheddar might pair well with, I searched the internet and found this recipe for grilled chicken breasts.

The recipe calls for splitting the breasts in half and stuffing them with the cheese.  I left ours whole and towards the end of the grilling time, made slits in the side of them and added the cheese.  The beer and and the aged cheddar pair together nicely making this a delicious dish for a summer barbeque. 


Beer Marinated Chicken with Aged Cheddar
Recipe Courtesy of Dairy Goodness

4 chicken breasts
1/2 cup (125 ml) light beer
1/4 cup (60 ml) unsweetened apple juice
1 clove garlic, chopped
1 tbsp (15 ml) chopped fresh rosemary or
1 tsp (5 ml) dried rosemary
Salt
Freshly ground pepper
4 oz (120 g) Canadian Aged Cheddar, thinly sliced

Instructions

Cut the chicken breasts in half to make them less thick.
Place chicken in a bowl and add beer, apple juice, garlic, rosemary, salt and pepper to taste. Marinate at least 30 minutes or several hours if time allows.
Preheat grill to medium.
Remove chicken from marinade and drain, then cook on grill with lid closed 5–7 minutes each side, depending on thickness of chicken.
Re-form chicken breasts by pairing up both halves after placing a quarter of the cheese between the halves. Close grill lid and allow cheese to melt for 2–3 minutes before removing from grill.


I am linking this to On The Menu Monday, Tasty Tuesday, Miz Helen's Full Plate Thursday and Foodie Friday.

Sunday, August 19, 2012

Watermelon Mint Quick Pops

For my birthday this year I received a gift certificate to a local kitchen store. I decided to use it on something I wouldn't normally buy or didn't need. I'd read about these Zoku pop makers and heading into summer thought one would be perfect for a quick refreshing treat. If you're not familiar with Zoku pop makers, the pops freeze in 10 minutes or less. Just keep the unit in your freezer, pour the base into the pop maker and in just a few minutes you'll have popsicles.  Be careful not to overfill the pop maker or you will have trouble releasing them from the mold.  Also, don't make your base too sugary or it won't freeze solid.

If you have kids, a Zoku pop maker would be perfect for those times when you need treats in a hurry.  I bought the one that makes two pops at a time, you can make four pops before the unit needs to be refrozen. 


Watermelon Mint Quick Pops
Recipe Courtesy of the Zoku blog
INGREDIENTS
12 oz (about 3½ cups) seeded, cubed fresh watermelon
¼ cup cold water
1 tbsp freshly squeezed lime juice
6-8 mint leaves
*sugar or agave nectar (optional)
MAKE THE WATERMELON BASE
In a blender, combine all ingredients and puree until smooth.
ASSEMBLE THE QUICK POPS
Insert sticks and pour the watermelon base until you reach the fill line. Let freeze completely, then remove the pops with the Super Tool and enjoy. Repeat with remaining pops.
*We recommend tasting the watermelon base before filling the Zoku Quick Pop Maker. If your watermelon is nice and sweet you won’t need to add sugar. If you find your base needs to be sweeter, simply add a little sugar or agave until you reach your preferred level of sweetness.

I am linking this to Kitchen Bouquet's Ice Cream Social, On The Menu Monday, Tasty Tuesday, Miz Helen's Full Plate Thursday, Foodie Friday.

Wednesday, August 15, 2012

Strawberry Jello Salad - Club Baked

 Who isn't reminded of their childhood when you hear jello salad?  At every holiday meal or special occasion when I was growing up, there was at least one jello salad.  Usually including pineapple or fruit cocktail and if we were lucky some whipped cream.  As an adult, I only think of jello as food we eat when we are sick or recovering from dental surgery.  I can't remember the last time I made a jello salad.  When I saw this week's Club Baked recipe was Strawberry Jello Salad, I was intrigued.  Really, the Baked Explorations authors are including a jello recipe in their cookbook? Baked Explorations features classic American dessert recipes the authors chose from their journeys across the United States. 

The recipe calls for making this is a 9 x 13 pan.  Since it's just the two of us, I didn't really want a big pan of jello.  I decide to make this in individual servings.  I made 1/4 of the recipe, with a little extra on the cream cheese layer and ended up with 4 servings.  I baked the pretzel mixture in the oven till crispy and the sprinkled it in the bottom of the glass.  It worked out perfectly and is much easier than cutting individual servings.

If you're looking for a salad for a family gathering, give this one a try.  It's a wonderful mixture of sweet, salty and creamy.  I would like to make this with pudding instead of jello, maybe chocolate?  For sure a chocolate version could be served at a holiday dinner for my husband's family, they love to call anything with whipping cream and pudding a salad. 


You'll find the recipe at Gloria, The Ginger Snap Girl's blog.  If you'd like to see what the other members of Club Baked did with this salad, you can find those links here!  Next up for Club Baked, Oatmeal Chocolate Chip Cake.

I am linking this to On The Menu Monday, Tasty Tuesday, Miz Helen's Full Plate Thursday, Foodie Friday and Sweet Tooth Friday