Sunday, March 13, 2016

Wacky Cake - Secret Recipe Club

For March Secret Recipe Club, I was assigned The Tasty Cheapskate.   Jean, the blogger behind The Tasty Cheapskate, says :

"I grew up neither cooking nor eating much. There were so many other things to do (like exercising compulsively. And high school! Cuteness! Grades! Rah!). And though my mom made most of our food (cheapskatery was a major theme of my childhood), I still managed not to learn to cook. I only ate foods, after all, with no fat, and the concept of whole foods was a little lost on us, (as it was on many in the '80s and '90s). We were more in the fat-free margarine camp (oh look, I can see my liver glowing). So fortunately, I've gotten past all that. I cook now. And eat. Good things, very good things (no offense to all the weirdo diets out there). Though--for the record--I'm still really cheap (not margarine cheap, my friends, but cheap). It's in my bones." 

Stop by and check out Jean's blog, lots of tasty recipes!!

Normally for SRC, I have a hard time deciding just which recipe to make.  For the second month in a row, I had no trouble deciding.  Early in my travels around Jean's blog, I found her recipe for the Wacky Cake.  Wacky Cake is perhaps the first cake I ever baked.  I remember how much fun this cake was to make and still have the recipe card written in my grade school handwriting.  Not familiar with a Wacky Cake?  The cake is made in the pan, has no dairy or eggs but does have vinegar.  I've always thought the addition of vinegar is how the cake got it's name. Some say the cakes name came from the depression era and was considered wacky because of the omission of eggs or dairy, which were rationed during that time.


If you have kids or grandkids, this is a great cake to make with them.  Everything gets dumped into the pan and when you add the vinegar, it may even fizz.


Wacky Cake
Recipe courtesy of The Tasty Cheapskate
Serves, well, it should serve at least 24
Prep time: 5 minutes
Cook time: 30 minutes
Cost: $.88
(flour: .16, sugar: .32, oil: .12, cocoa: .18, other stuff about .10)

2 C flour
2 C sugar
6 Tbsp cocoa
2 tsp baking soda
1 tsp salt
1/2 tsp. espresso powder (this is my addition)
2 C warm water
2/3 C oil
2 Tbsp vinegar
2 tsp vanilla (or 1/2 tsp mint) extract

In a 9x13 inch pan, mix dry ingredients
Add wet ingredients.
Bake at 350 for about 30 minutes or until a toothpick (knife, fork, whatever) comes out clean. Note: It is possible that if you bake this in an aluminum pan, vinegar/baking soda will react and cause it to taste like metal, so use glass or a non-reactive metal.


Saturday, March 5, 2016

Chicken Curry

Well this isn't the most appealing dish I've ever made but it certainly is one of the more delicious ones!!!  My son shared this recipe using chick peas as the protein source.  I didn't think Tim would buy into the chick peas being the "meat" in this dish, so I substituted chicken.

This recipe is so versatile, you could substitute any protein or veggies.  I may try carrots next time just to brighten up the color.   If you're a curry fan, give this one a try.  It's easy and oh so yummy!!


 Chicken Curry
Recipe Adapted from The Pioneer Woman
  • 2 cups Basmati Rice
  • 2 Tablespoons Vegetable Oil
  • 1 whole Large Onion, Diced Fine
  • Salt And Pepper, to taste
  • 2 teaspoons Curry Powder, Any Variety
  • 2 cloves Garlic, Minced
  • 1 cup Chicken Stock
  • 2 cups cooked diced chicken breast or thigh
  • 1 cup frozen peas
  • 1 can (13.5 Ounce) Coconut Milk
  • 1 Tablespoon Honey, More To Taste
  • 1 Tablespoon Sriracha Or Hot Sauce (more To Taste)
Cook the basmati rice according to the package instructions.  (I use a rice cooker, one kitchen appliance I wouldn't be without!)

Heat the oil in a medium skillet over medium-low heat. Add the onions, season with salt and pepper and cook for a few minutes, until the onions are soft and starting to turn golden. Sprinkle in the curry powder and garlic and stir, cooking for another minute or so. Pour in the vegetable stock and stir to scrape up all the brown bits in the pan. Add the coconut milk, honey and a squirt of sriracha. Bring to a boil, add the chicken and peas, reduce the heat, and simmer for 10 minutes. Taste and adjust the seasoning, adding more salt, honey, or Sriracha (or lime juice, if using.)

Serve the curry over the rice.

Sunday, February 28, 2016

Irish Potato Soup with Cheese and Red Ale

It's the fifth Monday of February and that brings an extra Secret Recipe Club reveal.  When there is a five week month, SRC features an extra reveal with a theme.  February's theme is Leprechaun's and Bunnies.

For this special SRC reveal, I was assigned A Day in the Life on the Farm.  A little about Wendy..... "My husband and I were both police officers in the third largest city in our state.  When we retired we moved as far away from the hustle and bustle as we could, landing in a small town of approximately 4000 people and buying a house on 12 acres. I enjoy scuba, travel, reading, games, hiking, entertaining, cooking, quilting and painting."  Stop by Wendy's blog and browse her wonderful collection of recipes and other posts.

I had no trouble choosing my recipe for this week's reveal.  Wendy's post for this soup was a posting for the group Food Fix.  In this group, a blogger chooses a movie and the post includes a review of the movie, along with a related recipe.  The movie Wendy reviewed was The Quiet Man, starring John Wayne.  John Wayne was the favorite actor of my late father and this movie was one I recall him watching frequently.   If that alone wasn't enough to convince me to choose this recipe, the original recipe was written by Crescent Dragonwagon.  Crescent is a food writer and former inn owner in one of my favorite little towns, Eureka Springs, Arkansas.

The wintertime price on the leeks at the grocery store was too rich for my blood, so I omitted them.  Although Kerrygold Cheddar Cheese is amazing, the store brand tasted great to me.  If you like blue cheese, do sprinkle some on top of the soup, it really enhances the flavor.  This hearty and delicious soup, served alongside a salad and crusty bread, makes a great weeknight meal.


Irish Potato Soup with Cheese and Red Ale
adapted from a recipe by Crescent Dragonwood as found on Relish.com

 Recipe Courtesy of A Day in the Life on the Farm

4 T. butter, divided
1 large spanish onion, chopped
3 leeks, white and light green parts, sliced
1 stalk celery, sliced
8 med. yukon gold potatoes, coarsely chopped
1 bottle Smithwick's premium Irish Ale
4 c. chicken broth
salt and pepper to taste
3 T. flour
4 c. milk (I used 2%)
7 oz. Kerrygold aged Cheddar Cheese, grated
6 slices thick bacon, crisped and crumbled
Blue Cheese (optional)

Melt 2 T. of butter in a stockpot over med heat.  Add onions, celery and leeks and cook for about 8-10 minutes until softened.  Add the potatoes, ale and chicken broth.  Season with salt and pepper and bring to a boil.  Cover, reduce heat and simmer until potatoes are tender, about 45 minutes.

Melt remaining 2 T. of butter in a medium saucepan.  Whisk in flour until smooth. Cook for a few minutes until flour smell is gone, stirring constantly.  Gradually whisk in the milk until hot and thickened.  Add cheese and stir until melted.

Stir cheese mixture into the potato mixture until combined.  Warm over very low heat for 10 minutes not allowing the soup to boil.  Ladle into bowls and garnish with the bacon and blue cheese, if desired.


Sunday, February 21, 2016

Blue Cheese and Bacon Truffles

I was looking for something different to take to the Super Bowl party we were invited to.  I wanted something besides those go to apps for Super Bowl.  I ran across this recipe from Giada and thought it would be perfect.

I modified the recipe slightly, instead of the one to one ratio of cream cheese to blue cheese,  I used a 2:1 ratio cream cheese to blue cheese.  I wanted them to have the taste of blue cheese but sometimes blue cheese can be overpowering.  This recipe, as written doesn't make very many, I doubled the amount of cream cheese and it made the perfect amount.  If you're looking for an appetizer to take to a party, give this one a try.  They're delicious!


Blue Cheese and Bacon Truffles

6 ounces double-smoked bacon, chopped fine
2 small shallots, minced
4 ounces cream cheese, at room temperature (I used 8 ounces)
4 ounces crumbled Gorgonzola, at room temperature
1 1/2 cups finely crushed pretzels
2 tablespoons minced fresh chives (I omitted these)

Directions

Place the bacon in a medium skillet and heat over medium heat. Cook the bacon until almost entirely crispy, about 10 minutes. Add the shallots and cook for an additional 2 minutes. Using a slotted spoon, scoop the bacon mixture into a medium bowl. Add the cream cheese and gorgonzola and mix well with a rubber spatula. Using a 1-tablespoon ice cream scoop, scoop little balls of the cheese mixture and roll them between your palms to smooth. Place on a plate, cover and refrigerate for at least 1 hour.

When ready to serve, allow the balls to sit at room temperature for 5 minutes. Mix together the pretzels and chives in a small bowl. Roll the truffles in the crushed pretzel mixture and serve.

Sunday, February 14, 2016

Cherry Vinaigrette

Last summer one of my neighbors brought me back a batch of beautiful Michigan cherries.  Having made this flavored vinegar earlier this year, I decided to use a few to make cherry vinegar.  What a beautiful color.  Fruit flavored vinegar is easy to make.  I combined the cherries and balsamic vinegar and let them sit in the fridge for a few weeks. 

I've gotten into the habit (a good habit) of making homemade salad dressing.  I made a simple vinaigrette with this cherry vinegar.   I chose a simple  recipe so the cherry vinegar could be the star.  It's so hard to get a good picture of dressing!  :-)


Cherry Vinaigrette

Combine 3 parts of your favorite oil with 1 part of flavored vinegar.  Add shallots and some dried herbs.  I make this a few hours before dinner so the flavors have a chance to develop.  

Sunday, February 7, 2016

Slow Cooker Carmalized Apples

Last fall Tim and our good friend The Landscaper went apple picking.  The Landscaper had all of the necessary tools for apple picking.  Our harvest was plentiful.  After making apple butter, an apple crisp or two, I froze the balance.

For our first Secret Recipe Club of 2016, I was assigned ButterYum.  Patricia, says, "I'm of British and Italian decent, the mother of 4, and I've been married to my wonderful husband for more than 25 years. I had always dreamed of going to culinary school, but reality hit when I married and started a family, so I took matters into my own hands and taught myself to cook and bake from scratch. I started with zero kitchen skills and now I teach cooking classes!"  How fun is that?!!

After enjoying a tour of Patricia's blog, I chose these Slow Cooker Caramelized Apples.  As a child, I remember enjoying baked apples with brown sugar.  This recipe is an even more delicious version of those baked apples!  I love that these can be made in the slow cooker, which is perfect for simmering these in the brown sugar and butter.  On the stove, they would require a constant stir and you would risk burning.  Served warm alongside a scoop of vanilla ice cream ...  yum!


Slow Cooker Caramelized Apples

serves 10

Ingredients
  • 8 cups diced baking apples (peeled and cored)
  • 1 cup dark brown sugar
  • 1 tablespoon ground cinnamon
  • 4 tablespoons unsalted butter
  • 1/2 teaspoon Kosher salt
  • 1 dash freshly grated nutmeg
  • 2 teaspoons pure vanilla extract
Directions
  1. Put all the ingredient in a slow cooker and mix thoroughly. 
  2. Cover and cook on high until apples are tender, about 3 hours.  The yummy salted-cinnamon-vanilla-caramel sauce that coats the apples will thicken slightly upon cooling.  Cook uncovered for a thicker sauce.


    Sunday, January 31, 2016

    Pork Ramen

    Depending on where you live there may be ramen restaurants popping up all over town.  In Omaha, we have just two but that doesn't stop the city from being crazy about ramen.  Last summer there was a ramen festival, I can't remember the exact numbers but over 10,000 people attended.  It's funny, ramen reminds most of us of the ramen of our college days.  Those noodles are the base for ramen dishes today.

    When I looked on Wiki for a definition of ramen, here's what I found
    Ramen (/ˈrɑːmən/) (ラーメン rāmen?, IPA: [ɽäꜜːmeɴ]) is a Japanese noodle soup dish. It consists of Chinese-style wheat noodles served in a meat- or (occasionally) fish-based broth, often flavored with soy sauce or miso, and uses toppings such as sliced pork (チャーシュー chāshū?), dried seaweed (海苔 nori?), menma (メンマ menma?), and green onions ( negi?). Nearly every region in Japan has its own variation of ramen, from the tonkotsu (pork bone broth) ramen of Kyushu to the miso ramen of Hokkaido

    The soft boiled eggs are missing from this recipe.  Tim doesn't care for them, I attempted to soft boil one for my ramen.  The result ... fail, the egg wouldn't peel and hadn't reached the soft boil stage.  Despite this, the dish was delicious and quite filling.  My ramen didn't follow the above definition exactly but we both really enjoyed it for a weeknight dinner.


    Spicy Pulled Pork Ramen

    Ingredients:

    10 to 12 ounces pulled pork shoulder (I used leftovers)
    2 tablespoons unsalted butter
    12 ounces shitake mushrooms
    2 garlic cloves, minced
    5 cups low-sodium chicken stock (or veg stock, or even beef stock!)
    2 tablespoons soy sauce
    1 tablespoon hoisin sauce
    2 blocks dried ramen noodles, seasoning packets removed
    4 scallions, sliced
    1 seedless cucumber, thinly sliced
    2 (or 4) eggs, soft boiled or poached
    2 tablespoons chili garlic paste
    2 teaspoons black sesame seeds
    2 teaspoons toasted sesame oil

    Directions:

    Heat a large skillet over medium heat and add the butter. Once melted, add the mushrooms and garlic and toss. Cook until the mushrooms are soft and juicy, about 5 minutes. Set aside.
    While the mushrooms are cooking, bring the stock to a simmer. Stir in the soy sauce and hoisin sauce. Cook your eggs too! I like to soft boil mine - but poaching is good too.
    Place the ramen blocks in two large bowls. Add the pork, scallions and a few cucumber slices to each bowl. Pour the stock over both blocks evenly and let sit for 2 to 3 minutes before stirring. Add mushrooms to each bowl and stir in a few more cucumber slices. At this point you could separate into two more bowls if you want 4 servings. Stir in the chili garlic paste (I do about a tablespoon per bowl for SPICY!) and add your egg and nori sheets. Sprinkle with sesame seeds and drizzle with toasted sesame oil. Serve immediately.

    Sunday, January 24, 2016

    Ruth's Chris Potatoes Au Gratin


    These potatoes remind me of the scalloped potatoes of my childhood. Layered among the cream and topped with cheese, they melt in your mouth and you can't resist a second helping. A perfect side dish for a holiday dinner or a weeknight meatloaf dinner.


    Ruth's Chris Potatoes Au Gratin
    Recipe Courtesy of Epicurious
      • 3 to 4 medium russet potatoes, peeled
      • 1 cup heavy cream
      • 1/2 cup milk
      • 1 1/2 tablespoons flour
      • 1 large clove garlic, pressed
      • 1/4 teaspoon salt
      • 1/8 teaspoon pepper
      • 1 tablespoon butter, softened
      • 1 1/2 cups grated Cheddar cheese
      • 1 teaspoon finely chopped fresh parsley


      1.   Preheat oven to 400 degrees F. 2. Cut the potatoes into 1/4-inch slices, then quarter each of those slices. 3. Beat together the cream, milk, flour, garlic, salt and pepper by hand just until well combined. 4. Coat the inside of a large baking dish with the softened butter. 5. Arrange one-fourth of the potatoes on the bottom of the dish. Pour some of the cream mixture over the potatoes. Repeat this layering step three more times. 6. Cover the potatoes and bake for 20 minutes. Uncover and bake another 40 minutes or until the potatoes are starting to brown on top. 7. Sprinkle grated cheese over the top of the potatoes and continue to bake for 5 to 10 minutes or until the cheese is melted and slightly browned and the potatoes are tender. 8. Sprinkle the parsley on top and serve.

    Sunday, January 17, 2016

    Salty Honey Pie

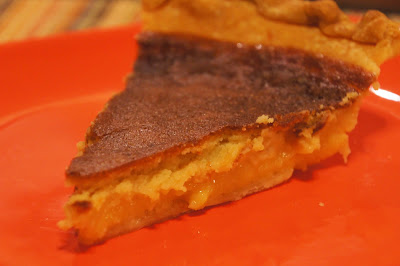
    Tim and love to cruise!  What's not to love, from the beautiful seas, amazing sunsets,  fabulous meals and fun entertainment.???!!!   Last winter, we cruised Celebrity Cruise lines for the first time.  If you were to ask Tim his favorite things about this last cruise, one of the top two or three would be the Salted Honey Pies, available in the coffee bar.   I love an afternoon latte while on a cruise, it helps me to stay awake for the evening show.  If you like you can enjoy a pastry along with your coffee.  On our first day, Tim discovered the honey pies, so he was happy to go along every afternoon when  I went to get my coffee.

    Since last winter, I've been telling him I would try to duplicate the treat.  I did some searching, really what did we do before google?  and found the Two and Twenty Blackbirds recipe for Salted Honey Pie.  I'm not sure this pie was quite as good as the ones on Celebrity because everything tastes better when you're on vacation but it was pretty darn close. I wish it hadn't gotten so brown on the top but otherwise,  I thought it was delicious.  This is a great custard pie if you're looking for an alternative to pumpkin for a holiday dinner.


    Salty Honey Pie
    Recipe Courtesy of Joy the Baker
    • Your favorite pie crust recipe
    • ½ cup butter melted
    • ¾ cup white sugar
    • 2 Tbsp cornmeal
    • ¼ tsp salt
    • ¾ cup honey (the best quality you can find)
    • 3 eggs
    • ½ cup cream
    • 2 tsp white vinegar
    • 1 tsp vanilla paste or extract
    • 1 or 2 Tbsp flake sea salt for finishing (like Maldon)
    Instructions
    1. Preheat oven to 350F.
    2. In a large bowl, whisk together the melted butter, sugar, corn meal and salt. Add the honey and the eggs one and a time, whisking well after each addition. Whisk in the cream, vinegar, and vanilla until mixture is silky smooth.
    3. Pour filling to shell, and bake pie for 45-60 minutes, or until the surface of the pie is puffed and golden, with the middle still slightly wiggly.
    4. Cool for at least an hour, or overnight. Serve with whipped cream or enjoy without, as we did!

    Sunday, January 10, 2016

    Sausage and Waffle Breakfast Bake

    For Christmas morning breakfast I was looking for a something I could make the night before and bake while opening gifts.  I've made this breakfast bake before but if I recall we had guests and I didn't take the time for pictures.  This is hearty and delicious breakfast casserole has just a hint of sweet from the maple syrup and sauce.  Preparing this the night before is not only convenient but allows the sauce soak to into the waffles and create a wonderful bread pudding like texture.


    Maple Sausage and Waffle Casserole
    serves 6


    8 frozen Eggo homestyle waffles, cubed
    16 ounces maple breakfast sausage, crumbled
    1 cup shredded cheddar cheese
    6 large eggs
    1-1/4 cups whole or low-fat milk
    1/4 cup maple syrup
    salt
    pepper

    Cook the sausage in a nonstick skillet over medium heat, breaking it apart with a wooden spoon, until well browned, 8 to 10 minutes. Drain fat.

    Grease an 8-inch square baking dish. Add half of the cubed waffles in a single layer. Top with half of the sausage and 1/2 cup of the cheese. Layer the remaining waffles and sausage and 1/2 cup more cheese. Whisk together the eggs, milk, maple syrup, salt, and pepper in a medium bowl until combined. Pour the egg mixture evenly over the casserole.

    Wrap the baking dish with plastic wrap and place refrigerate for at least 1 hour, or up to 1 day.

    Bake at 325 degrees 45 to 50 minutes.

    Sunday, January 3, 2016

    New Year's Eve Dessert Table

    For the NYE dessert table, I made brownie bites, cake balls, dressed up fortune cookies and boozy pudding shots.

     A few weeks ago, I made these for Tim's office.  Using that recipe as inspiration, I  used a white cake mix, along with a little vanilla extract for the base, dipping them in almond bark and sprinkling them with glitter.

    The brownie bites, no secrets here.  They were a boxed mix with a few mini chocolate chips tossed in.

    Who doesn't want to break open a fortune cookie to see what their fortune is?  And if you don't like the one you chose, try another one!  I bought these at World Market and dressed them up with white chocolate and edible glitter.

    And to top the evening off, I made some boozy pudding shots.  Using store bought chocolate cups, I made french vanilla pudding using milk and RumChata, topped off with a squirt of whipping cream.  Delicious!!


    Friday, January 1, 2016

    Happy New Year!

    Happy New Year!  I hope everyone had a wonderful New Year's Eve!!

    We're had two couples for a NYE dinner and celebration.  I wanted something to dress up the appetizer and dessert table in the bar.  Where did I turn for inspiration?  Pinterest, of course.


    The 2016 bottles were easy to put together, just be sure to allow plenty of time for the bottles to dry between steps.

    Here's what you need:

    Beer or Wine Bottles
    Spray Paint of your choice
    Scrapbook Paper of your choice
    Floral Wire
    Curly Ribbon
    1. Remove the labels from your bottles.  I used Oxi Clean laundry powder.  Soak for a couple of hours and the labels come off easily.  A word of caution, the oxi can cause staining in ceramic sinks.  I do this process in a dish tub or large bowl.
    2.  If desired, prime the bottles with white paint or primer.  Less glitter is required if you prime the bottles.
    3. Dry overnight, spray with your desired color of glitter.
    4. Trace numbers on the scrapbook paper.  Cut out numbers.
    5. Attach numbers to floral wire with tape.
    6. I used pieces of popcorn packing materials to hold the wire in place.
    7. Cut desired length of curly ribbon to place in bottles.
    I have enough scrapbook paper leftover, I can change the number for the next few years.  A fun and easy reusable New Year's Eve decoration.


    Sunday, December 27, 2015

    Green Bean Casserole with Goat Cheese, Almonds and Paprika

    For the past two weeks,  I've been using some creative techniques when cooking.  Two weeks ago, my stove top stopped working.  No parts anywhere, they had to be shipped in from overseas.  They arrived just in time for Christmas and the repairman was scheduled to install them on Christmas Eve.  Also, arriving in time for Christmas was eight inches of snow,  because of the heavy snow, the repairman couldn't  get to our house to do install the parts. 

    Over the past couple of weeks, I've relied on the  microwave and the slow cooker for things I would have cooked on the stove top.  I've hard boiled eggs and made cranberry sauce in the slow cooker.  Tim and I were planning on having green bean casserole for Christmas dinner.  If you're from the Midwest, you know the one, mushroom soup and french fried onion topping.  Tim found this recipe, with a Spanish spin on the traditional green bean casserole. 

    This recipes calls for a white sauce with goat cheese.  I made the white sauce in the microwave.  It was easier and turned out much better than I expected.  It was a little thick not sure if that was from cooking in the microwave or the sauce itself.  I will make this again and thin it out with a little more milk next time. 

    We enjoyed this recipe, the goat cheese adds a delicious tang and the Spanish paprika a wonderful kick! 


    Green Bean Casserole with Goat Cheese, Almonds and Smoked Paprika

    Recipe Courtesy of Food and Wine
    • Active:
    • Total Time:
    • Servings: 8 to 10

    Ingredients

    • 4 tablespoons unsalted butter, plus more for greasing
    • 2 1/2 pounds green beans
    • 1/4 cup all-purpose flour
    • 3 cups milk
    • 1 garlic clove, finely grated
    • 5 ounces fresh goat cheese
    • Kosher salt and freshly ground pepper
    • 1/2 teaspoon pimentón de la Vera (smoked Spanish paprika)
    • 3/4 cup almonds, coarsely chopped

    How to make this recipe

    1. Preheat the oven to 350° and butter a shallow 9-by-13-inch ceramic baking dish. In a large pot of boiling salted water, blanch the green beans until crisp-tender, about 4 minutes. Drain and cool under running water. Pat dry and thinly slice on the diagonal. Pat dry again.
    2. In a medium saucepan, melt the 4 tablespoons of butter. Add the flour and whisk over moderate heat until lightly browned, about 4 minutes. Gradually whisk in the milk and garlic and bring to a boil. Reduce the heat to moderately low and simmer, whisking constantly, until thick, about 5 minutes. Remove from the heat and stir in the goat cheese. Season the sauce with salt, pepper and 1/4 teaspoon of the pimentón.
    3. In a large bowl, toss the green beans with the sauce. Spread the mixture into the prepared casserole and sprinkle the almonds and the remaining 1/4 teaspoon of pimentón over the top. Bake for 20 to 25 minutes, until bubbling and the almonds are lightly browned. Let the casserole stand for 10 minutes before serving.

    Sunday, December 20, 2015

    Merry Christmas Magic Bars

    If you celebrate, are you all ready for Christmas?  We're ready at our house.  After weeks .... months of shopping, baking and wrapping, Christmas always seems to come and go so quickly.  We need to keep the spirit all year long.

    I love Magic Bars!  Okay truth be known, I love most things sweet.  Magic Bars are one of those desserts that eating one makes me want another and another!  Like most desserts I make, these didn't stay at our house.  I made a large enough batch to use half for holiday BUNCO,  half for a holiday lunch at work, leaving just a couple at home for Tim and I!

    I love how this recipe takes the traditional Magic Bar recipe and dresses it up for Christmas!  The original baker also used holiday chips, sprinkles and M&M's.  I used regular chocolate chips but they still shine with holiday color.  Bet you can't eat just one!!


    Christmas Magic Cookie Bars

    Yield: 12 cookies
    Prep Time: 15 minutes
    Cook Time: 25-30 minutes
    Total Time: 45 minutes

    Ingredients:

    • 1 stick butter (1/2 cup)
    • One 14 oz Can Of Sweetened Condensed Milk
    • 1 & 1/2 cups graham cracker crumbs
    • 1 cup Holiday or regular chocolate chips (divided into 1/2 cup portions)
    • 1 cup chopped nuts (I prefer walnuts)
    • 1 cup Holiday or regular M&M's (divided into 1/2 cup portions)
    • 1 & 1/2 cups flaked coconut

    Directions:

    1. Unwrap butter and place in 13" x 9" pan. Place pan, with butter, in the oven and turn the oven on to 350*F. Butter can melt in pan while preheating. Keep an eye on it, checking every few minutes and pulling out of the oven when butter is melted. Please be careful while preparing recipe as pan will be very hot.
    2. Crush graham crackers in a food processor to create graham cracker crumbs (or buy crumbs).
    3. When butter is melted, remove pan from oven and carefully sprinkle the graham cracker crumbs over the melted butter. Press in lightly with fork or back of spoon.
    4. Pour sweetened condensed milk over the crumb layer.
    5. Sprinkle 1/2 of the chocolate chips, 1/2 of the M&M's & the nuts over the sweetened condensed milk layer. Sprinkle coconut on top, followed by remaining chocolate chips & M&M's.
    6. Bake in oven for 25-30 minutes or until lightly browned. Remove from oven. Allow bars to cool completely. Slice, give and enjoy!

    Sunday, December 13, 2015

    Birthday Cake Truffles

    Am I the only one who is finding it hard to believe it's mid December?  Crazy, where did this year go?  Besides being close to the end of the year and the holidays, the second week of December is Secret Recipe Club time! I'm excited to be rejoining Secret Recipe Club Group B!!, Thanks to Group C for a fun 2016!

    For December Secret Recipe Club, I was assigned Amy's Cooking Adventures, Amy says she loves to cook and bake, decorate cakes and cookies. She also says she despises housecleaning and calls her look "organized chaos". Amy, that is my kind of housecleaning. Amy's blog features a wonderful assortment of sweet and savory recipes, stop by and check it out.

    For me, SRC posts are usually sweets. Tim has a food day at work every few weeks, so I'm always looking for recipes. Since, food days are usually to celebrate his coworkers birthday's, these Birthday Cake Truffles were the perfect treat. These truffles are easy to put together, even forming the balls didn't take too long. Dipping them in chocolate is a bit time consuming but I find using a fork to rest them on, helps with the process. I also added a bit of shortening to thin the chocolate just a bit, making the dipping process a little easier.These could easily be dipped in milk or dark chocolate, sprinkled with red and green sugar for holiday parties or gifting.


    Birthday Cake Truffles
    Recipe Courtesy of Amy's Cooking Adventures

    1 Box of FunFetti Cake Mix
    1 (14 oz) can sweetened condensed milk
    12 oz Milk, Dark or White Chocolate or Almond Bark

    In the bowl of an electric mixer, combine cake mix and sweetened condensed milk. Mix on low speed until combined. The batter will be very thick.Prepare a cookie sheet with waxed paper. Roll the batter into 1-inch balls and place on the waxed paper. Refrigerate for 30 minutes. Meanwhile, melt the chocolate in a double boiler or in the microwave. Dip each cake ball into the chocolate and place on a second cookie sheet lined with waxed paper. Decorate with sprinkles. Refrigerate the candies until the chocolate is hardened. Move to desired containers and refrigerate leftovers.


    Monday, December 7, 2015

    Pausing to Remember

    Thinking of my Father today, he was a Pearl Harbor survivor.  Thank you to him and all veterans for their service to our country.


    Sunday, December 6, 2015

    BBQ Spaghetti Casserole

    Slow Cooker pulled pork is one of my go to meals, perfect for a Monday when I know I won't feel much like cooking when I get home.  We buy the large loins when they are on sale and have the butcher cut and wrap them into smaller ones, perfect for the freezer.  Even with the smaller loins, we still have lots of leftovers.  I am always looking for recipes using the leftover pulled pork.  

    This BBQ Spaghetti Casserole caught my eye on Pinterest.  I've made BBQ Spaghetti before but never with the addition of pulled pork.  This is a delicious use for leftover pork just be sure to add enough BBQ sauce or it could be a little dry.


    BBQ Spaghetti Casserole
    Recipe Courtesy of Spicy Southern Kitchen


    Ingredients
    • 1 pound spaghetti, cooked until al dente
    • 1 pound bbq pulled pork
    • ⅔ cup of your favorite bbq sauce
    • 1 (8-ounce) can tomato sauce
    • 1 tablespoon tomato paste (I omitted this)
    • ¼ cup sour cream (I used greek yogurt
    • 3 green onions, chopped
    • 1½ cups shredded cheddar cheese
    • cilantro for garnish, optional
    • additional bbq sauce for serving
    Instructions
    1. Lightly grease a 9X13-inch baking dish. Heat the oven to 350 degrees.
    2. In a large bowl combine bbq sauce, tomato sauce, tomato paste, and sour cream. Stir well.
    3. Add pasta, bbq pork, and green onions to bowl and toss to combine well.
    4. Pour mixture into prepared casserole dish. Top with cheese, cover with aluminum foil. (spray foil with cooking spray so it will not stick to the cheese.) Bake for 20-30 minutes or until hot all the way through.
    5. Top with cilantro and drizzle a little additional bbq sauce on top.

    Monday, November 30, 2015

    Peanut Butter Truffles

    November is a five Monday month, you know what that means?  We have a bonus Secret Recipe Club  post!  Whenever there's a five week month, we do a themed Secret Recipe Club reveal.  What could be more perfect for this time of year but Holiday Treats?  Yummy!  A reveal of nothing but holiday treats is the best!!

    My assigned blogger is Cathleen of A Taste of Madness. As always I had fun browsing Cathleen's blog and had trouble choosing just one recipe.  I ended up choosing these amazing Peanut Butter Truffles.  They're delicious and easy to put together.  If you're looking for a food gift or something fun to take to a party, give these a try.


    Peanut Butter Pretzel Truffles

    What you'll need:
    • 1 1/2 cups pretzel pieces
    • 1/2 cup creamy peanut butter
    • 1 tablespoon butter, softened
    • 2 tablespoons brown sugar
    • 3 tablespoons icing sugar
    • 1 cup chocolate chips
    • 1 tablespoon shortening
    Directions:
    1. Put the pretzels into a large resealable plastic bag and crush into small bits using a rolling pan.
    2. In a small bowl, combine the peanut butter, butter and brown sugar until fully combined. Add in the pretzel pieces and icing sugar, and mix until fully combined.
    3. Line a cookie sheet with wax paper. Scoop around 2 tablespoons worth of peanut butter mixture, and gently shape into a ball with your fingers. Place the ball on the prepared cookie sheet, and repeat with the remaining peanut butter mixture. Place in the freezer for around 30 minutes.
    4. Boil 5 cups of water and pour into a medium bowl.
    5. Place the chocolate chips and shortening into a smaller bowl, and place it into the bowl full of water. Mix the chocolate chips and shortening until the mixture is smooth, making sure not to let the water mix in with the chocolate mixture.
    6. Take the frozen balls out of the freezer and dip them in the chocolate mixture. Place the dipped peanut butter balls back on the waxed paper. Quickly sprinkle the peanut butter balls while the chocolate is still wet with some extra broken up pretzels.
    7. In a microwave safe bowl, melt some peanut butter. Drizzle on top of truffles, and freeze until hard.
     
    http://new.inlinkz.com/view.php?id=570564" title="click to view in an external page.">An InLinkz Link-up

    Sunday, November 22, 2015

    New Orleans BBQ Beer Shrimp

    Tim and I have been brewing our own beer for about a year.  I regret not blogging about the process. Maybe in 2016?  It can be a little time consuming and a true test of team work.  Which in our cases is never a problem as long as Tim does it my way.   Ha!  Now that we have our system down, it's a fairly smooth process.  We've made a pumpkin ale, an IPA, a Hefeweizen a Lemon Coriander Weiss and a Holiday Ale.  Besides enjoying and sharing our beers, I love cooking with them.    This bbq beer shrimp is delicious, reminds me a little of good ole spiced shrimp with a kick.  I used our Lemon Coriander Weiss in this recipe.  Any mild or pale ale will work great.  I served this on top of rice with a loaf of crusty bread to soak up the delicious sauce. 


    New Orleans Barbecue Beer Shrimp
    Recipe Courtesy of The Beeroness
    Ingredients
    • 1 cup (2 sticks) butter, melted
    • 3 cloves garlic, minced
    • 2 tablespoons Worcestershire
    • 2 tablespoons fresh lemon juice
    • ½ teaspoons cayenne pepper
    • ½ teaspoon smoked paprika
    • 1 teaspoon dry oregano
    • ½ teaspoon hot chili sauce (such as sriracha)
    • 1 cup pale ale
    • 1 pounds raw shrimp, deveined, shell on
    Directions
    • Melt the butter in a cast iron skillet over medium high heat.
    • Add the remaining ingredients (besides the shrimp), bring to a simmer.
    • Add the shrimp, cook until shrimp have turned pink. Avoid over cooking or the shrimp will be tough.
    • Serve with crust bread to mop up all that beautiful sauce. And lots of napkins.

    Sunday, November 15, 2015

    Loaded Sweet Potato Soup - SRC

    For this month's Secret Recipe Club,  I was lucky enough to be assigned Debbie of Debbie Does Dinner Healthy.  Debbie is the hostess of Group C.  Thanks for all you do to make SRC a success.  I've been following Debbie's blog since I began blogging in 2009.  She has some great healthy and low cal recipes on her site!  Stop over and check them out.

    I love potato soup but never thought about making sweet potato soup.  After making this recipe, I realized I've really been missing out. This soup is so good and the great thing is, it's healthy.  I did use the bacon, not a lot, but it really adds to the flavor.  I pureed the soup with my immersion blender, next time I will be using the blender instead.  It takes a while to puree this soup and the blender would be so much easier.

    I love, love, love this soup.  One of the best soups I've made in a long time.  Thanks, Debbie for an amazing recipe, one I can't wait to make again soon!!!


    Loaded Sweet Potato Soup 

    Recipe courtesy of Debbie Does Dinner Healthy
    1 large onion, diced
    1 tbsp. bacon grease or oil
    Salt and pepper
    1 tbsp. garlic, minced
    1 tsp. dried thyme
    1 tsp. chili powder
    1/2 tsp. cinnamon
    1 can broth (chicken or vegetable)
    7 - 8 cups sweet potatoes, peeled and cubed
    1 tbsp. white wine vinegar
    Pepperjack or extra sharp cheddar cheese, shredded
    Sour cream
    Bacon (if desired and not vegetarian)

    Saute desired amount of bacon. Save bacon grease for sauteeing. 

    Add onion, bacon grease, salt and pepper to hot large pan and saute until tender.  Add garlic, thyme, chili powder and cinnamon, cook for a couple of minutes.  Add sweet potatoes, broth, vinegar and about 3 cups of water.  Season with more salt and lots of pepper.  Bring to a boil, reduce heat and simmer for about 25 minutes.  When potatoes are tender, puree with an immersion blender or carefully add to a food processor.

    Garnish with cheese, sour cream and bacon. 

    Sunday, November 8, 2015

    Beef Green Chili Cornbread Skillet

    When I saw this recipe on my blogging pal Renee's blog,  I knew it was a recipe I wanted to try.  If you haven't been to Renee's blog, Cheery Kitchen, you should check it out.  She and I have been blogging buddies for four or five years.  Renee has the best recipes and beautiful photos!

    I used my favorite hatch chile's for the green chili's in this recipe.  They were a delicious addition to an already terrific recipe.  I also had corn in the freezer from extra ears of corn on the cob.  My husband said "oh this is good, I'd have this again!"  A true compliment!  Renee, thanks for a great addition to my recipe box.


    Beef Green Chile Cornbread Skillet
    Recipe Courtesy of Cheery Kitchen

    Serves: 12 servings
    Ingredients
    • 2 pounds ground beef
    • 1 large yellow onion, chopped
    • 2 cups green enchilada sauce (I used red)
    • 1 (4-ounce) can chopped green chiles (I used Hatch Chile's)
    • 1 teaspoon ground cumin
    • 1 teaspoon salt
    • ½ teaspoon pepper
    • 1 (15-ounce) can pink beans, drained (I left these out)
    • 1 (15-ounce) can black olives, drained and sliced
    • 1 (15-ounce) can corn, drained
    • 1 (8.5-ounce) box cornbread mix, (I used Jiffy)
    • 1 egg
    • ¾ cup milk
    • 8 ounces cheese, shredded
    Instructions
    1. Preheat oven to 400 degrees.
    2. Over medium high heat in a large skillet, brown beef and onion together. Drain fat and return to pan.
    3. Add green chile sauce, cumin, salt and pepper, green chiles, beans, olives and corn and let it simmer for 5 minutes.
    4. Mix cornbread mix with egg and milk and pour over top of beef and vegetables.
    5. Place skillet in the oven and bake for 15 minutes.
    6. Sprinkle with shredded cheese and bake for 10 more minutes.
    7. Remove from oven and serve.
    8. Garnish with sour cream, guacamole, and tomato chunks if desired.

    Monday, November 2, 2015

    Forever Royal!

     It's been 30 years since my home town celebrated a World Series win.  Over those 30 years, there were many where few people went to games and few watched on TV.  My how times have changed, over the past few years,  The Kansas City Royals drafted a talented group of players.  These players have determination and heart like nothing I've ever seen.  Their determination, talent and heart payed off just after midnight last night when they were crowned the 2015 World Series Champions!


    Lucky enough to see these guys in Surprise this year during Spring Training, I was ready for a fun season.  From the beginning I felt they could Take The Crown!  162 regular games and 16 post season games,  I've watched all but a few!  Another come from behind victory last night, these guys never gave up!!

    Can't wait for the 2016 season, how many days to opening day?!!

    Sunday, November 1, 2015

    Herbed Goat Cheese Polenta Bites


    This recipe was originally presented on The Kitchen as an appetizer.  I decided to give it a try as a side dish.   These polenta bites begin with stove top polenta, poured into a square pan and cooled.  Mine was set and chilled in about an hour.    Once it's set, cut into squares and coat with panko.  I had trouble getting the panko to stick to the top side of the polenta.  Once I gave it a quick spray with olive oil, no problem getting the panko to stick to the top side.

    I really wanted to taste the goat cheese in this recipe and neither Tim or I could find it.    Perhaps,  I should have used a bigger pan, made a smaller batch or used more goat cheese.  I love the idea of this recipe and will try again, with a smaller batch, more goat cheese and a little heavier on the spices.  Also, the original recipe says not to use quick cooking polenta.  I did and it worked just fine.  Anyone know how to prevent polenta from bubbling all over your hands and the stove when you make it? 


    Herbed Goat Cheese Polenta Bites


    Makes 16 Bites
    1 tablespoon unsalted butter, for pan
    1 3/4 cups water, plus more if necessary
    1 cup milk
    3/4 cup stone-ground coarse cornmeal (not quick-cooking or instant)
    1 teaspoon kosher salt, plus more to taste
    Generous pinch freshly ground black pepper
    1/3 cup soft goat cheese
    2 tablespoon dried chives
    1 tablespoon dried thyme
    1-2 tablespoons extra-virgin olive oil
    1/2 cup panko bread crumbs 

    Butter an 8x8-inch pan and set aside.

    In a medium saucepan, bring water and milk to a slow boil over medium-high heat. Reduce heat to low and gradually whisk in the cornmeal, salt, and pepper. Cook uncovered until the polenta is thick and creamy, about 25 to 30 minutes. Stir often to prevent sticking or clumping. If it starts sticking to the bottom of the pan, add more water, 2 teaspoons at a time.

    Once the polenta is very thick and creamy, fold in goat cheese, 1 tablespoon of the chives, and thyme. Stir a few times until the goat cheese has melted into the polenta. Taste and adjust the seasoning as desired. Scoop the hot polenta into the prepared baking dish, and spread into an even layer. Refrigerate until firm, for at least one hour or overnight. Slice into 16 small squares. Spread the panko and remaining 1 tablespoon chives on a large plate and press each side of the polenta squares gently into the panko to coat completely.

    In a nonstick pan over medium heat, warm 1 tablespoon of olive oil. Pan-fry the polenta squares for about 2 to 3 minutes on each side, or until golden-brown and crispy. As the polenta soaks up some of the oil, you’ll likely need to add 1 additional tablespoon to keep it from sticking. Once finished cooking, set on top of a paper towel-covered plate to soak up excess oil, and plate immediately. Serve warm.

    Sunday, October 25, 2015

    Pumpkin Spice Latte Cake

    It's that time of year when everything includes pumpkin.  If you're a fan of those pumpkin lattes at your favorite coffee shop, you'll love this cake.  Moist with hints of coffee and a deep pumpkin flavor.  I made this cake a few weeks ago when friends came for dinner.  Normally I would send the leftovers to work with Tim, rather than keep them around to tempt us each evening.  Not with this one, it was so good, I couldn't give it up.  And yes, I ate way too much cake.


    Pumpkin Spice Latte Cake with Cinnamon Frosting
    Recipe courtesy of Baking Bites
    2 cups all purpose flour
    1 tsp baking soda
    1 1/2 tsp pumpkin pie spice
    1/4 tsp salt
    1 cup sugar
    1 large egg
    1 cup pumpkin puree
    1/4 cup vegetable oil
    1 tsp vanilla extract
    1/4 cup buttermilk
    2 tsp water
    2 tsp instant espresso or 1 packet Starbucks Via

    Preheat oven to 350F. Lightly grease a 9×13-inch baking pan.
    In a medium bowl, whisk together flour, baking soda, pumpkin pie spice and salt.
    In a large bowl, whisk together sugar, egg, pumpkin puree, vegetable oil and vanilla extract until very smooth. Stir in half of the flour mixture, followed by the buttermilk. Stir in remaining flour mixture, mixing just until no streaks of dry ingredients remain.
    In a small bowl, combine water and instant espresso or Starbucks Via and stir to dissolve. Add in 1 cup of pumpkin cake batter and stir until batter and coffee are well-combined.
    Place dollops of pumpkin batter around your prepared pan, intermixed with dollops of coffee batter. Use a butter knife or spatula to swirl the two batters together.
    Bake for 20-23 minutes, until a toothpick inserted into the center of cake comes out clean or with only a few moist crumbs attached.
    Allow cake to cool completely before icing. Spreading icing on in a thin, even layer.
    Serves 16-20
    Cinnamon Frosting
    1/3 cup butter, room temperature
    2 tbsp brewed coffee, cold
    1 tsp vanilla extract
    1 tsp ground cinnamon
    2-2 1/2 cups confectioners’ sugar
    Combine all ingredients in a large bowl and mix together at high speed. Gradually blend in the confectioners’ sugar until the frosting is soft and spreadable.

    Sunday, October 18, 2015

    Crock Pot Caramel Apple Cake

    Can you believe it's October?  I hope everyone is enjoying a beautiful fall season.  We've been blessed with amazing weather.  I'm hoping for a few more weeks before .....  winter!!  What else reminds you of fall?  Apples?  A couple of weeks ago Tim went with our friend the landscaper to pick apples.  Tim brought me home at least 4 dozen.

    The third Monday of the month brings us Secret Recipe Club.  You can find out about this group, here!  For October SRC I was assigned Melissa's Cuisine.  A little about Melissa and her blog....

    Let's start with the basics...I'm in my early 20's and I have been married to my sweet husband, Mike, since 2010.  We live in West Michigan with our adorable puppy, Champ.  We have a beautiful baby girl, Summer.  During the day, I am the office manager at a busy (and growing) counseling agency.  I spend most of my free time in the kitchen, so I've started running to avoid gaining a ton of weight from all the food I make!  So far, I've run a handful of 5k races and a half marathon.  I've recently discovered a passion for health and fitness and I love working out!  

    I've only made a dessert in the slow cooker one time.  A camping weekend several years ago, I tried a chocolate cake.   It was delicious and fudgy and so easy in the slow cooker.  Tim had requested an apple crisp, busy making jam, apple butter and apple sauce with my bounty of apples, I decided to make this cake.  It's moist and delicious and quick to put together.  A perfect fall dessert.


    Crock Pot Caramel Apple Cake
    Recipe Courtesy of Melissa's Cuisine
    1 C flour 
    3/4 C brown sugar
    2 tsp. baking powder
    1 tsp. cinnamon
    1/4 tsp. salt
    3 large apples, peeled and diced
    2 eggs, beaten
    2 tsp. vanilla
    Caramel Topping

    1.  In a medium bowl, mix together flour, brown sugar, baking powder, cinnamon, and salt.

    2.  Add diced apples to flour mixture and stir to coat.

    3.  In a small bowl, mix eggs and vanilla.

    4.  Pour the egg mixture into the flour mixture and gently stir.  

    5.  Pour into a greased crock-pot.

    6.  Cover and bake on high for 2 hours. 

    7.  Drizzle with warmed caramel topping before serving. Serve along side whipped cream or a scoop of ice cream.  

    Note: This recipe is the perfect size for a small crock pot, if you're using a larger one, you may want to double the recipe.  


    Sunday, October 11, 2015

    Honey Beer Bread

    On a recent trip to Minnesota, Tim picked up some local brews.  Looking for a nutty brown ale to use in a beer bread, I chose this bottle of Lost Trout from Third Street in Cold Spring, Minnesota.  Perfect to use in beer bread, this adds a delicious depth of flavor to the bread.  This bread is delicious warm, with a little honey butter.  Our favorite way to enjoy this beer bread was a grilled cheese sandwich.  As we approach winter and think about winter dinners, we'll be enjoying this with a bowl of chili or beef stew.


     Honey Beer Bread
    Ingredients:

    3 cups all-purpose flour
    2 Tbsp. sugar
    1 Tbsp. baking powder
    1 tsp. salt
    2 Tbsp. honey or agave nectar
    1 bottle (12 ounces) beer
    4 Tbsp. (half stick) butter, melted
    Directions:

    Preheat the oven to 350 degrees F. Grease a 9x 5x 3-inch loaf pan.

    In a medium bowl, whisk together the flour, sugar, baking powder and salt. Using a wooden spoon, stir the beer and honey into the dry ingredients until just mixed. (I recommend popping your honey in the microwave for a few seconds beforehand to make it easier to stir in!)

    Pour half the melted butter into the loaf pan. Then spoon the batter into the pan, and pour the rest of the butter on top of the batter. (Use a pastry brush to spread it around if you'd like.)

    Bake for 50 to 60 minutes, until top is golden brown and a toothpick/knife inserted in the middle comes out clean. Serve immediately.

    Tip:

    If you're a big fan of beer-cheese bread, add a cup or so of cheddar (or your favorite cheese) into the batter to give it the queso-kick. :)