Showing posts with label grilling. Show all posts

Thursday, July 7, 2011

Lemon, Rosemary and Balsamic Grilled Chicken

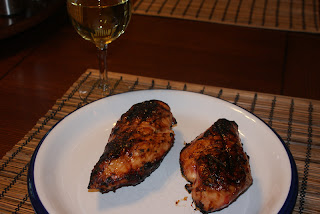
In the summer we grill at least two nights a week. There's always chicken in my fridge and I'm frequently looking for new ways to grill it. I love it when I find a recipe that uses ingredients I have in my kitchen. Even better when it uses one of the herbs from my herb garden. This recipe does both of those things and it's delicious.


Lemon, Rosemary and Balsamic Grilled Chicken
Recipe courtesy of Emeril Lagasse

3/4 cup balsamic vinegar
1/2 cup olive oil
1/4 cup rosemary leaves
3 tablespoons thinly sliced garlic
2 tablespoons lemon zest
1 tablespoon crushed red pepper flakes
8 chicken thighs (I used chicken breasts)
Salt and freshly ground black pepper

Directions

In a medium bowl combine the balsamic vinegar, olive oil, rosemary, garlic, lemon zest and red pepper flakes. Whisk to combine and pour into a 1-gallon resealable food storage plastic bag. Put the chicken thighs in the bag and seal it. Turn to ensure that the chicken is evenly coated, then refrigerate, turning occasionally, for 2 to 4 hours.

Preheat a grill to medium-low and brush the grates lightly with an oil soaked cloth. Remove the chicken from the marinade and pat dry. Season the chicken well on all sides with salt and pepper, then place on the grill, skin side down. Cook the chicken about 8 to 10 minutes, turn and continue to cook an additional 8 to 10 minutes, or until the chicken is cooked through. Remove from the heat and serve while hot.

I am linking this to Foodie Friday at Designs by Gollum and Miz Helen's Full Plate Thursday!

Thursday, June 9, 2011

From The Good Life

I am excited to have my first guest poster on Little Bit of Everything. He's my photographer, my taster, my supporter and my best friend. If you haven't already guessed, it's my husband Tim. Thanks for all you do for me!

Hi! I am Julie's husband, Tim aka "The Photographer". I seem to be on standby 24/7 as I never know when Julie is whipping up that next creation in the kitchen or I need to photograph something PINK! When Julie asked if I wanted to be her first guest blogger, I knew I had to tie something fun together, incorporating my pictures and of course food.

With summer temperatures rising this week it takes me back to our vacation this winter in Cabo San Lucas. Our friend Larry and I went fishing in the Pacific. We had the option to fish inland (small fish and lots of them) or head out in the ocean 40 miles and the chance for Yellow Fin Tuna. We went for fun and adventure and we found it. I never knew Tuna traveled with Dolphins. It was an amazing site to see hundreds of Dolphins and Tuna jumping at the same time next to the boat.


As a kid in Minnesota, I learned seeing a fish jump and catching a fish are two different things. We were lucky enough to catch a nice 15 pound Yellow Fin. After reeling him in, our deck hand filleted the fish out at 40 MPH on the back of the boat. If you have ever cleaned fish it’s hard enough doing this standing still. We ended up with 4 nice fillets that would sure taste good on the grill this summer.


This week, We fired up the grill to enjoy our catch. We lightly covered the 1 1/2 inch thick filets with olive oil and seasoning. Having never grilled this type of fish, our wisdom and Google said to cook 2 minutes each side. The joy of cooking is to experiment and learn. Looks like we needed to sear on one side and flip over after 1 minute, or less as they were a little bit over done. Still tasty, it brought back great memories of a great vacation.


Friday, June 3, 2011

Salt and Pepper Chicken

Isn't it great when you find a recipe you love? Even better when the recipe requires very little time and only has two ingredients? Yes, that's right, besides the chicken itself, just two ingredients. When I saw this recipe over at There's Always Time To Cook, I knew I'd be giving it a try. Carol said it was outstanding! Curious, I tried it that same weekend. She was right, it IS outstanding. In fact, we liked it so well, we had it again the following weekend while camping with friends. I am planning on adding rosemary next time.


Grilled Salt and Pepper Chicken
Source: original recipe can be found at Martha Stewart online
Courtesy of There's Always Thyme to Cook

1 tablespoon coarse salt
1 teaspoon freshly ground pepper
1 whole chicken (3 to 4 pounds), quartered, rinsed, and patted dry ( I used thighs, and removed the skin!)

Preheat grill to medium-high.

Combine salt and pepper. Rub chicken with mixture, covering all sides and shaking off excess. (You may not need all of the mixture.) Or put the mixture in a ziploc with the chicken and shake it all up. Let stand at room temperature 30 minutes.

Place chicken on grill, skin side down. Close cover, and grill 8 minutes. Flip chicken, and close cover. Grill until chicken is cooked through, about 15 minutes more.

Transfer chicken to a plate, and let rest 15 minutes.

I am linking this to Foodie Friday at Designs by Gollum.

Tuesday, May 24, 2011

Beer Marinated Pork Chops

I first posted this two years ago, thrilled to be grilling after a long winter. If you're like me and have childhood memories of shoe leather pork chops, give this recipe a try. This marinade produces a delicious, tender pork chop.


Pork Chops in Beer Teriyaki Marinade

2/3 cup soy sauce
1/4 cup mirin (syrupy rice wine)
1/4 cup cider vinegar
1/3 cup sugar
2 tablespoons chopped fresh ginger root
2/3 cup of your favorite beer (no dark)
4 1" thick rib or loin pork chops

In a saucepan combine the soy sauce, mirin, vinegar, sugar, gingerroot and the beer. Simmer until the mixture is reduced to about 1 1/3 cups. Let the marinade cool until it is room temperature. In a shallow baking dish or plastic bag, cover the chops thoroughly with the marinade. Marinate overnight, turning them several times.

Pour the marinade in a saucepan and boil it for five minutes. Grill the pork chops on a oiled rack set about 4 inches over glowing coals, basting them with the marinade while cooking, Cook 8 - 10 minutes of each side.

Tuesday, August 10, 2010

Bacon, Onion Cheese Stuffed Burgers

Okay because I consider you guys close friends, I will admit it. I don't normally make my own burgers. We buy the frozen already made ground chuck patties at Costco. They're easy and they're delicious. Nothing says summertime like hamburgers on grill, corn on the cob and baked beans. On this particular night, I did make my own burgers. These were delicious. The only thing I will do differently next time is add more stuffing.


Bacon, Onion and Cheese Stuffed Burgers
Adapted from Food Network


1 1/2 pounds ground beef
1 clove garlic, minced
1 teaspoon hot sauce (recommended: Frank's Red Hot)
Salt and freshly ground black pepper
4 piece of canadian bacon, diced
1/2 onion, chopped
1 cup grated sharp Cheddar
4 burger buns
Lettuce, tomato, pickles for garnish
Directions
Preheat grill to medium.

In a bowl combine beef, garlic, hot sauce, salt and pepper, to taste, being careful not to over mix. Form 8 even thin patties, about 1/2-inch thick and set aside. Saute onions in olive oil in skillet until tender, 5 minutes. Place onions and bacon in a bowl with cheese. Form a spoonful of bacon-cheese mixture into a ball, then place in the center of 4 patties. Top each with another patty and seal the edges. Grill burgers over medium-high heat, flipping once until desired doneness is reached, approximately 4 minutes each side for medium. Serve in buns with garnishes. Alternative: In a medium skillet over medium-high heat, sear the burgers 4 minutes on each side.


I am linking this to Tasty Tuesday's, Tuesday's at the Table and Tempt My Tummy Tuesday's.

One Year Ago...Basil Mojitos.

Tuesday, June 15, 2010

Red Wine Balsamic Grilled Chicken

I am always looking for new ways to grill chicken. A few weeks ago, I spotted this recipe over at Good Things Catered and bookmarked it for future grilling. Katie's recipe called for chicken breasts. I used skin on chicken thighs. This is a quick and easy recipe to put together. The balsamic vinegar and honey give the chicken a wonderful flavor.


Red Wine Balsamic Grilled Chicken

Ingredients:
4-5 boneless, skinless chicken breasts, about 3 lbs
(I used chicken thighs)
1/4 c. balsamic vinegar
1/4 c. red wine vinegar
1 Tbsp olive oil
1 Tbsp honey
Juice of 1/2 a sweet lemon (or orange)
1 clove garlic, minced
1 tsp dried mined onion
1 tsp kosher salt
1 tsp dried thyme
1/2 tsp cracked black pepper

Directions:
-Pound chicken breasts down to uniform thickness throughout (about 1-inch thickness throughout)
-Place in large, deep dish and top with remaining ingredients.
-With tongs, flip chicken and move around to coat evenly.
-Cover and place in fridge for at least 1 hour and up to overnight.
-When ready to cook, remove chicken from fridge and place on sideboard to remove chill while starting grill.
-Preheat gas grill on high for 10 full minutes.
-Clear grates, turn heat to medium-low and place chicken on grates n a diagonal.
-Cover and cook untouched until nice grill marks form, about 5 minutes.
-Flip and continue cooking until cooked through, about 10 minutes.
-Flip one more time, on opposite diagonal, 2 minutes before cooking is complete to obtain grill cross-marks, if desired.
-Remove from heat and let meat rest, covered, on cutting board for 3-5 mins before cutting and serving.

I am linking this to Tempt My Tummy Tuesday's, Tasty Tuesday's and Tuesday's at the Table.

Monday, May 17, 2010

Sesame Grilled Asparagus

You've probably noticed we eat a lot of asparagus at our house. Besides the warmer weather, it's one of my favorite things about Spring. My go to recipe for asparagus is either grilled or roasted in the oven. Either way it's so simple to prepare, just olive oil, salt and pepper. This Sesame Grilled Asparagus takes my go to recipe to the next level. The sesame oil and soy sauce are a wonderful compliment to an already delicious vegetable.


Sesame Grilled Asparagus

Recipe Courtesy of Steven Raichlen

Wooden toothpicks or bamboo skewers
1 pound asparagus
2 tablespoons dark sesame oil
1 tablespoon soy sauce
1 clove garlic, minced
2 tablespoons sesame seeds
Salt and black pepper
Directions
In a shallow pan, soak skewers in cold water for 1 hour, then drain and set aside.

Preheat grill to high. Snap off the woody bases of the asparagus and discard. Skewer 4 or 5 asparagus spears together, using the toothpicks or 2 bamboo skewers, forming a raft shape.

In a small bowl, combine the sesame oil, soy sauce, and garlic and stir with a fork to mix. Brush this mixture on the asparagus rafts on both sides. Season the asparagus with a little salt and lots of pepper.

When ready to cook, place the asparagus rafts on the hot grate and grill until nicely browned on both sides, 2 to 4 minutes. Sprinkle with the sesame seeds as they grill. You can serve the asparagus as rafts or unskewered.

I am linking this to I am linking this to Tempt My Tummy Tuesday at Blessed With Grace, Tuesday's at the Table at All the Small Stuff and Tasty Tuesday's at Balancing Beauty and Bedlam.

Tuesday, March 23, 2010

Grilled Pineapple

Finally the snow is gone and we can grill!! We love to grill veggies and fruits. Grilled pineapple is so pretty and tasty. It's simple to make and yummy to eat.

Grilled Pineapple

Slice the top and sides off of a whole pineapple. Slice the pineapple into 1 1/2 inch slices. You dont' want to slice it too thin or it will be hard to turn on the grill. Remove the core from the slices. If you have a small biscuit cutter, it works great for this.

Mix together 1/4 cup brown sugar and 1/4 cup honey. Combine to make a paste. Oil the grill. Grill pineapple, over medium heat, 2 minutes on both sides. Using a BBQ brush, spread the brown sugar mixture on the pineapple. Grill 2 additional minutes on each side.

Enjoy!


I am linking this to Tasty Tuesday at Balancing Beauty and Bedlam! If you haven't been to Balancing Beauty and Bedlam, it's worth your time to check it out!

Saturday, September 26, 2009

License To Grill Cookbook


This morning, dressed in a jacket and the wide brimmed gardening hat my son gave me for Christmas last year, I avoided the very large yellowjackets and successfully pruned the overgrown basil plant. The nights are going to start getting cooler next week and I know the days for fresh basil are numbered.

Little Bit of Everything's featured cookbook this week is License To Grill by Chris Schlesinger and John Willoughby. I believe I purchased this book when we had our lake house. We were in a grilling rut and I was always looking for new grilling recipes.

Basil - Garlic Chicken Breasts
1/2 cup roughly chopped fresh basil
1/4 cup olive oil
3 tablespoons minced garlic
4 whole boneless chicken breasts
In a small bowl, combine the basil, garlic and olive oil and mix well. Rub the chicken breasts with this mixutre. Sprinkle with sale and pepper. Grill over a medium fire, skin side down, until the skin is crispy 8 to 10 minutes. Turn the breasts over and grill for another 6 minutes. Grill until the chicken registers an internal tempeature of 170.
My notes on this recipe: I used both chicken breasts and thighs.


Friday, August 21, 2009

What's in a Name?

My husband's sisters name is Rosemary. Since rosemary seems to be the theme of many of my recipes of late, I wondered what Rosemary means. The name Rosemary comes from the Latin, word ros marinus meaning "dew of the sea". For centuries rosemary has been a symbol of friendship and rembrance, often used in wedding bouquets.

Our neighbors, Greg and Amy brought us the most scrumptious dinner on my second night home from the hospital. Greg said the chicken dish was nothing fancy but a dish that everyone really likes. I think it's fancy enough and he was so right, we loved it. When Tim returned the dishes, I asked him to ask for the recipe. The recipe from Canadian Living's Country Cooking magazine, Chicken with Rosemary and Lemon. The notes on the recipe describe it perfectly, "Although this recipe seems very simple, the combined flavors are sophisticated and intriguing".


Chicken with Rosemary and Lemon

6 chicken breasts
1/3 cup lemon juice
2 tablespoons fresh rosemary
2 tablespoons olive oil
2 tablespoons Dijon mustard
1/2 teaspoon each of salt and freshly ground pepper
1/2 teaspoon hot pepper sauce
1/4 teaspoon hot pepper flakes
2 cloves garlic, minced

Pat chicken dry. Place in a shallow glass bowl or plastic bag. I use a tupperware container I've had this container for years and it works so well for marinating. The design of the container allows you to turn it over to marinate all sides.

Whisk together all of the ingredients, pour over chicken, turning to coat all sides. Cover and marinate in the refrigerator for up to 24 hours.

Arrange chicken pieces on a foil lined baking sheet. Bake in a 375 degree oven for 35 to 40 minutes of until chicken is no longer pink inside. Alternatively, grill over medium heat until chicken is cooked to a temperature of 170 degrees.

Wednesday, July 1, 2009

Grilled Chicken with Cherry Sauce


I picked up a pint of cherries at the Farmers Market on Saturday. Not really enough for a pie or cobbler. I decided to try a cherry sauce for grilled chicken.

So these cherries have pits!! My kitchen is full of gadgets but not a cherry pitter. Normally when I see how you can take an ordinary item and make something else useful out of it, I always think what a great idea but never seem have a need for it. Who knew a paper clip would made a great cherry pitter?
This is my adaptation of several recipes for cherry sauce and cherry barbeque sauce. You could use this sauce on pork or even fish. It's slightly sweet with a little tang.


Cherry Sauce
1/3 cup apple juice
2 Tablespoons brown sugar
2 Tablespoons red wine vinegar
2 Tbs orange juice
¼ tsp grated orange rind
2¼ cups pitted quartered sweet cherries (about 1 pound)
2 tsp cornstarch
2 tsp water

Combine the first 5 ingredients in a saucepan and bring to a boil over medium heat. Boil 5 minutes, stirring occasionally. Stir in the cherries and bring to a boil over medium low heat. Cook 10 - 15 minutes, stirring often. Strain the mixture and return to the pan. Combine the cornstarch and water. Stir into the sauce and bring to a boil, stirring constantly for 5 minutes.

Brush on chicken breasts during the last few minutes of cooking. Watch carefully, since the sauce is sweet, it will burn easily.