Seems hard to believe but Little Bit of Everything is 4 years old this week. When I was younger I remember everyone telling me time was going to fly but I never thought it would be this fast! One of my favorite things about blogging is getting to know my fellow bloggers. Thanks to all of you stop by to check out my little corner of the world, your comments mean so much to me!!!
Although, we've been spared the terrible midwest weather these past couple of weeks, we do have snow on the ground. Here's a little glimpse into the beauty of winter From The Good Life!
When I was growing up, my Mom would make me eat hot cereal before going to school. I can't remember if it was only in the winter or all year long. There was oatmeal, Malt o Meal and Cream of Wheat. Does anyone eat Cream of Wheat these days? As near as I can remember, oatmeal was okay but the other two reminded me of something a prisoner would be served. Of course, I refused to eat it, then it would get cold and I still had to eat it. Just within the past few years, I've developed a love of all things oatmeal. Oatmeal is good for you and it's filling! It's the only thing I can eat for breakfast and not be famished by 11:00.
I pinned this recipe for Slow Cooker oatmeal a few months ago. The apples and peaches I had in freezer were the perfect addition. I've actually made this twice over the past few weeks. I added raisins one week and dried blueberries the other. This recipe is so versatile. You could use almost any fruit, nuts or some granola.
If you have kids, this recipe could be lifesaver in the morning. I saw the suggestion of using an ice cream scoop to make single servings, freeze them. When you're ready to eat them you just add milk and reheat.
Slow Cooker Overnight Oatmeal
Spray the slow cooker with cooking spray. Place 2 cups of apples (or the fruit of your choice) in the slow cooker, combine 1/3 cup brown sugar, 1T. cinnamon and sprinkle over the apples. Pour 2 cups of oatmeal and 4 cups of water on top. Do not stir. Cook 8 - 9 hours on low.
I am linking this to On The Menu Monday, Miz Helen's Full Plate Thursday and Foodie Friday!
Seems I am always slow in trying the recipes flooding the blogsphere! I didn't post cake pops till maybe two years after they were all the rage. I've seen versions of this Bubble Up Pizza for at least a year or so. I rarely make homemade pizza. Pizza for us is usually take out or the frozen ones from Trader Joe's. With a lot going on, I was looking for a simple recipe that didn't involve the slow cooker and saw this one in my Pinterest file.
Pizza is one of my favorite foods. It's one of those foods I would choose, if stranded on a dessert island! I am all about the crust, of course the part that's the worst for you. If you're a crust person, you'll love this pizza. Best of all, it's so easy to make and you can choose whatever toppings you like. I made a half recipe in a cast iron skillet. With a salad, this would be perfect for a family of four. As a blogger, I try a lot of new recipes but don't make very many of them more than once, this one is going into the regular rotation!!!
2 containers refrigerated biscuit dough, 6 biscuits each
1 jar pizza sauce
2 cups shredded mozzarella cheese, divided
1 cup pepperoni (or other favorite toppings) - I used Italian Sausage
5 fresh basil leaves - I didn't use the basil
Preparation: Preheat oven as per directions on
dough. With a sharp knife, divide each biscuit into 4. In a large bowl,
combine diced biscuit dough, sauce, 1 1/2 cups cheese and toppings. Stir
to combine.
Pour mixture into greased oven safe skillet or 9×13 baking pan.
Chiffonade the basil and sprinkle on top along with remaining cheese.
Bake according to directions on dough, checking to make sure dough is
cooked through and cheese is bubbling (I always bake mine for an
additional 5 minutes. Let cool 5 minutes before serving.
I am linking this to On The Menu Monday, Miz Helen's Full Plate Thursday and Foodie Friday!
I don't know about you but I can't believe it's Secret Recipe Club time again. Time has flown for me since the last SRC. We took a vacation to Mexico, moved my Dad's furniture from KC to Omaha another weekend and moved him into assisted living up here last weekend, all while implementing a new system at work. Needless to say, that's why I've been absent from blogging!
For those of you who don't know how SRC works, each month you're assigned a blog, you choose a recipe, keep it a secret until reveal day and then blog about it. I was assigned Satisfy My Sweet Tooth. I've been trying to choose savory recipes for SRC but with a blog assignment containing sweet in the title, it's hard to go for savory. Satisfy My Sweet Tooth features so many delicious recipes, it was difficult to choose just one to make. How many times have you heard someone say, "These are the best cookies?". With a title like that I couldn't resist.
Half of the recipe went to work with me for a coworkers birthday and the other half with Tim for his office. When I asked Tim what was his coworkers thought of them, he said everyone said these were "The Best Cookies". Guess we now know where the title came from.
Next time I make these, I want try a few more chocolate chips and a little less salt. These just seemed a little salty to me! Also, mine took more like 12 minutes to bake.
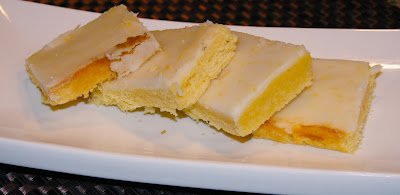
Lemonade reminds me of summer and on a cold winter day a few weeks ago I decided to give these Lemonade Brownies a try. They're easy to make and are made with dry lemonade mix. The recipe warns not to over bake them, despite the warning I think I baked them too long. I thought they were tart with a nice hint of sweetness, Tim thought they were too sweet. As with most of the sweet treats I make, I sent them to work with Tim and one of his co workers thought they were the best lemon bars she'd ever eaten.
Ingredients
Brownies
1/2 cup butter, room temperature
1/3 cup dry lemonade powder
1/4 cup granulated sugar
1 egg, plus 2 yolks
1 tsp vanilla
3/4 cup flour, plus 2 Tbsp
1/4 tsp baking powder
Glaze
1 cup powdered sugar
2-3 Tbsp prepared lemonade OR juice from one lemon (I used lemon juice)
approx 2-3 Tbsp
1 tsp lemon zest
How to Make
Preheat oven to 350°
Spray an 8x8 pan with cooking spray, set aside.
Cream butter, sugar and lemonade powder in mixer for about 2 minutes,until light and fluffy.
Add in egg and both yolks and vanilla. Continue mixing until incorporated.
Turn mixer to low and add in flour and baking powder. Stir until combined.
Spread batter into prepared pan.
Bake 15-20 minutes until edges begin to golden and center is JUST set. Do not over bake.
Remove from oven and cool on wire rack.
Glaze
Stir powdered sugar, lemonade or lemon juice and zest in a small bowl and pour over cooled brownies.
Let glaze set for at least an hour before cutting into squares.
After taking December off, I am happy to share this month's Secret Recipe Club post with you. For those of you who don't know Secret Recipe Club works like this, you're assigned a blog, you choose a recipe and keep it a secret till reveal day.
For the month of January, I was assigned The Bitchin' Kitchin'. My favorite part of SRC is browsing the blogs and trying to decide what recipe to choose. It's never an easy decision but I have vowed to try to always make a savory recipe since I never have ANY trouble finding new sweet recipes. We love all things basil at our house. During the summer, it is plentiful! We harvest springs for caprese salad, make mojitos or use in recipes. As the weather cools and we say goodbye to our basil plants, I often pick up a jar of Kirkland's pesto at Costco. It's every bit as good as homemade and easy to use in recipes.
When I saw Ellie's recipe for Basil Pesto Chicken, I decided it would be a wonderful reminder of summer, despite the snow covered ground. This is a tasty chicken dish! Easy to prepare and healthy for you too!
Basil Pesto Chicken
Recipe Courtesy of The Bitchin Kitchin slightly adapted from Kalyn's Kitchen
Salt, fresh ground black pepper, and cayenne pepper for seasoning chicken
Cooking spray
1/2 cup basil pesto
1/2 - 1 cup grated mozzarella cheese
1) Preheat
oven to 350 degrees F.
2) Trim the chicken so any visible fat and tendons are removed. Cut the
chicken breasts lengthwise into 2 or 3 pieces, depending on how thick
or thin you would like them.
3) Season the chicken with salt, pepper, and cayenne pepper as desired.
Don't use too much salt, as cheese will be added later on to the
chicken.
4) Spray a 9" x 12" (or 8.5" X 12.5") baking dish with non-stick spray, then
spread 1/4 cup basil pesto over the bottom of the dish.
5) Lay the chicken
strips over the pesto, then spread the remaining 1/4 cup basil pesto over the
chicken.
6) Cover the baking dish with aluminum foil and bake the chicken for 15-20
minutes, or just until chicken is barely firm and cooked through. (Don't
cook too much at this point, or the chicken will be overcooked by the
time the cheese is melted and browned.)
7) When the chicken is barely
cooked through, remove the foil and sprinkle the chicken with the grated
mozzarella cheese. Put dish back into the oven without foil and cook 5
minutes more, just until the cheese is melted. Serve hot.
I am a 50 something midwesterner. I love to cook, travel and garden. I collect spoons, a collection started by my mother. My blog is a creative journey through my cookbook collection (over 100), my clippings, newly found recipes and baking groups. I would love to hear from you. I love receiving comments on my blog! My e-mail is lakegirlatheart@hotmail.com.