Thursday, June 3, 2010

In My Garden

We had our first real Springtime storm last night. While tornado warnings were sounding in the surrounding counties, we had 50 mile per hour winds, pea size hail and sheets of rain. Have you ever seen rain coming down in sheets? It goes sideways across your lawn. Some of my flowers look a little torn and tattered but all in all everything looks pretty good.


We planted this Japanese Lilac four years ago . This is the first year it has bloomed!


I think my lettuce is almost ready to pick. What do you think?


Last summer my husband planted this yarrow plant. I thought it looked somewhat like a weed. It's much prettier this year.


One of my favorite plants in the garden is lavender. I love the beautiful purple color and amazing fragrance.

Tuesday, June 1, 2010

Spicy Brussels Sprouts

How do you record your thoughts, ideas and potential recipes to blog about? I have a notebook I carry with me. When I have a thought or hear about a recipe I want to make, I jot it down. Quite some time ago, I made a note to make David Chang's Brussels Sprouts recipe. Last weekend, as I was sorting my stack of recipe clippings, I found the recipe from November 2009's Food & Wine.

I halved the brussels sprouts, coated them in olive oil and kosher salt and roasted them in a 400 degree oven for about 20 minutes. I didn't have any fish sauce, so I substituted chicken broth. To prevent this recipe from being too spicy, I omitted the red chili. I love the idea of rice krispies being the topping for the brussels sprouts. Having your oil just the right temperature is they key to browning and not burning the rice krispies. Mine was a little too hot and we raced to turn off the alarm so the smoke detector didn't set it off. Seems I do that a lot in my kitchen. I also learned to be really cautious when pouring the cayenne pepper into the already smoking oil. That's one way to clean out your sinuses.

I really enjoyed the sweet and salty flavors of this recipe. Tim said he liked them but preferred this recipe.

I am linking this to Tasty Tuesday's at Balancing Beauty and Bedlam.


Monday, May 31, 2010

Chocolate Blini's - CWF

In my quest to try and use the ingredients I have in the house, I wanted to figure out what to substitute for the hazelnut flour. I was searching the internet for substitutions when I had one of those aha moments. There were hazelnuts in with the mixed nuts we had in cabinet. After shelling the hazelnuts, you blanch them. To me blanching has always been in a pan of water. I read you could do it that way but it seemed the recommended way was to bake them in a 325 degree oven for up to 25 minutes. Keep an eye on them, so they don't burn. Remove them from the oven, wrap them in a towel for 5 minutes and then use the towel to rub off the skin. It was really easy and so much less expensive than buying shelled hazelnuts or hazelnut flour.

I was thinking blini's were like crepes or blinzes but they're more like pancakes, only a little smaller. I was excited about making this recipe. The topping possibilites are endless! Also, it looks easy enough maybe this one will be a success? I haven't had the best luck with some of Chef Payard's recipes.

I halved the recipe and ended up with at least 10 blini's. The recipe says you may need to flatten the batter with the back of a spoon after you put it in the pan. Not my batter. My blini's were flat on their own. Something about me and folding in egg whites, I can never seem to keep their height. The instructions were to cook these on low. I turned them up a little because I didn't feel like they were getting done. Other than not being as puffy as pancakes, this recipe turned out great. I topped mine with nutella and sliced strawberries. YUM!!


This delicious recipe was chosen by Linda at Diva Weigh. You can find the links to all of the other Chocolate With Francois bakers here! I can't wait to see what everyone did with their blini's.

Sunday, May 30, 2010

No SMS - The Last Kid on the Block - Cake Pops

This week's SMS is Coconut Custard Pie chosen by Ruby of I Dream of Baking. Sorry Ruby, I am skipping this one. We're celebrating Memorial Day weekend at the lake with our friends Karen Larry. Instead am sharing my cake pops with you.

Okay I feel really old writing this and you’re going to think I am really old when you read this. I am not exactly sure how old I was but I remember all of my friends families were getting color television's for the first time. See I told you you’d think I am really old! I’d go to their houses and they’d have the new shiny, GIANT console color TV. I was so envious. I’d go home and say dad everyone’s getting a color tv but us. Funny, my father is conservative in spending money on some things, like color tv’s. Other things not so much, at 91 years old he still talks about wanting a new Buick. I was the last kid on block with a color tv but my dad always had that shiny new car.

About now you might be asking, what does this have to do with Cake Pops? I’ve had Cake Pops bookmarked since I started blogging and have never gotten around to making them. Thanks to Bakerella, cake pops are everywhere on the blogsphere. I feel like the last kid on the block or in the blogsphere to blog about cake pops.

If you’ve been following my blog the past few weeks, you know I am taking cake decorating classes. Three of the four weeks of class we baked and decorated a cake. Before decorating, you slice off the rounded top of the cake to make it flat and level. What to do with those cake tops? You can’t throw away the perfectly good cake top. It makes a cute cake top cake. I froze the tops from the other two weeks in anticipation of finally making cake pops.

I took the easy way out on this batch and used canned frosting. I think next time, I will make homemade for an even more delicious flavor. I am taking cake decorating classes at Michael’s. I took advantage of the coupon and bought Wilton chocolates for melting. Since this chocolate already had little colored sprinkles in it, I skipped the decorating.

Cake pop’s are easy and fun to put together. The only challenge is getting the cake to stay on the stick while dipping the chocolate. I ended up dipping my sticks in chocolate, putting them in the cake ball and refrigerating for an hour or so before dipping. It seemed to help, although I still had a few casualties. My family and coworkers loved these. I am looking forward to making them again. There's so many fun possibilities.


Cake Pops
Recipe adapted from Bakerlla
1 13X9 baked cake (box cake mix or from scratch … any flavor)
1 can cream cheese frosting
1 package dark chocolate melts
1 package colored or white melts
wax paper
lollipop sticks
sprinkles or something similar for top of cake pop
Styrofoam block (Very important!)

Bake your cake and let it cool completely. Take your cake and place it in a large bowl and crumble into the finest pieces possible (This is very, very important).
Mix in the frosting. Put in the refrigerator for about an hour or the freezer for about 20 minutes. (This helps a lot with the consistency) Roll into balls of your desired size - usually about 1" balls work best. Melt your chocolate and stir it well. I added a little parfin. I always add this to my Peanut Butter Balls. It gives them a nice sheen and the chocolate dries nicely. Add your decorations to the cake pop while the chocolate is still wet. Place into a styrofoam block to let dry. Enjoy!!!

Saturday, May 29, 2010

Happy Birthday Pink Saturday!

Pink Saturday is celebrating it's second year today!! Pink Saturday is a wonderful group of bloggers who every Saturday celebrate all things PINK!!

In honor of it's second birthday, Pink Saturday is featured in the current issue of Artful Blogging. There have been as many as 800 different bloggers participating in Pink Saturday! Amazing!!!

Thanks to Beverly of How Sweet the Sound, the founder and talented hostess of Pink Saturday.

This is the cake from my last class of Wilton Cake Decorating Course 2. Happy Birthday Pink Saturday!


One Year Ago Strawberry Rhubarb Crisp.

Thursday, May 27, 2010

Spring Vegetables Stir Fry

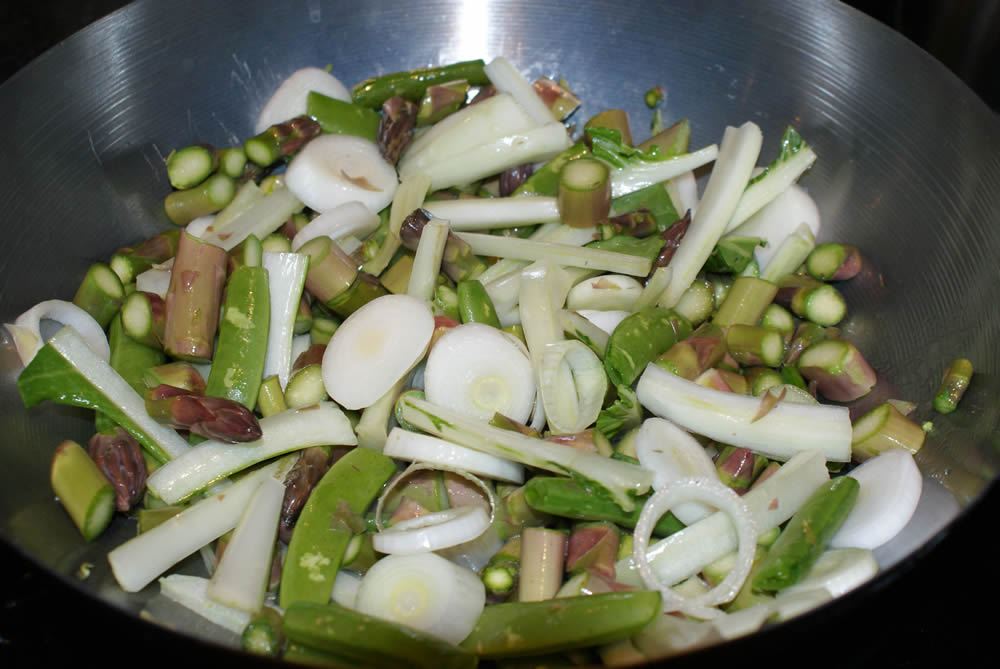
I wish I lived somewhere we could enjoy the flavors of garden fresh vegetables all year long. Of course you can get some of these all year in the grocery store but sometimes they're so expensive and not so tasty. I'd picked up bok choy and asparagus at the farmer's market and was searching for bok choy and asaparagus recipes. I found Emeril's recipe for Aspargus and Bok Choy Stir Fry. His recipe is a full meal, I adapted it to be a side and added onions and peas. This recipe is fabulous. The mirin adds a nice slightly sweet flavor to the sauce.


Spring Vegetable Stir Fry

Loosely adapted from Emeril Lagasse

1/4 cup chicken stock
2 tablespoons mirin
1 teaspoon honey
1 1/2 teaspoons cornstarch
1/4 teaspoon salt
1 tablespoon sesame oil
1/2 pound baby bok choy, trimmed and julienned
1/2 pound asparagus, trimmed and cut into 1-inch pieces
4 small Spring onions, sliced
1/4 pound of snow peas

Directions
In a small bowl, combine the chicken stock, mirin, honey, cornstarch and salt, and stir until smooth. Set aside. Place a wok over medium heat. Add the sesame oil and when hot, add the vegetables and stir-fry until crisp-tender, about 2 - 3 minutes. Add the stock mixture to the vegetables and stir to coat.

Cook, stirring, until the vegetables have absorbed most of the sauce and are moist and tender, 3 to 5 minutes.

Wednesday, May 26, 2010

In My Garden


I love this time of year. Everything is starting to bloom. Last Spring while staying at the Sonoma Mission Inn, both Tim and I fell in love with their snake grass around the pool. We asked our landscaper friend Lynn where to find it. He suggested the Elkhorn River bottoms. One Sunday, Tim and Mike went in search of snake grass. We'd heard it was notorious for spreading, so we decided against planting it in the ground. During the wet periods of the summer, it grew well. As the summer grew hotter and dryer, it began to dry up and wilt. At the end of the summer, Tim put the pot in our outside storage area. The snake grass spent our long, cold winter outside. This Spring, as the plants began to sprout, so did our snake grass.

More pictures from our garden...


One Year Ago Sunday Morning Frittata.