Showing posts with label Tuesday's at the Table. Show all posts

Tuesday, July 5, 2011

Graduation Candy Pops

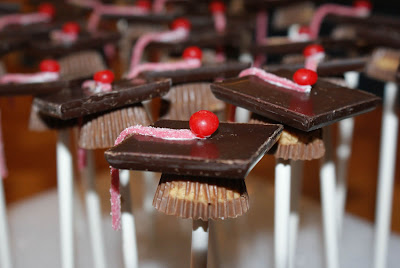
A few weeks ago I was looking to make something fun for Mike's graduation party! I found this recipe for graduation pops on Bakerella's blog. When Mike saw them, he said "crafty"! We all laughed about the different meanings of "crafty". In this case, I am hoping he meant that in a good way.

You'll find the assembly instructions here! I used red hots for the tops and Ghirardelli chocolate squares for the mortarboards. These were easy to make. The most challenging part was finding all of the ingredients.


I am linking this to Tuesday's at the Table, Tasty Tuesday's and Tempt My Tummy Tuesdays!

Tuesday, June 28, 2011

Crock Pot Chocolate Cake

If you follow my blog you know I use my Slow Cooker a lot. Nothing's better than coming home after work and having dinner ready to go. As you continue to use your slow cooker you learn some dishes are more suited to the slow cooker than others.

Until recently, I had never used my slow cooker for a dessert. A few weeks ago during one of our first camping trips, I tried this Apple Crisp. Wow, dessert does work in the slow cookert!! After my first success, I found this recipe for Crock Pot Chocolate Cake. I never would have thought a chocolate cake would bake in the slow cooker but it does. Don't expect the same texture as a cake baked in the oven. The texture of a slow cooker cake is more like a flourless chocolate or pudding cake. A trick I learned when I made the Apple Crisp is to take a towel or a few paper towels and put them under the lid. You'll find this absorbs the steam and moisture and helps the desserts to bake. If you're a camper, like I am or if you don't want to heat up your oven this summer, give this cake recipe a try!


Crockpot Chocolate Cake
  • 1 pkg. two layer chocolate cake mix
  • 3 oz. pkg. instant chocolate pudding mix
  • 4 eggs
  • 1 cup water
  • 2 cups sour cream
  • 3/4 cup vegetable oil
  • 3/4 cup semisweet chocolate chips
  • 1/4 cup milk chocolate chips

Preparation:

Spray a 4 quart crockpot with non-stick cooking spray and set aside. In a large bowl, combine the cake mix and pudding mix. In a medium bowl, beat the eggs with the water, then add the sour cream and oil and beat until smooth. Add to the dry ingredients and beat well. Stir in the chocolate chips.

Pour into crockpot. Cover slow cooker and cook on low for 6-8 hours, until top springs back when touched very lightly with finger. 8-10 servings

I am linking this to Tasty Tuesday's, Tempt My Tummy Tuesday and Tuesday's at the Table.

Tuesday, May 17, 2011

Hamburger Casserole - Revisited

Do you cook as much in the summertime? Although it's not summertime here yet, we've been so busy. Between enjoying the new camper, working in the yard and graduation, there's just not enough hours in the day. Not a lot of recipes to blog about. There's been a lot of pasta, burgers or brats on the grill, leftovers and pizza. The end result? Not many recipes in my drafts folder. Therefore, I am going to share another recipe from my early days of blogging.

My Dad is very much a meat and potatoes man and those two better not be mixed together. Except for this dish! This is the only casserole I can ever remember my Dad eating.


Hamburger Casserole
Into a well buttered casserole dish, place layers in order . Season each layer with salt and pepper.
2 -3 medium potatoes, sliced
2 -3 carrots, sliced
Can of peas (drained, saving liquid)
1 onion, sliced
1 stalk of celery, sliced
Over top of vegetables, placed 1 pound of ground beef, browned and drained.
Combine liquid from peas with can of tomato soup and pour over the top of ground beef.
Cover. Bake at 325 for 2 hours.

I am linking this to Tempt My Tummy Tuesday, Tasty Tuesday's, Tuesday's at the Table, Tuesday Night Supper Club.

Tuesday, February 8, 2011

Cream Cheese Enchiladas

If you purchase those rotisserie chickens at the store or roast your own chicken, this recipe is the perfect one for the leftover chicken. The flavors in this one are delicious. It's quick and easy to put together. I halved the recipe, it made the just the right amount for dinner, with leftovers for our lunches. I made the recipe as written but did bake it at 350 for 20 minutes covered and 10 minutes uncovered, to melt the cheeses.


Enchiladas De Pollo (Cream Cheese and Chicken Enchiladas)
Makes 20-24 enchiladas
Recipe from Paula Deen Courtesy of Tomatoes on the Vine

Ingredients:
4 large chicken breasts, roasted or boiled, skin and bones removed, meat shredded
One 8-ounce package cream cheese, at room temperature
One 10.75-ounce can condensed cream of chicken soup
Two 4-ounce cans diced green chilies, with juice
6 green onions, chopped, including green tops
20-24 four tortillas (7-inch diameter)
Two 10-ounce cans enchilada sauce
2 cups (1/2 pound) grated Monterey Jack cheese
4 cups (1 pound) grated sharp cheddar cheese
Sour cream, for garnish
Shredded lettuce, for garnish
Diced tomatoes, for garnish
Salsa, store-bought or homemade, for garnish

Directions:
1. Preheat the oven to 250 Degrees F. Spray two 13 by 9-inch casserole dishes with vegetable oil cooking spray.

2. Combine the chicken, cream cheese, soup, chilies, and green onions. Spoon 2 tablespoons of this mixture onto each tortilla and roll up.

3. Pour a very small amount of the enchilada sauce on the bottom of each casserole dish and tilt the dish so that the sauce covers the bottom. Place the enchiladas side by side on top of the sauce. When all of the enchiladas have been rolled and placed in the dishes, take the remaining enchilada sauce and pour it over the top of the enchiladas. Combine the Monterey Jack and Cheddar cheeses and sprinkle evenly over the casseroles.

4. Cover the dishes with foil and bake for 30 minutes. Uncover and bake for 10 more minutes. To serve, cut between the enchiladas and serve from the dish. Have bowls of sour cream, shredded lettuce, diced tomatoes, and salsa, for garnish.

I am linking this to Tasty Tuesday's and Tuesday's at the Table.

Tuesday, January 18, 2011

Pot Roast Carbonnade

Are you ready for a perfect winter recipe that isn't soup. Who's your favorite Next Food Network Star winner? Mine is Melissa d'Arabian. Although, I question how she can make some of these dinners for ten dollars, I love the her show Ten Dollar Dinners. I saved this recipe after watching her prepare this dish on an episode last winter.

I made a couple of minor changes to the recipe. I omitted the prunes, mainly because I didn't have any. I added potatoes, so as to have a complete meal when I took it out of the oven. If you have an afternoon to devote to making a fabulous dish, give this one a try, you won't be sorry.


Pot Roast Carbonnade
Recipe courtesy of Melissa d'Arabian Ten Dollar Dinners

1/2 pound slab bacon, cut into large lardons
2 medium onions, sliced
salt and freshly ground black pepper
1 tablespoon vegetable oil
1 1/2 pounds beef chuck, cut into large cubes
5 carrots, peeled and cut into large chunks
Generous tablespoon all-purpose flour
12 ounces beer (dark or light, depending on your preference)
6 prunes
1 tablespoon dried thyme
1 cup beef stock

Directions
Preheat the oven to 325 degrees F.
In a large Dutch oven over medium-low heat, add the bacon and cook until it renders its fat and almost becomes crispy. Remove it with a slotted spoon to a plate. Add the onions, season with salt and pepper, to taste, and cook over low heat until they are deep in color and caramelized, about 30 minutes.

Remove the onions to a plate, leaving as much fat in the pot as possible. Add the vegetable oil and mix it with the bacon fat. Raise the heat to high. Season the beef liberally with salt and pepper and sear, in batches, until nicely browned on both sides.

Once the meat is browned, add the first batch of meat back to the pan along with the onions, carrots and bacon. Sprinkle in the flour and stir. Cook for 1 minute before deglazing the pan with the beer. Add the remaining ingredients and bring the mixture to a simmer. Cover the pot and put it in the oven to braise until the beef is tender, about 2 hours. Remove the pot from the oven and transfer the pot roast to a serving dish.

I am linking this to Tasty Tuesday's, Tempt My Tummy Tuesday and Tuesday's at the Table.

Tuesday, January 11, 2011

Crock Pot Taco Soup

Is it soup weather where you live? Much of the country is in the midst of winter weather! We've been lucky so far this winter. Just yesterday in Omaha we received our first major snowfall of the season in the form of about 8 inches of snow. How much snow do you have on the ground?

When it's cold and snowy, there's nothing better than a warm bowl of soup. If you like tacos, give this one a try. It's a delicious hearty soup that can be made without without the meat!


2 cans of kindey beans
--2 cans of pinto beans
--2 cans of corn
--1 large can of diced tomatoes
--1 can tomatoes and chiles
--1 packet taco seasoning
--1 packet ranch dressing mix
--1 lb browned ground turkey or hamburger (optional.)
--shredded cheese and sour cream for embelishment
The Directions:
--brown meat if you are going to use it
--drain fat and add to crockpot stoneware insert (the meat. not the fat.)
--sprinkle seasoning packets on top of meat
--drain and rinse the beans and add
--add the ENTIRE contents of the corn and tomato cans
--stir.

Cover and cook on low for 8-10 hours or on high for 4-5. I think the longer you cook soup, the better, so if you have the time, opt for cooking on low. Stir well, and serve with a handful of shredded cheese and a dollop of sour cream

I am linking this to Tasty Tuesday's and Tuesday's at the Table.

Tuesday, January 4, 2011

Peppermint Whoopie Pies

If you have a Trader Joe's in your area, did you have the Candy Cane Joe Joe's cookies this holiday season? If so, you know how delicious they are. These cookies were my inspiration for Christmas Eve dessert, Peppermint Whoopie Pies. When I shared with people I'd be making Whoppie Pies, most people didn't know what Whoopie Pies were. They'd say are they like Moon Pies? Funny after I decided to make them, I received my Bon Appetit with an article discussing whether Whoopie Pies or Macarons are the new cupcake. My vote would be for Whoopie Pies, Bon Apetite chose Macarons.

These were were fun and easy to put together. I used a medium cookie scoop and it worked perfectly. Although, mine weren't all a unfiform size. These are like little cake tops filled with delicious marshmallow frosting. If you haven't tried Whoopie Pies yet and are looking for a new dessert, give these a try.


Peppermint Crunch Whoopie Pies
Recipe Courtesy of Paula Deen
Prep. Time: 45 minutes
Cook time: 12 minutes/batch of cookies
Level: Intermediate
Yield: 18-21 large whoopie pies or 33-38 medium

For Cookies
Ingredients:
3 cups sugar
1 cup unsalted butter, softened
4 large eggs, room temperature
½ cup vegetable oil
1 tablespoon vanilla
6.5 cups all-purpose flour
2 cups unsweetened cocoa powder
1 ½ tablespoon baking soda
1 teaspoon baking powder
1 teaspoon salt
3 cups milk

Directions:
Preheat oven to 350 degrees. Line two half-sheet pans with Silpats or lightly grease.

In a large (at least 5 quart) bowl of stand mixer, cream sugar and butter with paddle attachment for 3-5 minutes. Add eggs, beating well after each. Add vegetable oil and vanilla and beat.

In a large separate bowl, sift dry ingredients together.

With mixer on very low speed, gradually add half of the dry ingredients to the egg mixture. Blend well. With mixer running on low, add 1 1/2 cups of the milk. Mix until blended. Repeat with remaining dry ingredients and milk.

Using a standard 1/4-cup ice cream scoop, place batter on baking sheets, spacing 2-3” apart. Bake 12 minutes, rotating pans (move lower pan to top level and top level to lower level) after the first 6 minutes. Remove cookies from oven and transfer to cooling racks. Repeat with remaining batter. Don’t worry if some are a little cracked on the top – that’s normal! Cool completely prior to filling.

For Filling
Ingredients:
1 1/2 cups butter
1 1/2cups vegetable shortening
9 cups confectioners’ sugar
4 cups marshmallow creme
4 tablespoons milk
1 teaspoon peppermint extract
½ teaspoon salt
1 lb hard peppermint candies

Combine first 7 ingredients in large bowl of mixer and beat until fluffy with paddle attachment.

Place peppermints in heavy plastic bag and crush with hammer or flat side of meat tenderizer. Sift crushed mints through fine sieve to separate dust from bits of candy. Fold ½ of candy bits plus “dust” into the filling. Reserve other half of candy pieces for garnish.

ASSEMBLY: Place a scoop of filling on the flat side of one cookie. Place another cookie, flat side down on top, pressing down gently. Roll edges of icing in remaining crushed peppermints.

I am linking this to Tasty Tuesday's, Tempt My Tummy Tuesday and Tuesday's at The Table.
Tuesday, November 2, 2010

Brrr-ownies

Brownies are like chocolate chip cookies, there are a zillion recipes out there. Do you have a favorite recipe you always make? Or are you like me and you keep trying new recipes? I first saw this recipe on my friend Susan's blog. I bookmarked it and bought the mints immediately. Then what do I do? I forget about them. I was looking for toffee chips and burried in the basket were the mints. These are my favorite kind of brownie, gooey, chocolately with the addition of the flavor of mint.

The gooeyness of these made it hard to cut them into nice squares. I wonder if chilling them would have helped? Regardless they were delicious. This recipe goes in the make again soon file!!


Brrr-ownies (found on page 103 of Baking from My Home to Yours by Dorie Greenspan).
5 Tablespoons unsalted butter cut into 5 pieces
3 ounces bittersweet chocolate, coarsely chopped
3 ounces unsweetened chocolate, coarsely chopped
2/3 cup sugar
2 large eggs
1 teaspoon pure vanilla extract
pinch of salt
1/3 cup all purpose flour
1 cup (6 ozs) York Peppermint Pattie Bites (or equal weight of patties) chopped into bits
Getting Ready: Center a rack in the oven and preheat the oven to 325 degrees F. Line an 8 inch square baking pan with foil. Butter the foil and place the pan on a baking sheet.
Set a heatproof bowl over a saucepan of simmering water. Put the butter in the bowl, top with chopped chocolates and stir occasionally until the ingredients are just melted - you don't want then to get so hot that the butter separates. Remove the bowl from the pan of water.
With a whisk, stir in the sugar. Don't be concerned when your smooth mixture turns grainy. Whisk in the eggs one at a time. Add the vanilla and whisk vigorously to bring the batter together and give it a shine before gently stirring in the salt and flour; stir only until incorporated. Switch to a rubber spatula and fold in the peppermint pieces. Scrape the batter into the pan and smooth the top with the rubber spatula.
Bake the brownies for 30 to 33 minutes, or until the top is dull and a thin knife inserted into the center comes out almost clean. (The tip of the knife may be a touch streaky) Transfer the pan to a rack and cool to room temperature.
When they are completely cool, turn out onto a rack, peel away the foil and invert onto a cutting board. Cut into 16 2 inch squares.

Tuesday, October 26, 2010

Beer Can Chicken

How do you prepare a whole chicken? In the winter, there’s nothing better than the smell of a chicken roasting in the oven. In summer, I don’t want to have the oven on 400 for over an hour to roast a chicken. My kitchen is warm enough in the summer without turning on the oven. Our go to recipe for whole chicken in the summer is Beer Can Chicken. There are so many possibilities, different types of beer, spices or a rub can give the chicken it’s own flair. On this particular night, we used an IPA from a local brewery that we love, Lucky Bucket. We used the cajun rub our friends Rat and Julie from New Orleans sent us for Christmas last year. The flavors were delicious and the chicken was so moist. The secret to a moist chicken is to let it rest before carving!


Beer Can Chicken
1 (4-pound) whole chicken
2 tablespoons olive oil
2 tablespoons salt
1 teaspoon black pepper
3 tablespoons of your favorite dry spice rub
1 can beer
Directions
Remove neck and giblets from chicken and discard. Rinse chicken inside and out, and pat dry with paper towels. Rub chicken lightly with oil then rub inside and out with salt, pepper and dry rub. Set aside.

Open beer can and take several gulps (make them big gulps so that the can is half full). Place beer can on a solid surface. Grabbing a chicken leg in each hand, plunk the bird cavity over the beer can. Transfer the bird-on-a-can to your grill and place in the center of the grate, balancing the bird on its 2 legs and the can like a tripod.

Cook the chicken over medium-high, indirect heat (i.e. no coals or burners on directly under the bird), with the grill cover on, for approximately 1 1/4 hours or until the internal temperature registers 165 degrees F in the breast area and 180 degrees F in the thigh, or until the thigh juice runs clear when stabbed with a sharp knife. Remove from grill and let rest for 10 minutes before carving.

I am linking this to Tempt My Tummy Tuesday's, Tasty Tuesday's and Tuesday's at the Table.

Tuesday, October 19, 2010

Butternut Squash and Sausage Bake

Winter squash is so versatile. A couple of weeks ago while camping, we roasted acorn squash in the campfire. So easy, I sliced it in half, added a pat of butter, salt, pepper and a big drizzle of honey to the middle. I wrapped them in three layers of foil and roasted them in the campfire for about an hour. They were so delicious. No pictures, we were eating by the light of a camping lantern.

I've never made a casserole with squash but when I saw this recipe on Serious Eats, I thought it sounded interesting. It takes a while to prepare but is so worth it.

Since it's just the two of us, I decided to make a half recipe. As with many recipes, this one didn't come out quite right cut in half. I made some adjustments along the way. I used 1 large onion. When I make it again, I will use two. I used more Italian Sausage than the recipe called for, about 3/4 pound. My butternut squash wasn't huge, so I ended up using all of it.

The recipe called for a step I've never seen before, simmering the broth with the pulp and seeds from the squash. Interesting? I am sure it's to infuse the flavor of the squash into the broth. Make sure to give this recipe the full baking time. I pulled it out a little early and a few pieces of squash weren't quite done.

One word for this recipe, FANTASTIC!! This would also make a great stuffing.


Butternut Squash and Sausage Casserole
Recipe Courtesy of Serious Eats
1/4 pound Italian sausage
1/4 cup olive oil, divided
3 onions, quartered and sliced
5 thyme sprigs
2 teaspoons dried sage
salt and pepper
1 small butternut squash, peeled and chopped into 1/2 cubes, (about 6 cups) seeds and scrapings reserved
1/4 cup flour
1/2 cup shredded smoked mozzarella
3/4 cup chicken stock
3 slices white sandwich bread, cut into cubes
2 tablespoons melted butter, optional, plus a little extra to prepare baking dish
Procedures
1
Preheat oven to 350 degrees Fahrenheit. Butter a 9-by-12 inch baking dish.
2
Remove sausage from its casing and cook in a large skillet over medium heat until just browning, breaking up sausage with a wooden spoon as it cooks. Remove cooked sausage and refrigerate until ready to use.
3
Add enough olive oil to the rendered fat in the skillet to equal two tablespoons, and then add the onions, thyme and sage. Season liberally with salt and pepper. Cook over medium heat for 20 minutes, stirring occasionally, scraping the bottom of the skillet to loosen brown bits. When onions are thoroughly soft, remove and set aside.
4
While the onions cook, simmer the squash seeds and scrapings in the chicken stock for 10 minutes, strain and keep the stock warm over low heat.
5
Add the remaining two tablespoons of olive oil to the skillet. Toss the squash with the flour and arrange in a single layer in the skillet. (If the skillet isn't big enough, you'll need to do this in two batches.) Let the squash brown, undisturbed, for 4 minutes then stir the squash as it cooks for the next 4 minutes. Season liberally with salt and pepper and set aside.
6
To assemble the casserole, layer the onions in the buttered baking dish. Dot the onions with the sausage bits evenly, and then top with the squash. Sprinkle the smoked mozzarella over the top, and the pour the stock into the baking dish. Press the top of the casserole with a spatula to evenly distribute the liquid. Cover tightly with aluminum foil and bake for 30 minutes.
7
While the casserole bakes, pulse the bread crumbs with the melted butter (if using) in a food processor until you have coarse bread crumbs.
8
After 30 minutes, pull the baking dish out of the oven, remove the foil, top casserole evenly with breadcrumbs and bake uncovered an additional 20 to 30 minutes, until the liquid is absorbed and the top is nicely browned.

I am linking this to Tuesday's at the Table, Tasty Tuesday's and Tempt My Tummy Tuesday.

Tuesday, October 12, 2010

Pasta with Bacon, Brussels Sprouts

I love pasta! I could eat it every night. There are so many combinations and possibilities; I think you could go years without ever preparing the same recipe. I’ve been trying to use more whole grain pasta and make recipes that have vegetables. At least that way it’s sort of good for you. If you’re a brussels sprouts fan, you know they are so good prepared with bacon. I had brussels sprouts that needed to be used up and a couple of slices of leftover bacon, so I decided to see if I could find a recipe to use them up. I wish I was better at just creating a recipe myself!! The flavors in this recipe are so clean and crisp. The sage and the brussels sprouts are delicious together!


Pasta With Brussels Sprouts and Bacon
Courtesy of Martha Stewart Living
6 ounces bacon (about 7 slices), cut into 3/4-inch pieces
Up to 1/4 cup extra-virgin olive oil
2 large garlic cloves, minced
4 large shallots, cut into thin rounds
1 1/4 pounds brussels sprouts, trimmed and halved (quartered if large)
1 1/4 cups homemade or low-sodium store-bought chicken stock
Coarse salt and freshly ground pepper
12 ounces rigatoni pasta
1/2 cup freshly grated Parmesan cheese, plus more for serving
1/3 cup coarsely chopped fresh sage leaves, about 20 leaves
Directions
1.Heat a dry large skillet over medium heat. Add bacon; cook, stirring occasionally, until crisp, 5 to 7 minutes. Using a slotted spoon, transfer to a paper-towel-lined plate to drain. Add enough oil to bacon fat in skillet to total 2 tablespoons. Add garlic, shallots, and sprouts; cook, stirring occasionally, until pale golden, about 3 minutes. Add stock; season with salt and pepper. Cook until most of the liquid has been absorbed and sprouts are tender, 10 to 12 minutes.
2.Meanwhile, bring a large pot of water to a boil; add 1 tablespoon salt and the pasta. Cook according to package directions until al dente. Drain, reserving 1/2 cup cooking liquid; return pasta to pot.
3.Stir in sprouts mixture, reserved 1/2 cup cooking liquid, and cheese. Drizzle with 2 tablespoons oil; add sage and bacon. Toss until combined. Serve with more cheese.

I am linking this to Tasty Tuesday's and Tuesday's at the Table.

Tuesday, September 21, 2010

Pacific Rim Chicken

Do you participate in the Tuesday blog party, Tempt My Tummy Tuesday's? If you don't, you should check it out. Not only is it a great way to showcase your blog, you can find all sorts of great recipes to try!

A couple of weeks ago Lisa posted a recipe for Pacific Rim Chicken. The flavors in this recipe are some of my favorites and as a bonus this recipe goes in the crock pot. I've mentioned before the crock pot is my friend. Especially on a Monday or any other day when I know I may not feel like cooking after work.

I prepared this recipe with chicken thighs. Until recently, I never cared much for chicken thighs. Besides their nice flavor, they're so reasonably priced. I just bought a large package at Costco for .99 cents a pound. Seriously, it doesn't get any better than that!!!

I served this with brown rice. One of the challenges with brown rice is the cooking time. I've read recently if you soak brown rice prior to cooking, it cooks much faster. After soaking mine for four hours, it cooked in about 25 minutes in the rice cooker.


Pacific Rim Chicken

1- large onion, finely chopped
1-large green bell pepper, chopped
4-5 large chicken breast halves, skin and fat removed (about 3 1/2 lbs)
1- 8oz can crushed pineapple, including juice
3/4 cup chicken broth
1/4 cup dry sherry (I used Mirin)
2 Tbsp soy sauce
1 Tbsp packed light brown sugar
2 tsp rice vinegar
1/2 tsp ground ginger
1/2 tsp salt (optional)
1/4 tsp black pepper
1 1/3 cup long-grain white rice, cooked according to package directions (I used brown rice)

In large crock pot, combine onion and green pepper. Arrange chicken over vegetables. In medium bowl, combine pineapple and juice, broth, sherry, soy sauce, brown sugar, vinegar, ginger, salt, if desired, and black pepper. Stir to mix. Pour over chicken.

Cover and cook on high 1 hour. Reduce heat to low, stir chicken into sauce, and cook an additional 5-6 hours or until chicken is done.

Remove and reserve chicken in medium bowl. Transfer liquid and vegetables to saucepan. Quickly boil down sauce, stirring frequently, to thicken slightly. Meanwhile, slice chicken meat. Arrange rice on serving platter. Arrange chicken slices over rice. Pour sauce over all.

Tuesday, September 14, 2010

Cheese Tasting 101

Tim gave me a cheese board for my birthday this year. Having grown up eating ColbyJack and Gouda, I want to learn more about cheeses. I decided to check out the cheese selection at Whole Foods. Don't you just love that store? The cheese monger was so helpful. I knew I wanted a soft, hard and goat cheese. A lot of articles say to include a blue cheese but I knew most of my guests didn't like blue cheese. After some discussion and several suggestions, we settled on Appenzeller for the soft, Parrano for the hard and Humbolt Fog as the Goat Cheese.

What should you serve with your cheese? In addition to the baquette, we had grapes, nuts and if you chose a drizzle of honey. What else do you need to know? Be sure to take the cheese out of the refrigerator an hour or two prior to serving to allow it to come to room temperature.

Which cheeses would we would like? Would there be some we didn't like at all? Which one would be the star?

Each of the cheeses had their own unique flavor. My favorite was the Humbolt Fog. I love that it looks like a beautiful piece of layer cake. The flavor is tart, yet mild. The texture is beautifully creamy. I think the rest of the group was partial to the Parrano. The parrano had a buttery texture and a nutty flavor. It reminded us all of gouda. I guess it was our comfort zone cheese. The Appenzeller was our "stinky" cheese. The aroma comes from the washing of the rind.

This was such a fun and interesting experience. I can't wait to do another cheese tasting!


I am linking this to Tuesday's at the Table and Tasty Tuesday's.

Tuesday, August 3, 2010

Rhubarb Cake

I am not a rhubarb fan, so my recipe files don’t contain rhubarb recipes. Tim loves rhubarb, especially rhubarb desserts. On an envelope in his scribbles is his mother’s rhubarb dessert recipe.

I didn’t have cream so I substituted evaporated milk. I remember Tim’s daughter making this a few years ago and thinking it was a little runny, so I didn’t put in two full cups of milk.

Tim says this dessert is a yummy combination of cake and rhubarb. Even with the decreased amount of milk, it was still a little runny. Maybe it’s just supposed to be that way? Since this recipe was scribbled on an envelope, it didn’t have any instructions for storage. I think it keeps longer if you store it in the fridge.

Rhubarb Cake

Yellow Cake Mix
4 cups rhubarb, sliced
1 cup sugar
1 pint of cream or half and half

Mix cake mix as directed on the box. Pour in the bottom of a greased 9 x 13 pan. Put rhubarb on top of cake mix. Sprinkle sugar over rhubarb. Pour cream over the top. Bake at 350 for 1 hour.

I am linking this to Tasty Tuesday's, Tempt My Tummy Tuesday's and Tuesday's at the Table.

Tuesday, June 15, 2010

Red Wine Balsamic Grilled Chicken

I am always looking for new ways to grill chicken. A few weeks ago, I spotted this recipe over at Good Things Catered and bookmarked it for future grilling. Katie's recipe called for chicken breasts. I used skin on chicken thighs. This is a quick and easy recipe to put together. The balsamic vinegar and honey give the chicken a wonderful flavor.


Red Wine Balsamic Grilled Chicken

Ingredients:
4-5 boneless, skinless chicken breasts, about 3 lbs
(I used chicken thighs)
1/4 c. balsamic vinegar
1/4 c. red wine vinegar
1 Tbsp olive oil
1 Tbsp honey
Juice of 1/2 a sweet lemon (or orange)
1 clove garlic, minced
1 tsp dried mined onion
1 tsp kosher salt
1 tsp dried thyme
1/2 tsp cracked black pepper

Directions:
-Pound chicken breasts down to uniform thickness throughout (about 1-inch thickness throughout)
-Place in large, deep dish and top with remaining ingredients.
-With tongs, flip chicken and move around to coat evenly.
-Cover and place in fridge for at least 1 hour and up to overnight.
-When ready to cook, remove chicken from fridge and place on sideboard to remove chill while starting grill.
-Preheat gas grill on high for 10 full minutes.
-Clear grates, turn heat to medium-low and place chicken on grates n a diagonal.
-Cover and cook untouched until nice grill marks form, about 5 minutes.
-Flip and continue cooking until cooked through, about 10 minutes.
-Flip one more time, on opposite diagonal, 2 minutes before cooking is complete to obtain grill cross-marks, if desired.
-Remove from heat and let meat rest, covered, on cutting board for 3-5 mins before cutting and serving.

I am linking this to Tempt My Tummy Tuesday's, Tasty Tuesday's and Tuesday's at the Table.

Monday, May 17, 2010

Sesame Grilled Asparagus

You've probably noticed we eat a lot of asparagus at our house. Besides the warmer weather, it's one of my favorite things about Spring. My go to recipe for asparagus is either grilled or roasted in the oven. Either way it's so simple to prepare, just olive oil, salt and pepper. This Sesame Grilled Asparagus takes my go to recipe to the next level. The sesame oil and soy sauce are a wonderful compliment to an already delicious vegetable.


Sesame Grilled Asparagus

Recipe Courtesy of Steven Raichlen

Wooden toothpicks or bamboo skewers
1 pound asparagus
2 tablespoons dark sesame oil
1 tablespoon soy sauce
1 clove garlic, minced
2 tablespoons sesame seeds
Salt and black pepper
Directions
In a shallow pan, soak skewers in cold water for 1 hour, then drain and set aside.

Preheat grill to high. Snap off the woody bases of the asparagus and discard. Skewer 4 or 5 asparagus spears together, using the toothpicks or 2 bamboo skewers, forming a raft shape.

In a small bowl, combine the sesame oil, soy sauce, and garlic and stir with a fork to mix. Brush this mixture on the asparagus rafts on both sides. Season the asparagus with a little salt and lots of pepper.

When ready to cook, place the asparagus rafts on the hot grate and grill until nicely browned on both sides, 2 to 4 minutes. Sprinkle with the sesame seeds as they grill. You can serve the asparagus as rafts or unskewered.

I am linking this to I am linking this to Tempt My Tummy Tuesday at Blessed With Grace, Tuesday's at the Table at All the Small Stuff and Tasty Tuesday's at Balancing Beauty and Bedlam.

Tuesday, May 4, 2010

Tabasco Quinoa with Asparagus

I am trying to incorporate quinoa into our diet whenever possible. I am thrilled when I see a quinoa recipe. Although, you're starting to see more and more quinoa recipes, there's still not nearly as many as other side dishes like rice or potatoes. I found this recipe on 101 Cookbooks. Thanks Heidi, I love your blog!!

I read some staggering statistics the other day about how much food we throw away. While I've never felt like I am a wasteful person, I am trying harder to not throw away food. Asparagus is a great example. When I make roasted asparagus, I use only the top 1/2 or so of the aspargus. Except for the very end of the asapargus, the rest of it can be used in recipes such as this one. It works great if you chop it in 1/4" pieces.


Tabasco & Asparagus Quinoa
Recipe courtesy of 101 Cookboks

1/2 cup unsalted butter, room temperature
2 teaspoons Dijon mustard
25 drops Tabasco sauce
2 teaspoons fresh lemon juice
1/4 teaspoon fine grain sea salt
1 pound asparagus, cut into 1/2 inch segments
4 cups cooked quinoa*
1/3 cup pine nuts, toasted
more Tabasco sauce to taste

Start by making the Tabasco butter. In a food processor, or with a hand blender, whip the butter until it is light and airy. Add the mustard, Tabasco sauce, lemon juice and salt. As I mention above, you can make it stronger if you like, adding more hot sauce to taste.
Boil the asparagus in a large pot of well salted water, for just for a minute or so -depending on the thickness of your asparagus. Drain. If you are serving this immediately you can leave the asparagus hot, but if you are going to wait to serve this, or think you'll have leftovers I recommend you stop the cooking with cold water or a dunk in an ice bath, then drain well before using.
Take the 4 cups of hot cooked quinoa and toss with 3 tablespoons of the tabasco butter. You'll have leftover butter - you can serve that on the side or use it for other purposes. Stir in the asparagus, pine nuts, and dollop with creme fraiche. Serve with more Tabasco sauce on the side.
Serves 4 - 6.
*To cook quinoa: Combine 2 cups of well-rinsed dried quinoa with 3 cups water and 1/2teaspoon fine grain sea salt in a medium saucepan. Bring to a boil, cover, reduce heat and simmer for 25 - 30 minutes or until quinoa is tender and you can see the little quinoa curliques.

I am linking this to Tasty Tuesday's at Balancing Beauty and Bedlam, Tuesday's at the Table at All the Small Stuff , Tempt My Tummy Tuesday at Blessed With Grace .